Monday, June 13, 2011

Raspberry Gratin...Another reason worth turning on the oven...


This dessert is so heavenly--one that I miss during the cold winter. Not unlike like ice-cream, it's not exactly healthy, but it's SO worth the splurge! And I know, I'm all talk about not turning on your oven & then I give you two recipes in a week that require none other than: YOUR OVEN! Forgive me. It's just that it's summer. When else do we get such amazing produce with which to experiment! After this....well, I'll try to stop using the oven. Now, let's turn to the magic that is the raspberry gratin....an adult pudding--decadent, creamy, yet fresh.

The recipe below is Bittman at his finest--simple, elegant, delicious. It's fruit 'robed in creamy custard'. And a LOT lighter than some gratin recipes out there with many, many eggs! It's been at least 6 years since I first made this, but I think of this recipe more often than I ever imagined. 

How can you resist not eating these raspberries?! If you can, this dessert will be worth it. Here are some fun facts on raspberries.

I have loved these fruits from a young age when my grandparents would take us kids up to the mountains.


We used to pick white raspberries and my grandparents would teach my brother and I about bear tracks...to this day, I have a vivid image of my grandmother carrying a heavy load of raspberries in her apron over her skirt and laughing. Here is a picture of my mom with my grandparents in Romania a few years ago.


 The only thing that might make this dessert more decadent is a scraped out vanilla bean. Let me know if you try it that way. One bonus feature of this recipe is that you can prepare most of it in advance the night before or morning before entertaining. Once you fold in the cream, the next day, it only takes 10 or less minutes in the oven!!!

Best part? You can make this with ANY fruit.


 RASPBERRY GRATIN
Adapted from How to Cook Everything by Mark Bittman
  • 1 cup milk (I used skim)
  • 1/2 tsp. ground cinnamon
  • 1 egg, PLUS 1 egg yolk
  • Pinch of salt
  • 1/2 cup sugar
  • 1/4 cup all-purpose flour
  • 3/4 cup heavy cream
  • 3 cups fresh raspberries, rinsed and patted dry (this is about a 12 ounce container)
Place the milk and cinamon in a small saucepan and turn the heat to medium. When steam rises from the milk, remove it from the heat.

Meanwhile, beat the egg and yolk with the salt until light and foamy. Combine the sugar and flour and beat about half of the mixture into the eggs; add about half the milk and beat again. Add the remaining sugar-flour mixture, beat, then the remaining egg.

Place the mixture in small saucepan and turn to the heat to medium-low. Cook, stirring almonst constantly, until the mixture begins to boil; it will thicken almost immediately. Remove the custard from the heat and continue to stir for about a minute or so longer. Cover well and chill thoroughly, at least 1 hour and up to 12 hours.

About 20 minutes before you want to eat the dessert, preheat the broiler. Stir about 1/4 cup of the cream into the custard to lighten it. Whip the remaining cream until it holds soft peaks. Fold the cream gently into the custard.

Place the fruit on the bottom of an 8- to 10- inch long gratin dish or an attractive 8-inch square baking dish. Pour the cream mixture over the top and shake the pan a little to distribute it among the berries or fruit. Broil about 4 to 6 inches from the heat until lightly browned on top, about 10 minutes.


Truly, raspberries bathed in creamy, cinnamon custard.


Dole the custard out in pretty cups before serving. Serve immediately. But, we have eaten this dessert cold and it's just as good as when it's pulled straight out of the oven. Enjoy!

Sunday, June 12, 2011

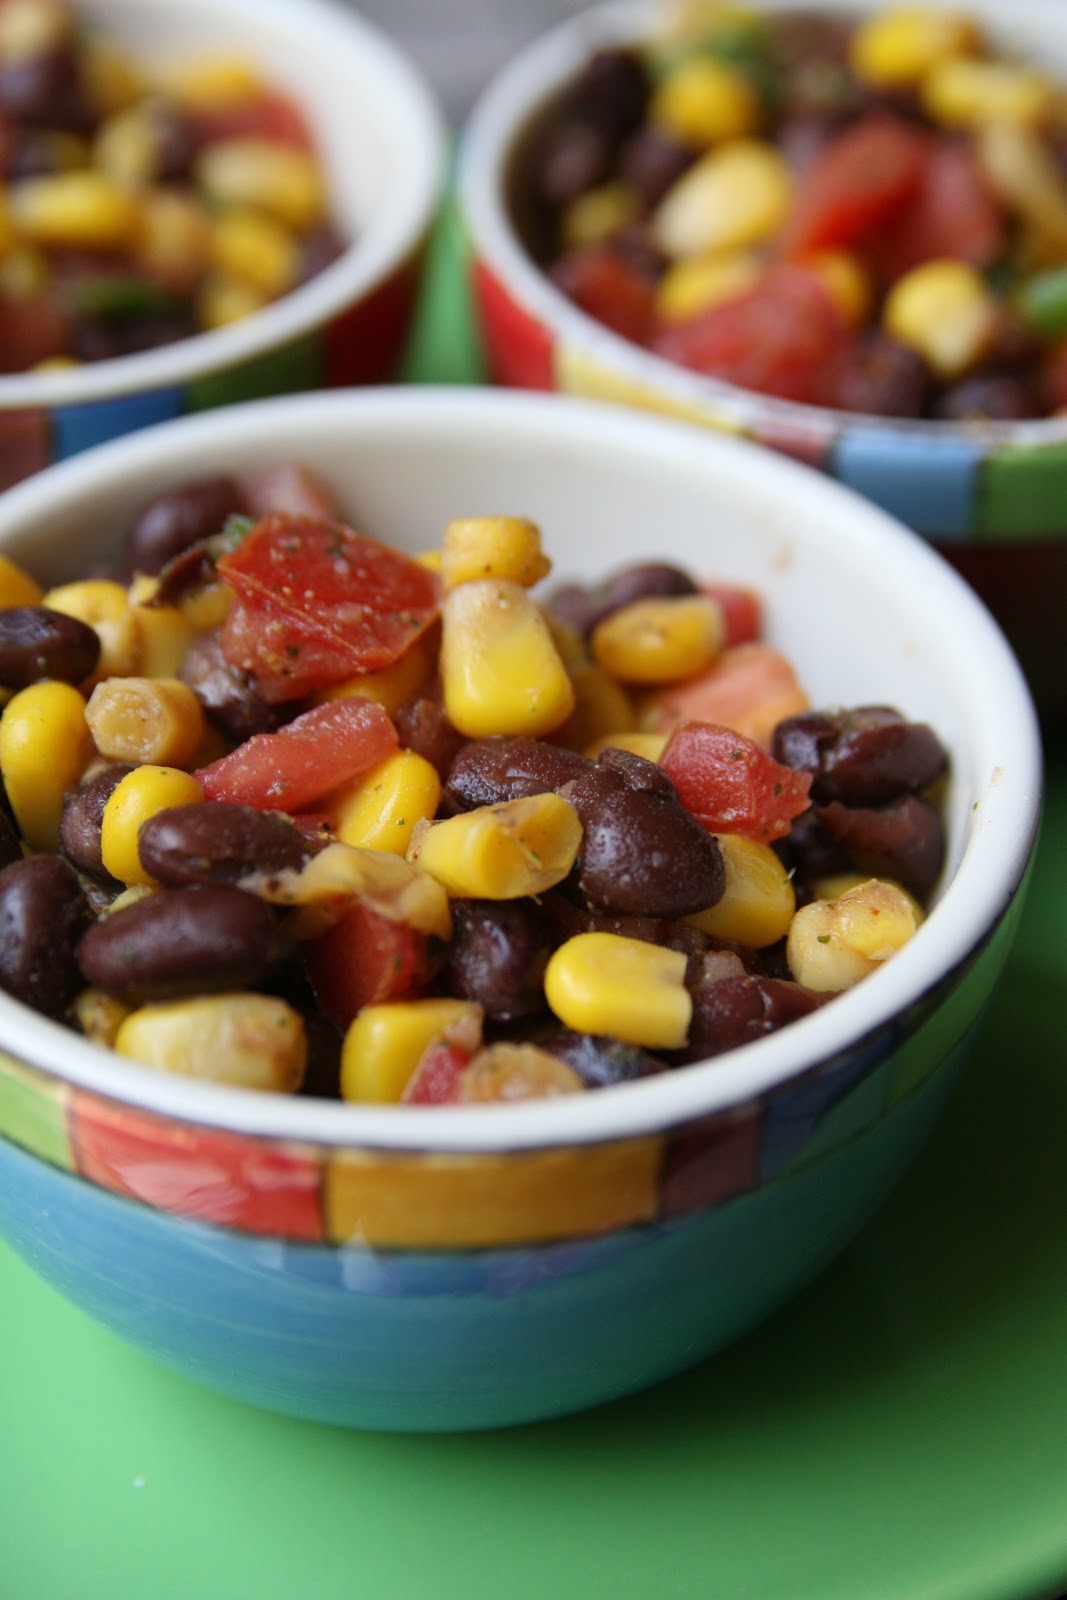
Summer Staple: Black Bean & Corn Salad (or Salsa)


One of my greatest buddies, Lila, posted this recipe on FB recently. She's an amazing cook. She was my college suite-mate and we used to have 'fancy dinner nights'. I miss her cooking. She recommended it from http://www.allrecipes.com/ and here is the original recipe. But, in the interest of time and availability, I had to make do today and the result was still very delicious. Thank you Lila for the recipe and I will make the original sometime soon with peppers and avocado (but with a little less oil). Below is my abbreviated, in-a-bind, version. We couldn't stop eating it--hope you all make Lila's version first!

This is the PERFECT picnic food. Also, a salad you can make a day or so ahead of time before serving. When my friend Kelly and I used to travel for business outside of Charleston (Mount Pleasant, SC), we would always have lunch at this cute place called Square Onion at I'On--a lovely little casual lunch bistro in an idealistic community where you could eat on the sidewalk and see how the other side lived. In our case, the 'other side' were the posh stay at home moms that seemed to have nannies, perfect hair in sweltering 95 degrees, and shopped as a sport. Kelly and I would arrive, hurried, sweaty in our business attire, carrying some file folder that we'd try to sort out over caprese sandwiches and this delightful black bean and corn side salad and figure out who would get the coordinator to write up the adverse events and who would bribe the medical records lady with food for extra files that we realized we needed. Makes me miss you Kelly! Can't eat this salad without thinking of those times....

Hope you all will enjoy this summer staple--salty, tart, spicy, and full of flavor. A great side to sandwiches or quiche or a delicious dip with crispy tortilla chips.


BLACK BEAN AND CORN SALAD

Serves 4

  • 1 can black beans, rinsed and drained
  • 1 can corn, drained
  • 2 Roma tomatoes, diced
  • 2-3 green onions, chopped (use both white and green parts)
  • 1 handful of fresh cilantro, chopped (I used a cilantro 'cube' from Trader Joe's)
  • 1 clove garlic, minced
  • 1 lime, juiced
  • 1 Tbsp. olive oil
  • 1/2 tsp. ground cumin
  • 1/8 tsp. chili powder
  • 1/8 tsp. cayenne pepper
  • Salt & pepper, to taste
Toss all ingredients together and serve as a side dish or with chips as a salsa. Taste for seasonings. You can serve the salad either cold or at room temperature.

Store leftovers, covered, in the refrigerator.

Saturday, June 11, 2011

Blackberry Basil Yogurt Popsicles


We had a wonderful beach vacation last week. Thanks to my in-laws for our annual trip to Kiawah Island. While there, my mother in law had the cool idea to freeze lemonade in popsicle molds for the kids to take down to the beach. Absolutely, positively BRILLIANT idea for these hot days. The kids were in heaven...and I have to say, I was a bit jealous the adults didn't get any. But then I saw their joy, and it was ok. Just look at how cute they seem from our beach chairs....


So fast forward to the present: we're back and I got my hiney on Amazon faster than Wienergate made the news...Ok, so that may be stretching it; however, I received my popsicle molds in 2 days (this does bring me to the point of 'Amazon Mom'--if there are any newish moms out there, check it out--wish I'd heard about it sooner. Here's a link.)

My daughter was ecstatic to open and play with these cute molds--they are made by Orka. After reading a lot of popsicle reviews, I decided to go with a quality brand in a smaller size (2 oz) so they can be easily eaten by a 2 year old (and portion control for the mom). Hey, it's summer here from May to October....anything keeping a person cool should be justified.


So while staring inside the fridge (for the tenth time today) and looking out at the basil growing on the porch, I remembered this amazing blackberry-basil flavor combination crisp I made from Barbara Kingsolver's book, Animal, Vegetable, Miracle.


My child is not as big of a yogurt fan as I'd like her to be, so sneaking Greek yogurt into a 'treat' was starting to sound better and better. And local honey got used as a natural sweetener...


And thus, the healthy blackberry basil yogurt popsicles were born. Can't wait to try this recipe with strawberries or raspberries and mint or basil.


BLACKBERRY BASIL YOGURT POPSICLES

Makes 5-6 (2 oz) popsicles
  • 1 (12 oz) container blackberries, rinsed and patted dry (OR 1 pint strawberries, cored and quartered)
  • 1/4 cup honey (agave nectar or raw sugar would work well too)-I used 1/3 cup & it was quite sweet
  • 1/2 tsp. pure vanilla extract
  • small handful of basil leaves (amounts to a 1-2. Tbsp chopped basil)
  • 1 tsp. freshly squeezed orange or lemon juice
  • *7-8 ounces (~1 cup) Greek-style yogurt (I used fat-free, but any kind is fine) 

Bring the blackberries, honey, basil, vanilla extract, and orange or lemon juice to a simmer in a medium sauce pan. Simmer for approximately 5-8 minutes, or until blackberries are very soft or bubbly. Place fruit mixture into a food processor and pulse a few times, until the fruit mixture is almost pureed, but not completely liquified.


If desired (sort of recommend this actually if you hate berry seeds), push the puree pieces through a fine mesh sieve and discard seeds. Chill the berry puree in the refrigerator until cooled.

Stir the yogurt into the blackberry mixture until combined. Pour the puree into molds and freeze for at least 8 hours, or overnight. To remove the popsicles from the molds, run some warm water over the outside of the mold until you can gently pull/wriggle the popsicle out.

*You can also use regular vanilla yogurt and omit the vanilla extract.

 
And after an unfortunate spillage incident after the third serving, we learned that even the dog loved these popsicles.

Friday, June 10, 2011

Tomato, Squash & Feta Gratin


Hello folks! Let me introduce you to my new favorite vegetable side dish....courtesy of the Costco Connection. I have SO many summer vegetable gratin recipes. And for some reason, I never made a one. Not today. Today was not the day that I would shirk away from a dreamy vegetarian, eye-popping recipe. This took about 15 minutes to assemble. The dish requires few ingredients and yes, it's worth turning on your oven for this one once the sun goes down.  This side dish is truly wonderful--a little cheese goes a long way and I'm mighty disappointed I didn't make two pans of this gratin. Serve it with a rice pilaf and grilled meat. I was thinking it would also go well with some roast chicken (or Worthington multigrain cutlets) and mashed potatoes.

The recipe below is the one featured in Connie Guttersen's book, The New Sonoma Cookbook. Dr. Guttersen is the creator of "The Sonoma Diet". Another cookbook that I own, that has yet to be dusted off. But now that I've tried this recipe, I can't wait to see what else she's got for me :))

And speaking of Sonoma...did I mention how in love with it I am? Below is a (tiny) picture my husband took from a trip back a few years ago while we were at the wonderful Chateau St. Jean winery--an exquistely beautiful and peaceful place (just couldn't get the picture to stretch with my blog format).


So, while we can't exactly go back to Sonoma for a while....I will enjoy its food. Hope you will too!


TOMATO, SQUASH, AND FETA GRATIN

Serves 4 as a side dish

  • 6 oz zucchini sliced 1/4" on long bias
  • 6 oz yellow squash sliced 1/'8' on long bias
  • 2 scallions chopped
  • 1 1/2 tsp. minced garlic
  • 1 1/2 tsp. oregano
  • 2 oz feta cheese, crumbled (I used reduced fat feta cheese)
  • 12 oz tomatoes cut in half then sliced 1/4"thick crosswise (If you use Roma tomatoes, you don't need to cut again)
  • 2 tsp. olive oil
  • salt & pepper to taste

 
Lightly oil 6" diameter corning ware or pyrex dish (Dr. Guttersen says saute pan works fine too).

 
Toss zucchini with salt & pepper. Toss yellow squash with salt & pepper. In a bowl mix scallions, garlic, oregano, & feta.
 
Lay zucchini slices in pan slightly overlapping like shingles. Sprinkle with salt & pepper. Top with a layer of tomatoes slightly overlapping. Sprinkle on half of the scallion mix. Top with a layer of yellow squash & another of tomatoes sprinkling each with salt & pepper. Top with remaining scallion mix then drizzle with olive oil.

Bake for 30 min at 400 degrees or until top is slightly browned. Allow to sit for 10 min then cut into wedges & serve. 4 servings.
 
Here's the part where I come clean: I didn't follow the recipe exactly because I was lazy. I didn't weigh the squash, tomatoes, etc....I can tell you that I used approximately 1.5 zucchinis, 2 yellow squash zucchinis, about 3 Roma tomatoes, 1 big clove of garlic, and 1 1/2 green onions. Then I mixed the olive oil with the garlic, oregano, salt and pepper. I alternated the vegetables in the pan, drizzled the oil-garlic-oregano on top and sprinkled it all with the green onions and feta. My way seemed much easier (maybe it's not). And it was simply amazing. I'm going to continue to eat my vegetables this way....

Thursday, June 9, 2011

Tropical Meringues (Easy Overnighters or Afternoon Delights)


Light, airy, sweet...and in bakeries all over Paris. A city I have yet to see. I know, can you believe it?! Me, not see gay PAREE?! I've seen the south of France, parts of Spain, Italy, Greece and even TURKEY (?!), but not Paris....So much of this culinary world yet to be seen. So many more shifts my husband will be working....(haha). Here is a great post with pictures of meringues in bakery windows. I was left drooling...


Meringues, the rumor is, are of Swiss descent. For me, they have always been associated with  'floating island'--the dessert my mother would make when I was a kid. Yes, the women in my family were INCREDIBLY talented pastry makers, but then again so were all the Romanian moms I knew....Nobody makes those kinds of dessert anymore...not that there's anything wrong with American pies and cookies (as you can see, I enjoy those too), but I just LOVE LOVE LOVE European desserts. Sigh...it's a sentimental week for me.

Below, you will see a slower and faster method to make these cookies--which by the way, are wonderful with a cup of dark, hot coffee. Keep in mind, this is a very, very easy cookie recipe! These cookies are crispy, sweet, and have a chewy center. Here's what the middle of my tropical ones looked like:

  
A few tips about having meringue success:

  1. Chill your mixing bowl and beaters (at least 15 minutes to several hours)
  2. Use eggs that are at room temperature
  3. Add a little salt to ensure a more 'rounded' flavor
  4. Use powdered sugar--it helps incorporate faster into the egg whites.
  5. Cutting back on a bit of sugar will ensure a softer, chewier meringue. But traditional meringues have a good amount of sugar to ensure they are stiff, crispy, and airy.
These cookies can be flavored with anything--almond extract and ground almonds, a little bit of raspberry puree (would look super cute for Valentine's day piped as hearts), mini chocolate chips, etc., etc., etc.....


TROPICAL MERINGUES

Makes ~50 (but they go pretty fast and you can always share with your friends & neighbors)
  • 6 egg whites, at room temperature
  • 1/2 tsp. rum extract OR coconut extract
  • 1-2 small pinches of salt
  • ~3 cups powdered sugar
  • 1 cup lightly toasted sweetened flaked coconut
  • 1/2 cup macadamia nuts, chopped 


FIRST METHOD:
If you don't have toasted coconut, here's a great link on how to make it.

Preheat the oven to 185 degrees. Cover 2-3 sheet pans in parchment paper or use silpats.

Using an upright electric mixer, or a handheld mixer--and in either a glass or stainless steel bowl--beat the egg whites and rum or coconut extract on high speed until they are foamy. Then, begin to sprinkle the sugar and salt in, and continue to beat on high speed.

Beat the egg whites, sugar, salt, and extract until the mixture becomes stiff, white, and very shiny. This can take anywhere from 15-20 minutes (safe to walk away). When the glossy mixture is finished, gently fold in the lightly toasted coconut and chopped macadamia nuts.

Spoon heaps of the meringue mixture onto the parchment paper (don’t worry about how they look, you can make them little or drop them in big, sloppy mounds. OR, you can make them look sophisticated by filling a pastry bag with the meringue mixture and piping them into fancy shapes onto the silpats or parchment paper).

Cook them for about 2 hours or until they are dry and crispy, but not browned. Let them cool completely before storing them in an airtight container.


SECOND METHOD (OVERNIGHT or 'FORGOTTEN COOKIES'):

Preheat the oven to 350 degrees. Follow directions as above, but after the meringues have been heaped or shaped onto the pans, turn off the oven. Place your pans into the oven (that has been turned off) and close the door. Don't open it again until the morning. (About 8-10 hours--but who gets that much sleep anyway? You'll just have to resist eating them when you put them away in the morning. I, no doubt, failed.)

Even though the point is not to have them turn brown, this particular recipe may give the appearance of a bit more golden meringues because the composition contains toasted coconut (that's ok!). Either way, these little cloud cookies were good!


Meringue cookies keep at room temperature for a week if they are stored, covered, in a DRY area.

Wednesday, June 8, 2011

Amaretto Espresso Ice Cream with Almonds & Chocolate Covered Espresso Beans


When life gives you heavy cream and LOTS of chocolate covered espresso beans (thanks to one of my 'besties', Erinn!), you make special occasion ice-cream!

I get sentimental about coffee ice-cream because it reminds me of the ice-cream that my aunt made for us when we spent the summer in Bran, Romania when I was 9 years old. I had never had homemade ice-cream up until then... and to this day, I have tried to replicate Cami's ice-cream. My last experiment resulted in scrambled eggs....happy to say this time was not the same! One taste, and the memories come flooding--I remember holding my new baby cousin (Alex), the fragrant fruit trees in the front yard, the animals my grandparents let me help feed (they had chickens & lambs), the smell of the cheese my grandmother was smoking in the back yard (yes, she smoked her own cheese!), and the wildflowers I picked along the river bank that crossed their property. Hope that you guys have happy memories that flood you when you eat ice-cream too!

I came up with this recipe because the heat is in the triple digits, I didn't want to go to the store for ice cream, and my husband deserved a treat after working to clean out our office. This was SO. GOOD. If you are a coffee and nut lover, I think you will enjoy this! IF you want a milder, regular coffee flavor--omit the espresso/coffee powder (but leave the strong brewed coffee in).


AMARETTO ESPRESSO ICE CREAM WITH ALMONDS & CHOCOLATE COVERED ESPRESSO BEANS
  • 2 cups heavy cream
  • 1 cup skim milk
  • 1 cup super strongly brewed coffee or espresso
  • 2 Tbsp. coffee or espresso powder
  • 1 1/8 cup sugar
  • 1/4-1/2 tsp. pure almond extract (depending on how strong you like your almond flavor)
  • 1/2 tsp. pure vanilla extract
  • 1 or 2 small pinches salt
  • 6 large egg yolks (reserve whites for another use)
  • 1 cup (8 oz) chocolate covered espresso beans, roughly chopped (I ran mine through the coffee grinder until they were chopped into smallish chunks--but you don't have to)
  • ~1/3 cup sliced almonds

In a saucepan, combine the cream, milk, coffee, sugar, extracts and salt until the mixture is steaming hot and the sugar has melted into the cream mixture. You will notice tiny bubbles around the edge of the saucepan. Turn off the heat at this point.


Meanwhile, in another bigger saucepan (about medium sized) whisk the egg yolks until their texture is sort of 'fluffy' in a large bowl. (I like to use a silicone coated whisk because a metal one scratches the bottom of my enamel coated pots. I don't mind using a metal whisk on metal pot....maybe I should?)


Begin pouring a little bit of the hot cream into the whisked eggs---slowly, a tiny bit at a time (WHILE CONTINUALLY WHISKING), so as to 'temper' the eggs. When the mixture is well combined, place the pan over medium-low heat and continue to heat the custard-like mixutre while stirring. (Yes, you can step away just a little bit to get the mail or whatever else you have to do, but hurry back). When the custard coats the back of a spoon, it is to be removed from the heat. This is what I mean:


Trust me on this one: Pour the hot custard through a fine sieve and into a bowl. See what I have below? Little remnants that did not make the cut. (Continually whisking helps eliminate 'curds')


Refrigerate the cream mixture at least two hours, and even overnight. After chilling, pour the custard mixture into the ice-cream maker (with a FROZEN BOWL). When the ice cream is about half-way through the churning process, add the chopped espresso beans and almonds.


Scoop the ice cream into a container--it will be soft. You can either enjoy it now in a softer texture, or freeze for at least 4 hours. I like it to freeze a bit longer before I eat it--but it's all about preference.


Scoop it out and enjoy the creamy, very crunchy, adult-like treat!


If you like 'mudpie' flavor, you absolutely have to try this!


My husband said it tasted like Haagen Dazs.

Tuesday, June 7, 2011

Product Rewiew: OXO Cherry Pitter


If you've been to the grocery store lately, you may have noticed that cherries are in season. I got some for $3.99 a pound. I can put an amazing shirt back on the shelf at the store, but when it comes to fruit that is in season, it's coming home with me....so if you're wanting to eat cherries in a less messy way, give this product a try: OXO cherry pitter.


This product is FANTASTIC! It cost me $5 on clearance at Williams-Sonoma and it was really worth it. At first I bought it so that I could get my daughter to eat cherries in an easier fashion. But, it became quickly apparent that we were all eating more of them with ease....I love OXO products. They are not cheap, but they really work. You can buy this cherry pitter on Amazon for $12.98 or at Bed, Bath & Beyond for $12.99 (PLUS, don't forget you can use a 20% off coupon at BBB!).


Also, I read that this pitter can also be used for olives!!! I'm in love with a piece of plastic that simplifies the ability to obtain two of my favorite things--cherries and olives. Although, it seems I have a lot of 'favorite things'....just makes me think of my dad's love of tools and father in law's saying that 'any job is easier if you have the right tools'. Amen to that!


Beautiful Women & Cherries:

The man for me is the cherry on the pie. But I'm the pie and my pie is good all by itself. Even if I don't have a cherry. --Halle Berry

A relationship isn't going to make me survive. It's the cherry on top. --Jennifer Aniston

Monday, June 6, 2011

Hello Summer! Mini Caprese Skewers


A word about summer entertaining: Why would you complicate your life in this triple digit heat index weather with complicated food when having company over? You wouldn't. My mother in law taught me a long time ago that most people are just happy to be together--they don't need fancy meals or pristine homes. They want to feel wanted and any effort most always goes appreciated. It took me YEARS to get this. And I thank her from the bottom of my heart as Eastern European entertaining seems to be a bit more complicated--even mom these days has given way to making her life a bit easier. These 'warehouse clubs' have impacted our lives for the better.

Hence, these summer days, we have been known shove all our messes in closets or drawers, buy Costco salmon burgers to throw on the grill, serve chips as a side, make one signature fun drink, and accept our guests' offers to bring a dessert or salad. Amazingly enough, my stress level has plummeted and everyone is relaxed and happy (except for the next day when I have to pull out the messes from the closets-what to do with all the ironing and mail?!).

This is one of the reasons I grow basil in the summer....caprese salads, caprese pizzas, caprese sandwiches, caprese bruschetta, caprese skewers....plus, it makes my husband fall in love with me all over again (yes, it's that easy when it comes to 'caprese' things). Below is a caprese sandwich we ate on the Amalfi Coast of Italy a few years ago (Positano):


So as my neighbor, Patsy, says: I've said all that to say.....that this is an amazing and easy, non-recipe recipe to remember for when you want to have people over. We made these babies for a friend's bridal shower over a year ago and it was a hit. Most of you have tried them, but it doesn't hurt to be reminded. It's a lot easier to eat things on 'sticks' when you're walking around--no need to carry those forks for this favorite salad of many. And YES, you can still make it with regular mozzarella if you can't find buffalo (fresh) mozzarella or want to save a little cash. No one will say no! It's the Italian flag!


MINI CAPRESE SKEWERS

What you will need:

  • Grape or cherry tomatoes
  • Fresh buffalo mozzarella, cubed (OR regular mozzarella, cubed)
  • Fresh basil leaves
  • Toothpicks
  • OPTIONAL: Extra virgin olive oil, balsamic or red wine vinegar, and salt & pepper--OR Italian dressing
Thread or pierce one of each tomato, mozzarella cube, and basil leaf. I prefer to use smaller tomatoes (like the 'grape' variety) so that we don't have explosive red messes on people's clothes when entertaining. But if you have cherry tomatoes, you can always halve them too. Fold the basil leaves before threading if they are too large. The key is to try and cut the cheese about the same size as the tomato that it the skewer is easier to eat.

ONLY if you wish, drizzle with the olive oil, balsamic vinegar, and sprinkle with salt and pepper. Keep in mind that this may make them a little messier if people are eating while standing or walking around. (Some people like to serve these with pesto sauce, but I find that the basil flavor can be too overpowering).

For bigger skewers, use mozzarella balls and cherry tomatoes. Make them REALLY big skewers (more of a caprese salad skewer) with bamboo sticks.


ENJOY!
 
You can also cut the tomatoes in half and thread one half first and one half last (after the cheese and basil) to make little 'sandwiches' like we did for a bridal shower last year--our friend, Kate, enjoyed them ;). Group the skewers together (as it seems much more impressive looking-ha!)--here is what I mean:


LASTLY (how do I have this much to say over something so ridiculously simple? LOVE), you can make these little skewers with variations:
  • Use strawberries instead of tomatoes (or blackberries)
  • Use smoked mozzarella or provolone
  • Thread on a cube of toasted bread for a panzanella skewer (panzanella is Italian bread salad)
  • Thread on a roasted or grilled mushroom
  • Thread on a cube of grilled chicken
  • Try a strawberry, mint, cheese skewer
  • Thread on some tortellini instead or with the cheese

The possibilities are pretty plentiful.....have fun--this idea is pure genius and obviously not mine!

Sunday, June 5, 2011

Easy Breakfast or Dinner: Quesdillas Huevos Rancheros


I cut this quick little recipe out of a magazine almost 7 years ago and it has become one of our favorite breakfasts. And if you're rolling your eyes at another Mexican breakfast, you are once again going to miss out on a good meal. We are obsessed with Mexican=type things in this house... Bookmark this recipe to use next year when you are left scratching your head and wondering what to do with leftover hard boiled eggs after Easter has passed.

This dish makes me think of what healthier fast food could be (well, if you omit the pimento cheese especially)....but still cheesy, quick, easy (well not as easy as going through the drive through....but easy when you consider how few ingredients it has and simple preparation), and amenable to all ages. A fun meal for a real family. 

If you have hard boiled eggs already waiting in your fridge, you can make this lightening fast. I would even serve these quesadillas huevos rancheros for dinner with a Mexican salad of lettuce, corn, beans, tomatoes, olives, cilantro, avocado and jicama (optional). Vegetarians, rejoice!

QUESADILLAS HUEVOS RANCHEROS

Adapted from Real Simple magazine

Serves 4
  • 4 (6-inch) corn tortillas (we've done it with flour tortillas too)
  • 1/2 cup grated Monterey Jack cheese (or a Mexican cheese blend) + a couple Tbsp. pimento cheese (truly optional, but oh so good!)
  • 3 hard-boiled eggs
  • 1/4-1/3 cup salsa
  • Guacamole OR diced avocados & light sour cream (optional)
Make the hard-boiled eggs.

Lay the com tortillas on a cookie sheet. Place in a 325ยบ F oven for 10 minutes.

Remove from oven and top 2 of the tortillas with the Monterey Jack cheese and the sliced hard-cooked eggs. This is what they will look like:


Top with the other tortillas.

Bake until the cheese melts, about 5 minutes. Cut into wedges and decorate with spoonfuls of salsa.

Serve with hashed browns and fruit salad for a more complete meal :)