Monday, August 29, 2011

The South is Calling Again: Sweet Tea Icebox Tart


I may have become a Southerner....for the most part. Except for my disdain of humidity--any and all humidity. But that may be the thorn to the rose that is The South. When people hear me speak back in IL, they say I 'talk' like a Southerner. When they hear me speak in TN, they ask where I'm from. So a transplanted Southerner. My first boss down in Chattanooga told me he really liked me so he would call me his 'Yankee' instead of his 'damn Yankee.' Why, thank you. I guess. And living here in Memphis is a little bit of the South and a little bit of the North. No Steel Magnolias set-up here, but there is still a great deal of Southern history here. And they still love their sweet tea.


However, since I left the Midwest for the South (14 years ago), I have fallen in love with kudzu and Spanish moss, wrap-around porches, old Coca-Cola signs on barns, windy/hilly country roads, being greeted like a friend in small town shops, cotton fields, fried green tomatoes, the sound of cicadas at night, pick-up trucks, boiled peanuts off the side of the road, their comfort with shotguns, the way a Southern woman takes pride in her hair and make-up (my new blogging friend, Stephanie, claims the higher the hair, the closer to God), the miles of imperfect coastline, their love of SEC football, jukeboxes in diners, cheese grits, and bluegrass music.
  
Saw this in a local shop and realized I couldn't have said it better (click on it to enlarge if you can't read it):


And as you can see, tea is mentioned first. Sweet tea is a staple down here. And though I like it, I just can't drink it by the gallon like some we know (you know who you are!). I'm so humored to see the delight my brother has whenever he visits us and exclaims, 'yes! we can get sweet tea again!' So far, the best sweet tea I've had is from Ice-Cream & Coffee Beans in Spartanburg, SC (live here long enough and you'll find most good things come out of TN & SC--don't shoot me friends!). It's a strawberry flavor and since my sister in law gave it out as a wedding favor, I've been hooked. So, of course, we served it at our wedding too. If you find yourself in the Spartanburg area--make a stop!

Recently, Southern Living did an article on recipes using sweet tea. My transplanted Southern soul almost did a back-flip when I saw this tart recipe--couldn't get it out of my mind all summer. Finally, I made it and it is wonderful! My changes are in italics. Try it! We LOVED it--almost like a sweet tea version of key lime pie...can't wait to make it for my in-laws. And for my brother. And for my Northern peeps.

SWEET TEA ICEBOX TART
Adapted from Southern Living

Yield: SL says 12 servings, I say ~8-10

*For crust:
1 1/2 cups crushed gingersnap cookies
5 Tbsp. butter, melted (I found this too be WAY too much--I'd do 4 Tbsp. next time...maybe even 3 Tbsp.)
2 Tbsp. light brown sugar (I skipped this and didn't miss it at all)
1/4 tsp. ground cinnamon

For filling:
2 Tbsp. unsweetened instant iced tea mix (Lipton is a good brand)
2 Tbsp. water (I used lemon juice)
1 (14-oz.) can sweetened condensed milk (I used low-fat)
1/2 tsp. orange zest
1/2 tsp.  lime zest (I used lemon zest)
1/3 cup fresh orange juice
1/4 cup fresh lemon juice
2 large eggs, lightly beaten

For topping:
1 cup heavy cream
3 Tbsp. sugar

Topping Note: if you’re feeling extra lazy, you can use Cool Whip like I did—but I’m sure the real stuff is WAY better.

Garnishes: lemon or orange slices, fresh mint sprigs

To make crust: Stir together all ingredients. Press mixture into a 9-inch tart pan with removable bottom.

To make filling: Preheat oven to 350°. Stir together iced tea mix and 2 Tbsp. water (or lemon juice) in a large bowl. Whisk in sweetened condensed milk and next 5 ingredients until blended. Place gingersnap crust on a baking sheet; pour in milk mixture.

Bake at 350° for 20 to 25 minutes or just until filling is set. Cool completely on a wire rack (about 1 hour). Cover and chill 4 to 24 hours. Remove tart from pan, and place on a serving dish. 

To make topping: Beat cream and sugar at medium speed with an electric mixer until stiff peaks form. Pipe or dollop on top of tart; garnish, if desired.


*2 (4-oz.) packages ready-made mini graham cracker piecrusts may be substituted.

Note: You may also bake this tart in a 14- x 4-inch tart pan with removable bottom; increase bake time to 25 to 28 minutes or until filling is set.

Friday, August 26, 2011

Mushroom Tart in Potato Crust


I love this recipe. I found it in a newspaper somewhere as a new bride. Those were the days where I would leave my husband with meals for every night I was traveling for business. Those days are long gone. But guilt that he was a new medical student and studying hard and would come home to an empty fridge (while I was out having expensive business dinners), motivated me to spend time in the kitchen for him. Making this mushroom potato tart reminds me of coming home from a business trip to our first modest apartment down by the Mississippi River, and settling down to eat with Cort at my in-laws' old table (man do I miss that table--it's been making the rounds in the family), venting about the cost of textbooks, laughing at how the groundskeeper cracked another one of our windows while mowing, not answering the phone, and promising ourselves the best was yet to come.

So if you want a good and easy meal, try this tart. Every time we eat it, we ask why we don't make it more often. I've gotten to the point that I don't even measure the mushrooms, onions, or cheese--it's quite forgiving. This mushroom potato tart makes for a delicious vegetarian dinner when paired with a crisp green salad, a hunk of bread, some roast asparagus, and a lovely Chardonnay. Or just have it for breakfast with some turkey bacon or sausages and sliced strawberries. Or take it to work the next day for lunch. We love it. Hope you do too!


MUSHROOM TART IN POTATO CRUST
Makes approximately 6 servings
  • 4 cups frozen shredded hash brown potatoes
  • 6 scallions, sliced or 4 big shallots, diced
  • 3 Tbsp. grated Parmesan cheese
  • ½ tsp. freshly ground pepper (salt is optional--but it depends how salty your feta is-I like to add a few dashes)
  • 4 large eggs, beaten
  • 1 Tbsp. olive oil
  • 8 oz. assorted mushrooms (white, cremini, shiitake, and oyster), sliced (about 3 cups)--you can use just one kind too--baby portabellas are particularly good
  • ½ cup crumbled feta cheese
  • ½ cup milk
  • 1 tsp. fresh thyme leaves, finely chopped, or dried Italian seasoning works really great!

Place a baking sheet on the middle shelf of the oven and heat oven to 475 degrees.
Spray a 12-inch tart pan with removable bottom, or a 12-inch pizza pan, with butter-flavored nonstick cooking spray. (I've never tried it in a pizza pan)

Combine potatoes, half the scallions (or shallots), half the parmesan, and half the pepper in a large bowl.

Stir in half the eggs and mix until well blended. Spread the potato mixture evenly on the bottom and up the sides of the pan. Put the tart on the preheated baking sheet and bake for 10 minutes or until golden brown. Remove from the oven.

Reduce oven temperature to 375 degrees. Meanwhile, heat the oil in a skillet over high heat; add the mushrooms and sauté for 5 minutes. Remove from heat.

Stir in the feta, milk, thyme and remaining scallions, Parmesan, pepper and eggs. Pour the mushroom mixture into the potato crust and bake for 10-15 minutes or until set.

Serve warm or at room temperature.

Wednesday, August 17, 2011

Italian Toasts with Roasted Grape Tomatoes

Lately, we seem to be really busy. And I haven't had time for fussy meals. Sometimes we need something a little bit lighter with a piece of grilled chicken, or a summer salad, or some fruit. This dish fits the bill. I can still remember my husband making me cheese toasts in college with processeed cheese and topping the toasts with slices of fresh tomatoes. But, after we got married, we started to use the real stuff--Cheddar (what does Maya Angelou say? When you know better, you do better?).

And we've always served roasted tomatoes as a vegetable side dish, but on night I decided to combine these two things and we really enjoyed this as a light dinner. The crispiness of the bread pairs well with the savory melted cheese and the light sweetness and pop of the tomatoes.


Roasting the tomatoes takes some time, but you can probably them ahead of time and reheat them in the microwave before making the toasts (which take a few minutes only). Otherwise, the dish is super easy. I love it if I have extra tomatoes the next day after I roast them--they are delicious tossed in a salad or in a pasta dish.

By the way, I've never made SLOW roasted tomatoes, but when the weather cools down, I definately want to try Smitten Kitchen's idea. See here.


ITALIAN TOASTS WITH GRAPE TOMATOES

Serves 4 as part of the main entree or 6-8 as an appetizer.
  • 1 package grape tomatoes or a mixture of yellow and red teardrop tomatoes, rinsed (no need to dry off)
  • 2-3 cloves garlic, minced
  • 2 Tbsp. olive oil
  • Salt & pepper to taste (1 tsp. coarse sea salt + ½ tsp. cracked black pepper)
  • 4-8 pieces of country multi-grain bread (the hearty stuff—like La Brea brand, not the soft sandwich type bread, although I'm sure that might work ok, just not as good for this recipe)
  • 4-8 pieces of provolone cheese (smoked is fine)
  • ~2 tsp. Italian seasoning OR 1 handful of freshly chopped basil leaves


Preheat oven to 400 degrees F. 

Place the tomatoes on a large baking sheet. Drizzle with olive oil. Add the garlic, salt and pepper. Using your (clean) hands, roll the tomatoes around until they are even covered by all the ingredients.

Roast for 20 minutes, and then stir. (I had read somewhere that if your tomatoes seem to dry, to add 2 to 3 tablespoons of hot water, but mine have always seemed fine).

Meanwhile (during the time you're waiting to stir the tomatoes), place the bread on another large baking sheet. Top each piece of bread with a slice of provolone and sprinkle the Italian seasoning over the toasts. (If using fresh basil—wait to use it until the toasts are assembled).

Return the tomatoes to the oven and cook for about 20 to 30 more minutes (but before they turn black).

In addition, add the toasts to the bottom rack simultaneously. Let the edges of the toast crisp up and the cheese melt before taking the toasts out (this should about 5 minutes or so—depending on your oven—but keep an eye so they do not burn). Take the bread out and set aside.

When the tomatoes are ready, they will have begun to shrivel.
 

You can assemble the toasts by placing one or two pieces per plate and adding a few roasted tomatoes on top—best if tomatoes are still warm. If you have fresh basil around, top the toasts with some slivered pieces and serve immediately.

Thursday, August 11, 2011

Pesto, Spinach, & Chicken Stuffed Shells

Recently, I have joined Pinterest. I am learning to slow down with my new obsession...Having Pinterest has allowed me to throw away several scrap papers--and yet virtually 'pin' my favorite images--and categorize them on bulletin boards. It's fun to see what your friends are pinning too! Somewhere along the way, someone pinned this awesome recipe. It looked superb. So, I was inspired to try it recently for our family and for a friend to whom I was taking a meal. It was well received and therefore, has become a keeper.

By the way, it's sort of nice to try a stuffed shell recipe that doesn't require tomato sauce, but don't let that stop you if you're a sauce kind of person--you just go ahead and spread some sauce over the shells if you can't stand not seeing red sauce over pasta.

And as I tend to do with these things, I adapted the recipe because the stuffing seemed a little dry to me (I didn't use as much pesto because I didn't want too overwhelming of a flavor). Below is a double recipe (I boiled the whole box of pasta and used about 75% of the shells--the other 25% had fallen apart anyway) and got two 8x8 pans of the dish. However, if you were having a big group for dinner, you could do a big 9X13 inch pan. Consider this a freezer friendly meal.


PESTO, SPINACH, & CHICKEN STUFFED SHELLS

Makes approximately 10 servings.

  • 24-36 jumbo pasta shells
  • water for boiling pasta
  • 1 small onion, diced
  • 3-4 cloves garlic, minced
  • 1 (6 oz) bag of baby spinach (rinsed & chopped)
  • 8 oz reduced-fat cream cheese, softened
  • 1 cup freshly grated Parmesan or Asiago cheese + 1/3 cup MORE for topping
  • 4-5 Tbsp. prepared basil pesto (homemade or store bought)
  • 1 Tbsp. olive oil
  • 1/3 cup fat-free Greek yogurt
  • 4 cups shredded cooked chicken
  • Salt and pepper, to taste

In a large pot over high heat, boil water and prepare pasta shells as directed on package. Cook pasta shells only until al dente. The pasta will finish cooking when the dish is baked. Drain the pasta shells and set aside.

In a large saucepan, heat a little olive oil and saute the onion for a few minutes. Add the garlic and continue to saute until the onion is almost transclucent. Add the chopped spinach and cook for a minute longer or until spinach has JUST wilted.

Because I'm trying to use less dishes, add the cheeses (reserving that 1/3 cup of Parmesan), pesto, olive oil, yogurt, and shredded chicken to the pot (where you have sauteed the onion/garlic/spinach). Combine. 

Fill the pasta shells with the filling and place in a baking dish (either two 8X8 inch pans--can freeze one of them! or a 9X13 inch pan). Sprinkle the remaining 1/3 cup of cheese over filled shells.

Preheat oven to 350 degrees and bake shells (uncovered) for 30 minutes or until shells are bubbling hot and cheese has melted.

Serve with a fresh salad. Or with diced, fresh tomatoes on top.

Wednesday, August 10, 2011

Nordy Bars


Years ago, I used to work at a shi shi outdoor mall in Oak Brook, IL. It was very pretty. And during my lunch breaks, I would walk around window shopping at Mark Shale, Pottery Barn, or Restoration Hardware. Often, I'd stroll into Nordstrom--an even more luxurious department store than the one I worked at....Nordstrom was shiny and bright. There was classical music playing and all the salespeople were dressed beautifully with impeccable hair and manners. In order to enter this amazing store, you had to pass through their cafe. Oh, the smells this cafe offered! The air was filled with espresso, butter, and vanilla. Sigh. This place felt like what one often thinks a home should feel like (ha!). Until you glanced at the price tags of the Manolo Blahniks past the coffee shop. Then reality came crashing in and you settled in for a caramel macchiato and braced yourself to walk amongst the glittering beauty and temporarily feel part of a different world.

As the years have passed, I've been able to 'visit' several Nordstroms around the country and I must say that their wares do not tempt me as much as they used to....possibly because I am more practical, possibly because God answered my prayers. Their food....however.....is a different story. (Check out my favorite tomato basil soup recipe from their cafe here.) I have been yearning to try this decadent bar recipe Nordstrom used to sell in their cafe years ago (they no longer do). I am not sure of the Nordy bar's recipe's origin--most likely, it's a copycat and can be found on several sites on the internet. But I am featuring it here, because it is simply wonderful. These bars are ooey-gooey (albeit, a tiny bit too sweet--making them excellent with dark coffee)....and worth the extra miles you have to run to make up for their taste. They went fast in our house!

 
I suggest you make them when you have people to share them with.....you will not be able to resist the marshmellow, butterscotch, vanilla, and chocolate combination in this recipe....

NORDY BARS
Makes ~16

  • 1/2 cup butter (1 stick)
  • 1 (11 oz) pkg. butterscotch chips
  • 1/2 cup  brown sugar
  • 2 eggs
  •  1 1/2 cups flour
  •  2 tsp. baking powder
  • 1/2 tsp. salt
  • 2 tsp. vanilla
  • 1 (12 oz) pkg. semisweet chocolate chips
  • 2 cups miniature marshmallows
In medium sauce pan melt butter, add butterscotch chips and brown sugar.  Stir until melted (this may look a little strange, but it will be ok).
Remove from heat, add eggs, flour, baking powder, and salt.  Add vanilla and set aside and cool (I stuck the batter in the refrigerator for about 15 minutes).
Meanwhile, preheat oven to 350 degrees.
When the butterscotch batter has cooled (it doesn't have to be cold--just not warm!), stir in chocolate chips, marshmallows.  Spread in an ungreased  9 x 13 pan.  Bake for 25 minutes. 

Remove and cool – they will be soft and gooey when you take them out – they will set up as they cool.  Enjoy!

Saturday, August 6, 2011

The Versatile Roasted Eggplant, Pepper, & Onion Spread

I really like this spread. It is very similar to the one my mother has made my whole life from my Romanian heritage (zacusca)--but truth be told, my mother and aunt's roasted vegetable spread is better by far than anything else I've tried. One day, I will master it and post on it. It's also not as pureed. So, if you want to keep your spread with more texture, dice the vegetables a little smaller--this may also require less cooking time, so keep your eye on the oven--and skip the processing or process just slightly until you get the texture you want. One of these days, I may actually throw in a few mushrooms--can't imagine that would hurt.

I call this roasted vegetable spread 'versatile' because I think it's a good base for other recipes/uses. For instance, it's delicious on crostini with a slice of Manchego cheese on top. You can also use it as a sauce: Just add a little chicken stock, or for a really over the top sauce--mix it with heavy cream (or heavy cream and half and half until you reach the consistency you'd like) and toss with pasta. I like to mix it with whole wheat pasta and place the pasta in a baking dish, sprinkle it with cheese (fresh Mozzarella and/or Parmesan), and bake it until the cheese is all melted and the dish is hot throughout. Or mix some of the roasted vegetable spread with cream cheese for an alternative bagel spread.

But probably my favorite use, is for the creamy dip that is listed below the original recipe below.

ROASTED EGGPLANT SPREAD

Yield: 6-8 Servings

  • 1 medium eggplant
  • 2 red bell peppers, seeded
  • 1 red onion peeled
  • 2 garlic cloves, minced
  • 3 Tbsp. good olive oil
  • 1 1/2 tsp. salt
  • 1/2 tsp. freshly ground black pepper
  • 1 Tbsp. tomato paste (or tomato sauce)
  • 1 small handful of fresh parsley (my addition--so optional!)

Preheat the oven to 400 degrees F.

Cut the eggplant, bell pepper, and onion into 1-inch cubes. Toss them in a large bowl with the garlic, olive oil, salt, and pepper (I do this directly on the baking sheet--one less dish!). Spread them on a baking sheet. Roast for 45 minutes, until the vegetables are lightly browned and soft, tossing once during cooking.

Cool slightly.

Place the vegetables (and parsley) in a food processor fitted with a steel blade, add the tomato paste, and pulse 3 or 4 times to blend. Taste for salt and pepper.


For an alternative creamy dip/spread, try the recipe below (you just use half of the above quantity of spread--I'm not saying make half a recipe, just use half of your total amount). It's so simple and absolutely delicious--I took it to my friends' house when visiting and it was a great appetizer to our farmer's market dinner of green beans, yellow tomatoes, corn, boiled new potatoes, and fresh peasant-style bread (thanks Misha). My friends asked for the recipe, so here it is below.

CREAMY ROASTED EGGPLANT SPREAD

Mix 1/2 of the above roasted vegetable spread with (basically reserve half of your total recipe):

  • 1 (8oz) package reduced-fat cream cheese, softened
  • 1 Tbsp. freshly squeezed lemon juice
  • 2-3 Tbsp. mayonnaise
  • Salt & pepper, to taste
 Mix all ingredients together and serve with pita crisps or crostini.

Serves ~6-8 people

Wednesday, August 3, 2011

Octane Energy Bars

I've been dragging lately...my energy level is down because of this ridiculous heat. So, I blame the heat for my unproductivity--unfortunately, it's one of the busiest times of the year for me. I could either do this:


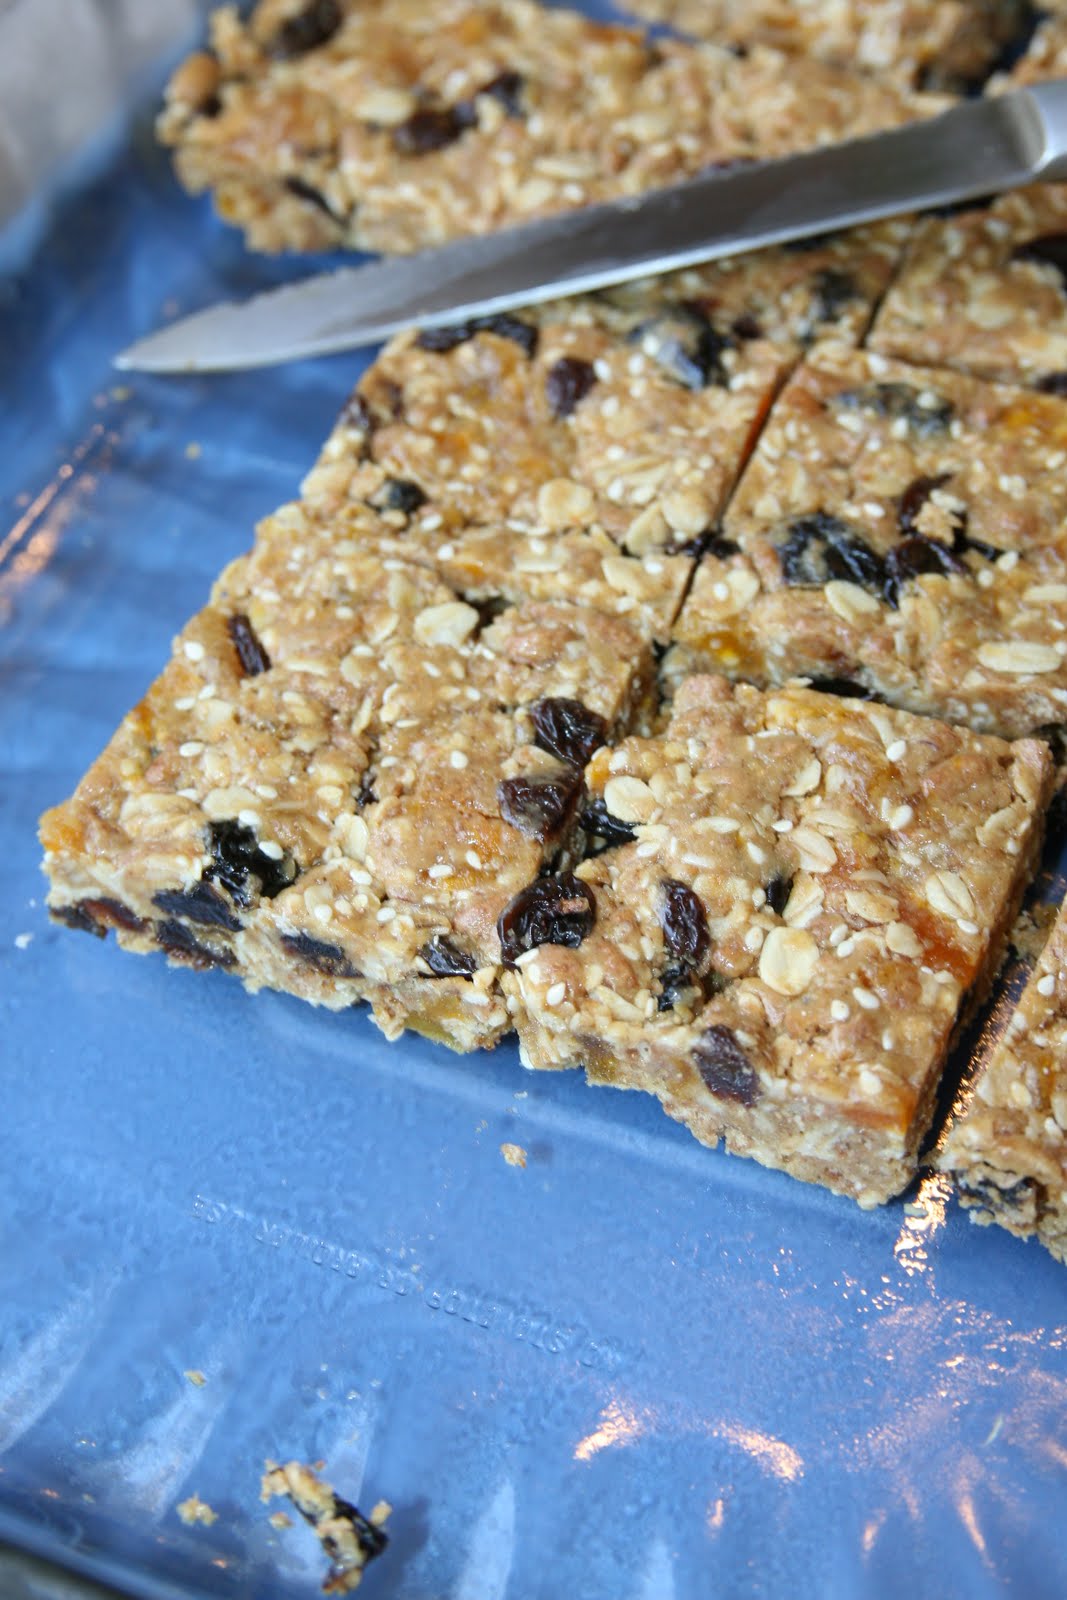
Or...try something healthier. After having my mother in law visit recently to help us out (my husband had his 4th weekend home since 2011 started this weekend), I was inspired by her energy and pulled out an energy bar recipe I've been meaning to try since college (yes, since COLLEGE). It was featured in the local paper outside of Chattanooga, TN. I didn't name them 'Octane Energy Bars'--so I realize the term 'octane' doesn't scientifically apply. It's been a while since chemistry has been on my radar, but according to Wikipedia (no, it's not my only source!), 'By the mid-nineties, the phrase [octane] was commonly being used as an intensifier and has apparently found a place in modern English vernacular.'  Now, let's hope these bars act like rocket fuel. I've adapted the recipe to suit my needs and make it somewhat easier to follow directions after some trial and error.


Am I ever glad that I made these!!! These energy bars are absolutely phenomenal. WAY better than your grocery store granola bars. Decently healthy recipe, in fact. The only other time I used brown rice syrup was for the crunchy brown rice crispy espresso nut bars from Heidi Swanson (she calls them 'Big Sur' power bars). I really like cooking with it now! It's not cheap though...you can find it Whole Foods or online--Heidi Swanson says that it doesn't give you that jolt of sweetness that other sweeteners do and has a more rounded flavor. The bars are chewy, sweet, nutty, and sort of creamy.

Reasons to make these:
  1. Your kids will love them.
  2. They taste like a treat. You're forced to eat healthier.
  3. It's a great snack when in a hurry.
  4. They have a ton of fiber. At least the fat is a 'good fat.'
 Cons: You have to go to the health food store to buy the ingredients. If you saw how annoying it was to shop at my small Whole Foods,  you'd understand. But, it was worth it. Enjoy!


OCTANE ENERGY BARS


 Makes ~18-24 bars
  • 1 cup rolled oats
  • 1 cup crunchy grain cereal (I used crispy brown rice cereal, but you can use 'Rice Krispies'--just not 'puffed' rice cereal)
  • 1/4 cup sesame seeds
  • 1 1/2 cups dried apricots, chopped (I used 1 cup dried apricots + 1/2 cup dried cherries)
  • 1 cup raisins
  • 1/2 cup wheat germ
  • 1/2 cup protein powder (I used vanilla-flavored soy protein powder)
  • 1 tsp. butter or olive oil (I used Smart Balance spread)
  • 3/4 cup brown rice syrup
  • 1/2 cup natural peanut butter
  • 1 tsp. cinnamon

 TIP: Get all your ingredients together and read through the entire directions because you need to move sort of quickly--it really helps.

Preheat oven to 350 degrees. Grease a 9X13 inch pan and set aside.
Toast the first 3 ingredients (oats, cereal, sesame seeds) for about 10 minutes (I used a shallow edge-rimmed cookie sheet), stirring once, about halfway. Do NOT let the mixture brown. (You can turn your oven off at this point as you will no longer need it.)

Meanwhile, in a separate smaller bowl, mix the wheat germ with the protein powder and set aside.

In a large mixing bowl, spoon in the toasted oat-cereal-sesame seed mixture. Mix in the dried fruits, trying to separate the pieces. Then, add the wheat germ-protein powder mixture to this and stir until incorporated as best you can.

In a saucepan over medium heat, melt butter or heat oil, and add rice syrup until bubbly. Mix in the peanut butter and cinnamon (I just put all of these in a pan and heated them until they were incorporated, melted, and more liquid like).

Pour the liquid mixture over the dry ingredients and QUICKLY mix together and transfer to the 9X13 inch pan (Come clean moment: I had to use my hands to fully incorporate everything and it was much easier because it's not like mixing sticky rice crispy treats). Pat mixture with your hands to spread it out evenly.

Refrigerate the bars for at least 4 hours. Cut into about 24 bars and wrap each bar in wax paper.


Store in refrigerator.

Tuesday, August 2, 2011

Muffin Mania (The Obsession Continues): Berry Oat Bran

I haven't posted anything in a while because we've been super busy! Also, I have had several of failures trying some new things: vegetable strata, peanut butter & banana muffins, corn fritter patties, etc. Sometimes it is disappointing to have high hopes & have a string of failures. But, without failing, how would you ever appreciate success? In the end, you find some gems....

I believe the world to be a muffin pan, and there certainly are a lot of muffins here. -Aaron Funk

Behold the modern muffin. It's not as sexy as the glazed donut, but it hasn't quite let itself go the way shredded wheat cereal has. It walks the tightrope between cupcake and cardboard. And when nibbled, the eater is torn between guilt and comfort. I get it. The muffin is my friend. Perhaps because I am a housewife. Perhaps because I have a muffin top. If you aren't perfecting your balancing skills, you may not appreciate this lowly little baked good. Maybe that is why I post so much on them--I'm championing the appreciation of the AVERAGE.


Well, the following are more than average to me  and quite DELICIOUS. I love love love them. Probably because I feel closer to comfort than guilt when eating them--they have only 2 Tbsp. of oil for a dozen and made with fat free Greek yogurt and whole grain oat bran (LOVE the crunchy, nutty, chewiness of this grain). So, now you're thinking...'oat bran'? What is 'oat bran?'  It is the outer husk of the oat grain. It has the most dietary fiber and nutrients of oats. (Keep in mind fiber helps you feel 'full' and is an important tool in weight loss.) Oat bran looks like this (photo from Google):

You can find oat bran in the bulk food section of natural food health stores. But recently, while on the hunt for mason jars (random), I found a bag of Bob's Red Mill Oat Bran for $2 at Big Lots (I know you're thinking I'm so classy right now):

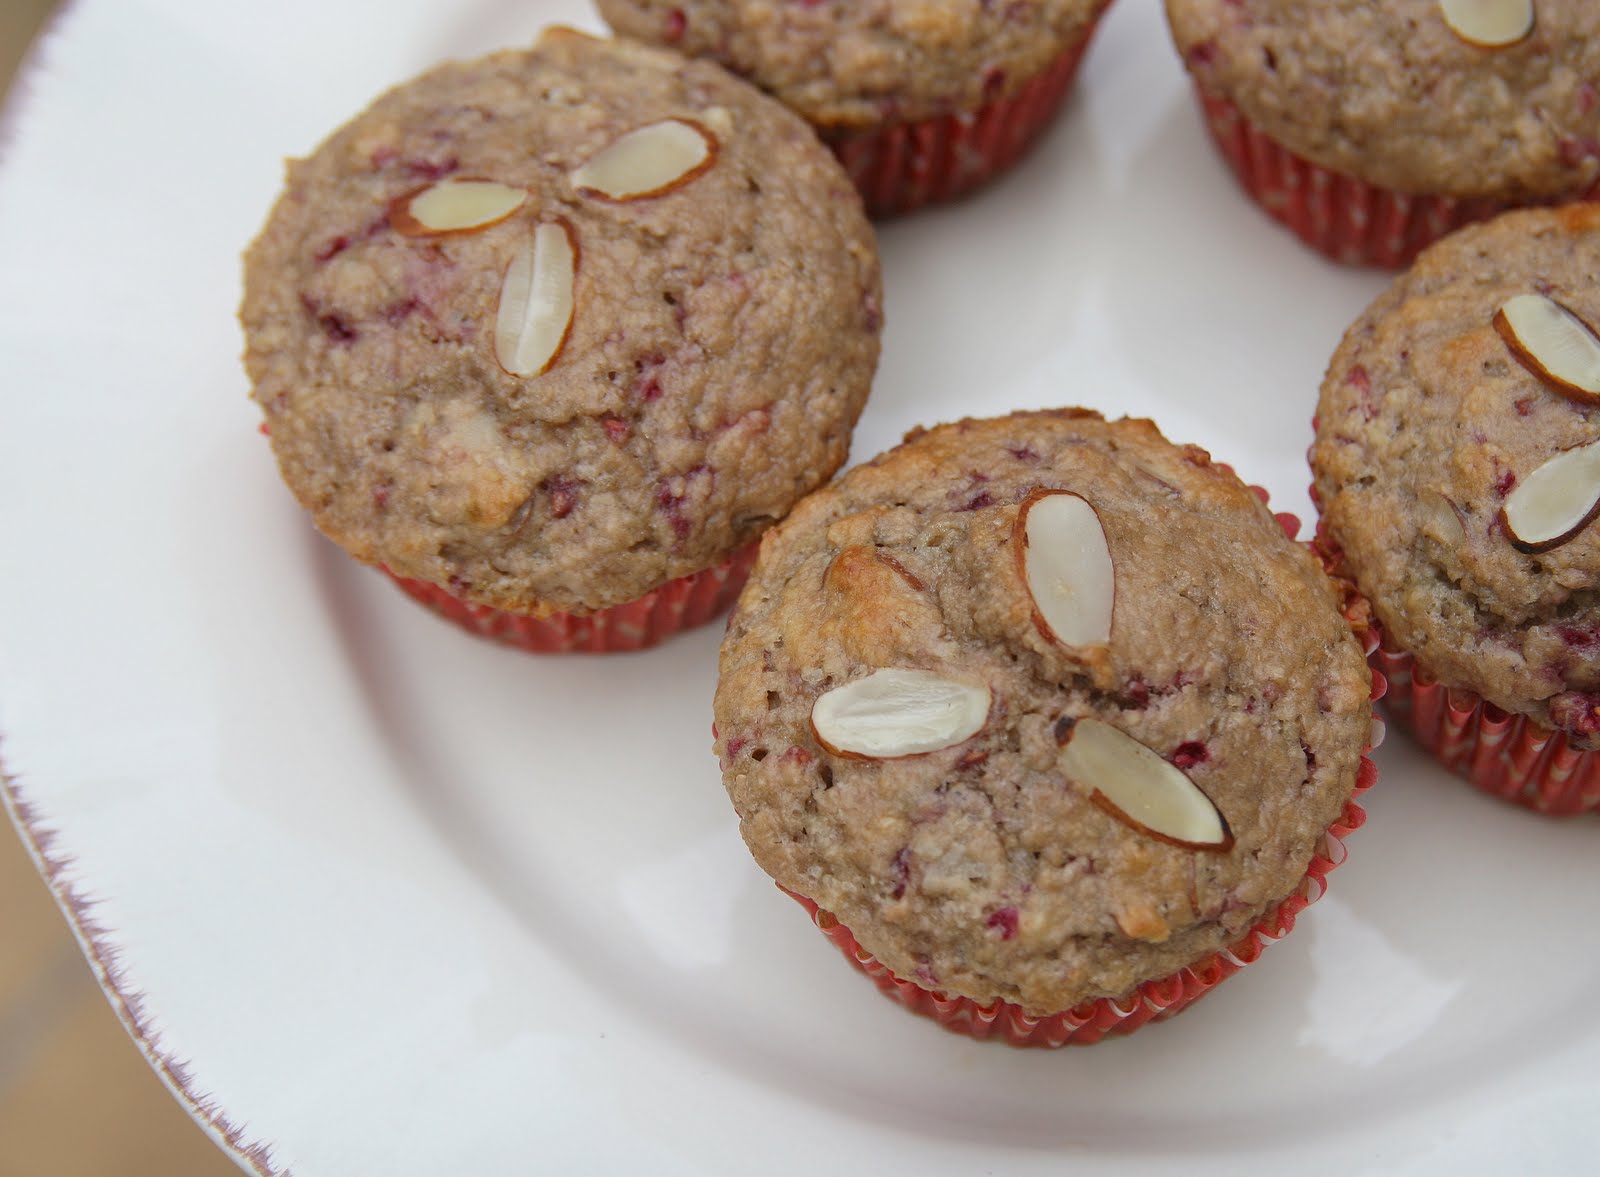
I have made the muffins three times in the last month (yes, I definitely share with others). And enjoyed them just as much with fresh raspberries and almonds as with fresh blueberries and lemon zest. And they come out lighter in color than a lot of whole grain muffins. So you can still feel like you're cheating.

BLUEBERRY OAT BRAN YOGURT MUFFINS
Adapted from www.chocolateandzucchini.com

Makes one dozen muffins
·         1 cup oat bran (apparently wheat bran may be substituted--but your muffin will come out darker)
·         1 cup flour (I used whole wheat pastry flour)
·         1 tsp. baking powder
·         1/2 tsp. baking soda
·         ~1/4 tsp. salt
·         1/2 cup unrefined cane sugar (or regular sugar)
·         1 cup blueberries (no need to thaw them if frozen)
·         1 cup plain yogurt (apparently buttermilk can be substituted--but I use Greek fat-free yogurt)
·         2 Tbsp. vegetable oil (I used some nut oils with great success, but apparently sunflower oil works well too—if you have it)
·         1 tsp. pure vanilla extract
·         *2 eggs, at room temperature


Preheat the oven to 360°F and line a muffin pan with paper liners.

In a large mixing bowl, whisk together the bran, flour, baking powder, baking soda, salt, and sugar, until no lump remains. Add the blueberries and toss gently to combine.

In another bowl, whisk together the yogurt, oil, vanilla, and eggs. Pour this mixture into the dry ingredients, and fold it in gently with a spatula until no trace of flour remains. The mixture will be lumpy, but resist overmixing.
Pour the batter into the prepared muffin tray, filling each muffin mold by about three quarters (apparently to minimize the mess, but I fill them all as equal as I can until I use up all the batter & I have no problems with spillage). Bake for 12 to 16 minutes, until set and golden.

Serve slightly warm or at room temperature. (I store them in the refrigerator and before I eat it, I pop it in the microwave for 15 seconds--makes all the difference!)

*I have a trick for this--because I don't have time for my eggs to get to room temperature since I don't always plan ahead, I put really hot tap water in a bowl and set my eggs in there while I measure out the dry ingredients and take them out to crack when I'm ready to use them.


I love you little guy! (as my 2 year old daughter says)


For a Raspberry-Almond Oat Bran Muffin (really delicious), substiute raspberries for blueberries and add ~3/4 cup of sliced almonds to the batter with the raspberries. Otherwise all ingredients and directions remain the same.


I just added a few almonds slices to the top--I think using just two slices to make a heart would be wonderful for Valentine's Day.

Saturday, July 16, 2011

Pasta with Fresh Mozzarella, Tomatoes, Arugula, and Pine Nuts


Easy dinner. Fantastic tasting. Almost like you don't even know it's healthy (used whole wheat pasta, but you can use what you like--multigrain pasta is good too). Came up with this dish last night while in a hurry to make something for dinner. We loved it! Definitely use summer's best tomatoes (heirloom tomatoes if you can get them)--this dish is much better in the summer with fresh tomatoes--not the mealy ones of the winter-grocery variety. In the winter, consider sauteing 1-2 cans of diced tomatoes in with the garlic for a few minutes for this dish. I certainly will.

We had leftover lemon basil chicken from this recipe I made (and adapted) earlier this week. It was very good!


The chicken was great with the pasta. But, I bet the pasta would also be very good with some white (cannellini) beans (instead of the chicken) for a vegetarian meal. Next time, I'm going to try it that way and maybe even replace the fresh mozzarella with feta cheese for variety. By the way, arugula is wonderful in pasta dishes!

PASTA WITH FRESH MOZZARELLA, TOMATOES, ARUGULA, AND PINE NUTS

Serves 6

  • 16 oz. pasta (farfalle (bowtie), penne, fusilli/rotini, cavatelli shapes are good options)
  • 2 Tbsp. extra virgin olive oil
  • 2 garlic cloves, minced
  • 2 large tomatoes, diced
  • 1/4-1/3 cup pine nuts (pignoli)
  • ~1 tsp. sea salt
  • ~1/2 tsp. cracked black pepper (or to taste)
  • 8-10 ounces fresh mozzarella, chopped
  • 5 oz. baby arugula (this is ~6 cups)
  • ~4 cooked chicken breasts, chopped (optional)
  • Parmesan cheese, (optional)

Cook pasta according to package directions. While that cooks, heat olive oil up with the garlic and cook slightly without browning. When garlic starts to brown, turn off the heat. Let cool until pasta finishes cooking. Combine the tomatoes, pine nuts, salt and pepper with the fresh mozzarella, and arugula. Add the cooled olive oil and garlic.

Drain pasta and combine toss with the tomato-arugula-cheese-nut mixture. Add cooked chicken, if using.

Serve immediately. For extra pizzazz--serve with freshly grated Parmesan cheese over each serving. Doesn't this look delicious? It really was. Hope you enjoy it.

Friday, July 15, 2011

Summer in My Mouth: Strawberry Pineapple Quick Bread


Quick Breads: More matter with less art.--Anonymous

Fun fact: Quick breads originated in the 1850's.

Summer in a bread.....sweet, moist, simply wonderful! This recipe is amazing--I found it on allrecipes.com, read all the lengthy reviews, and deemed it capable of handling healthy changes. The reviews proved that to be true. Here is the original recipe--it uses frozen strawberries and canned pineapple (that is not acceptable to me when it's cheaper to buy the fresh during this season). This quick bread is intensely flavorful!

My version is below--I wanted less sugar, less cinnamon taste (so the fruit flavors would be more discernible), some whole grain flour, and half the fat. The only thing I would do differently next time is to use even less sugar! It was a little too sweet to me--but still very good. This recipe makes TWO loaves--so keep in mind that if you don't freeze one, you will probably have to share with your coworkers, friends, and/or neighbors--and then you will probably have to share the recipe too (or so say the reviewers). (Each loaf has about 10 slices-give or take--more like take!)

I found it super easy and was surprised by how fast it came together. I might be making this again at the holidays--can't imagine it would compete with any fruitcake I've had. 


STRAWBERRY PINEAPPLE QUICK BREAD
Adapted from www.allrecipes.com
Makes 2 loaves

  • 1 2/3 cups sugar (definitely decreasing this further next time by another 1/3 cup)
  • 4 eggs, beaten
  • 1/2 cup applesauce (heaping)
  • 1/2 cup vegetable oil
  • 1 tsp. pure vanilla extract
  • 1.5 cups all-purpose flour
  • 1.5 cups white whole wheat flour (good, but will use whole wheat pastry flour next time)
  • 1 tsp. baking soda
  • 1 tsp. salt
  • 1 tsp. cinnamon
  • 1 cup chopped pineapple--packed and drained
  • 1 cup sliced strawberries--packed
  • 1 cup chopped walnuts (optional--but I liked the crunch)
Preheat oven to 350 degrees (F). Lightly grease two 5x9 inch loaf pans.

In a medium-large bowl, mix the eggs, applesauce, oil, vanilla extract, and sugar. Then mix in the strawberries and pineapple.

In a separate (smaller) bowl, sift together the flour(s), baking soda, salt, and cinnamon. (In all honestly, I'm not a big 'sifter' and therefore skipped this step. I don't think we suffered too much because of it. Or at all.) 

Mix the flour mixture into the bowl with the fruit until evenly moist. Fold in walnuts. Divide the batter between the prepared loaf pans.

Bake 1 hour in the preheated oven, until a toothpick inserted in the center of a loaf comes out clean. Cool on wire racks.


A dreamy treat with coffee or tea...

Thursday, July 14, 2011

Calabacita Squash with Corn, Tomato & Onion


During my first month at home with a new baby, someone gave me a copy of an Oprah magazine. I was intrigued by an article featuring Jennifer Anniston's celebrity chefs. They cook healthy meals--now, as much as I enjoy time in the kitchen (it's stress relief to me), to have a celebrity chef prepare healthy meals for my family and not to have to worry about dishes or clean up is the thing dreams are made of...well, I clipped Jill Elmore's favorite recipe on preparing squash and finally got to make it. What a wonderful way to use up summer's bounty--it's a delicious side dish! So, so, good!

You don't feel like you're eating healthy in a frustrated way....you can use whatever cheese you have around--I used Swiss and enjoyed it. It's a flexible recipe--I used 3 large zucchini and a bag of frozen corn with good results. And because I was in a hurry, I didn't drain the zucchini. I think it would make a difference so I definitely will not skip that step next time. This vegetable recipe would make a great side dish or something different to bring to a potluck dinner.

You might be asking what calabacita/calabasita is. And I have seen it spelled both with a 'c' and with an 's'. It means 'little squash' in Spanish. It's a lighter skinned, shorter (squattier), summer squash used in Mexican and Hispanic cooking. I have read that it has a less bitter skin. I used this kind of zucchini squash. It was labeled as 'calabacita' in my Hispanic grocery store, but you can find it in regular grocery stores too. I imagine that any zucchini would work, really. Not really sure which is the proper way....but in any case, at last you can eat like Jennifer Anniston with this dish (ha).

CALABACITA SQUASH WITH CORN, TOMATO, AND ONION
Adapted from The Family Chef by Jewels and Jill Elmore
Serves 5
  • 4 small zucchini, diced
  • 2 tsp. kosher salt
  • 2 Tbsp. olive oil
  • 1 medium onion, chopped
  • 1 clove garlic, minced
  • 4 ears corn, kernels sliced off
  • 2 plum (Roma) tomatoes, diced
  • ½ cup shredded mozzarella or feta (optional)

Place diced zucchini in a colander set over a bowl. Sprinkle with salt; toss and let stand 20 minutes. (This draws the excess liquid out of the zucchini.)

Transfer zucchini to a kitchen towel and pat dry. (This step is optional but worth the time: Drying zucchini prior to sautéing it keeps it from becoming watery, and Jill think this step removes its occasional bitterness.)

Heat oil in a large nonstick skillet over medium-high heat. Add onion and garlic; sauté 3 to 5 minutes until soft. Do not brown. Add zucchini and corn kernels. Saute 6 to 7 minutes until vegetables are almost tender. Add diced tomato; sauté 2 to 3 minutes until softened and zucchini is tender.

Remove from heat and stir in cheese if desired.

Per serving: 143 cal, 4 g pro, 21 g car, 4 g fiber, 7 g fat (1 g sat fat), 0 mg chol, 602 mg sod

Jill's Tip: She says she loves adding leftover calibasita to scrambled eggs in the morning for a breakfast burrito. Add a dash of hot sauce, roll it up in a tortilla and hit the road!

Sunday, July 10, 2011

Savory Zucchini Dill Corn Muffins


I've been making these savory dinner muffins for a long time and I just love them!. They are a great accompaniment to chili in the winter--particularly spicy chilies. But, in the summer, these muffins also fare well alongside grilled vegetables and meats because zucchini are so readily available and cheap in this season. So during hot months, I just make try to make them early on in the morning.

These muffins do not rise as much as regular breakfast muffins, but they are moist and tender. I have actually noticed that they are even more delicious when you use organic or stone-ground cornmeal. If you don't like feta, use goat cheese. And dried dill works fine if you can't locate fresh dill. I've always wondered how good they would be with some fresh corn kernels thrown in....Serve these muffins at room temperature or warmed a bit, with butter. 


SAVORY ZUCCHINI DILL CORN MUFFINS

Makes one dozen savory dinner muffins

  • 1 1/2 cups cornmeal
  • 1/2 cup all purpose flour
  • 1 tsp. baking soda
  • 2 tsp. baking powder
  • 1/2 tsp. salt
  • 4-5 Tbsp. butter, melted (half a stick or 1 Tbsp. more)
  • 1 cup low-fat buttermilk
  • 1 egg + 1 egg white
  • 1/4 cup chopped fresh dill (or about 1/2 tsp. dried dill)
  • 2 zucchini, grated (~2-2 1/2 cups)
  • 1/4-1/3 cup grated or crumbled reduced-fat feta cheese OR regular crumbled goat chese
Preheat oven to 375 degrees. Grease or spray a muffin pan with Pam or other cooking spray or line muffin pan with paper cups. Set aside.

In a medium sized bowl, mix the cornmeal, flour, baking soda, baking powder and salt.

In a smaller bowl, whisk together the melted butter and buttermilk. Then whisk in the egg, egg white, and dill. Using a spatula, mix in the shredded zucchini and cheese.

Add the wet ingredients to the dry ingredients and gently mix until a batter is formed.

Fill muffin cups with batter and bake for about 25 minutes or until tops are golden and a toothpick inserted comes out clean.

Yield: 12 muffins

(Note: if using paper liners, in order to prevent muffins from sticking to the liners, wait to peel them after they have nearly cooled).


Friday, July 8, 2011

Snappy Red Sauce


I have a dirty little secret. I know we all have those--whether we want to admit it or not. I'm almost too ashamed to admit it. Pause. But, here goes. I watch a bad show. It helps me realize I'm really not crazy. That there are other people out there who absolutely define crazy. People out there who put their lives front and center so that we, as viewers, can watch with shame and horror and then feel downright normal. Who are these people? They are The Real Housewives of New Jersey.


I know some of you may be take a higher road and don't watch reality tv. Or own a tv. Well, more power to you. Can someone come and take mine away? Because this really is like watching a train wreck. Do I recommend this show? No. Do I have a problem because I continue to watch it? Most likely. I always feel like I need an emotional shower and the need to pray after this show. Yet, I continue to watch it and then say to myself....'See, you're fine!' It's totally ok that you apologize before any new thing you serve to friends and family before they taste it. It's totally ok to have to physically force and rip open your tupperware drawer because everything in there is jammed in unorganized. It's totally ok to refuse to wear hosiery from February to November. It's totally ok to think the Mr. Clean magic eraser is really magical. And it's ok to be Dharma to your Greg.

Anyway, I digress. My point is that on this crazy show, the mother of all that is crazy is a character named Teresa. Who has an obnoxious life. And an obnoxious house. And an obnoxious husband. And seeminly obnoxious children. But, my goodness! It looks like her cooking is to die for! She has written two cookbooks so far (watch out Giada!). The first was 'Skinny Italian' and the second is 'Fabulicious' (because everything in her life is 'fabulous'--and you know, I think her attitude is awesome! I think we should all go around saying our lives are fabulous--whether we wear animal print and have a gold bathroom or not). Anyway, after an internet search of some of her recipes, I'm convinced that she may know what she's talking about. Her recipes make one salivate in anticipation. And they don't look that complicated! So, as a warning, I will be trying a few here and there.

Below is Teresa's 'snappy red sauce'. A basic (slightly spicy) red sauce that is a staple in her Italian family's home and the basis of many of her recipes. I tried it and really like it. And what's strange is that 2 year old ate it up by spoonfuls. It really is a fast and basic red sauce that is delicious on pasta. I'm considering using it on pizza dough. The recipe is a great jumping-off point for other additions. But it's very balanced and uses ingredients you would not have a hard time finding in your home or grocery store.


SNAPPY RED SAUCE*
Adapted from Fabulicious by Teresa Giudice

  • 1 Tbsp. extra-virgin olive oil
  • 1 small onion, chopped
  • 1/4 tsp. salt
  • 2 garlic cloves, minced
  • 1/2 tsp. red pepper flakes
  • 1 28-oz. can crushed tomatoes in thick puree
  • 3 Tbsp. chopped fresh Italian parsley

Heat oil in a large saucepan over medium heat. Add onion and salt. (Teresa says that a little salt brings out the onion flavor.) Cook, stirring occasionally, until onion is translucent, about 5 minutes.
Add garlic and red pepper flakes and stir until garlic is fragrant, about 1 minute. Stir in tomatoes with their puree and parsley and bring to a boil.

Reduce heat to medium-low. Cook at a brisk simmer, stirring occasionally, until slightly reduced, about 5 minutes. Serve hot as a pasta sauce.

Makes 3 1/2 cups (enough for 1 pound of pasta)

*For my tastes, I prefer to add a little more salt and stir in about a teaspoon of olive oil at the end. Also, if I'm not serving it with a dish already using these same herbs, I would add some basil or oregano in with the parsley.

Thursday, July 7, 2011

Super Succotash


My child and I have a love for lima beans. And now succotash. I recently learned that this dish came about during the Great Depression because of widely available and inexpensive ingredients. This is my version below. It makes for an awesome summer lunch. Flavorful, fresh, and resplendent with grilled meats and potatoes. Another example of how a vegetarian dish can be full of flavor. Also, it makes a great meal to pack for work.

Keep in mind that the version below is a bit fresher than traditional succotashes which saute the onions and bell pepper--feel free to do so and toss with the corn and beans if you prefer. Also, if you really want to 'kick it up a notch' (as our friend, Emeril, says)--add about 3-4 pieces of crumbled cooked bacon (we use turkey bacon). Feel free to add more butter--it really makes for a better taste with the creaminess of the lima beans and sweetness of the corn. We love this--hope you do too!


SUPER SUCCOTASH

Serves 4-6

  • 1 (10 oz) package frozen lima beans
  • 1 big red bell pepper, diced
  • 3-4 green onions, chopped--white and green parts
  • 3-4 ears of cooked corn--kernels cut off OR 2 cups of corn from either cans (drained) or cooked from frozen
  • 2 Tbsp. of sesame seeds (heaping)
  • 1/4-1/2 tsp. garlic powder
  • 1 Tbsp. light butter (melted) or extra virgin olive oil (can use Earth Balance spread for vegans)
  • Juice of half a lemon or lime (optional)
  • Salt & pepper to taste (a bit heavier on the pepper)
Cook lima beans according to package directions (either on the stovetop or in the microwave). While still warm, toss the onions and bell peppers with the lima beans--this softens the 'bite' of the onion. Add the corn and sesame seeds and garlic powder. Pour the melted butter (or oil), citrus juice (if using) over the ingredients and gently mix it all together. Season with salt and pepper--taste and adjust seasonings as necessary.

Wednesday, July 6, 2011

Happy Belated Birthday, America!

Hope everyone had a spectacular 4th of July! This post is way too late (been kinda busy), but below is what I made for Independence Day (4th of July).


Every single time I have made this cake, I make it with Ina Garten's recipe (Barefoot Contessa). I highly recommend you guys bookmark her recipe to make for next year. This year, I wanted to simplify my life and used a cake mix (white 18.25 ounce). Then, decided to make it healthier and modified the cake mix directions by omitting the water and replacing it with some applesauce and butternut squash puree (added extra vanilla extract). So then surely, I had to reduce the fat in the frosting. This recipe was my inspiration in lightening the cake. I was surprised that the cake was still good. Even so, with all my more health-conscious alterations, you should still make Ina's cake at some point--it's very, very good. HERE is her recipe. It's also WAY prettier!

By the way, Ina's original frosting recipe is a bit scary if you're trying to eat healthier. So this year, for the frosting--instead of using FOUR sticks of butter and 24 ounces of cream cheese, I used 1 stick of LIGHT butter, and 16 ounces of REDUCED FAT cream cheese (that's two 8-ounce packages of cream cheese). And yeah, it was still quite good! Just something to consider.