Pages

Saturday, September 8, 2012

Healthy Protein Lunch: Chickpea Sandwich Spread (Vegetarian/Vegan)


I have been sending my better half to work with sandwiches lately. He left the land of scrubs, a fully stocked doctor's lounge, and the comfort of driving a truck to the world of 'Midwestern Ivy' academia--wear crisp shirts and khakis, pay $1.79 for a bad cup of coffee, and take the bus to work. And though he insists he's totally happy with peanut butter and jelly, I'm not happy with that idea.

So....the trick has been finding protein-filled sandwiches that would be safe at room temperature for a few hours (since he hadn't found the department fridge yet). Which usually means, something vegetarian--and to be exact, something vegan for a while. Can't risk anything spoiling and then having him get sick at work.

I read the helpful reviews for this chickpea sandwich spread online and was motivated to try it. After a few adjustments to the recipe (based mainly on what I had), we absolutely love it! It's right up there with this tofu sandwich spread. Both these sandwich spreads are just delicious! And would make creative pita pocket fillings.

This chickpea sandwich spread is also another great replacement for tuna fish. One reviewer said that a member of their family didn't know they weren't eating a tuna fish sandwich while enjoying this sandwich--it was just that good. A couple people used it as dip or stuffed tomatoes with it. I made a double recipe of this sandwich spread and was very glad because it was good as a thick dip with crackers dipped into it (ha). Even my in-laws enjoyed these sandwiches after a long travel day.

Give this spread a try. It's really very, VERY good! Imagine the possibilities you could do with the base of chickpea, vegan mayo and lemon juice!


VEGETARIAN CHICKPEA SANDWICH SPREAD
Adapted from www.allrecipes.com


Below is almost a double recipe--it makes about 6-8 sandwiches.


  • 2 (15 oz.) cans chickpeas (also called garbanzo beans), drained and rinsed
  • 3 stalks celery, diced (mine were on the smaller side)
  • 4 green onions, chopped (you can use 1 small onion instead as the original recipe calls for)
  • 1/4 cup, or less, vegan mayonnaise (such as Vegenaise--grapeseed variety is the best)
  • Juice of about one lemon
  • 2 tsp. dried dill
  • 1/2 tsp. garlic powder
  • Salt and pepper, to taste


1) Put the rinsed and drained beans in the bowl of a food processor and process a few times until the texture of the beans is a chunky paste. Because there is very little liquid, the beans won't process to a paste. In fact, you can add a little lemon juice or water to help the processing go smoother. Place the mixture in a medium-large sized bowl.

OR, 

In a medium to large sized bowl, just mash the (garbanzo) beans with the back of a fork until you get the texture you wish--a chunky paste.

2) Then, mix in the celery, onions, mayonnaise, lemon juice, and spices. Add a little water if more liquid is needed.


Store the filling in refrigerator. DELICIOUS!!!! And almost better the next day.


If anyone has any other great vegan/vegetarian sandwich filling ideas, please let me know!

Thursday, September 6, 2012

RIDICULOUSLY EASY Rustic Tomato Basil Parmesan Bread


A couple weekends ago I met my girlfriends for a weekend trip in Nashville. I'd like to take a moment and say that the only thing more wonderful than homemade bread is sharing it with women who can laugh at themselves. And you. And then make even you laugh at you.


We went to the spa in honor of one of our friend's new baby--instead of a baby shower. And as if that weren't smart enough (wish I could take credit for that genius plan)...two of the significant others of the girls...well, they made us food. Like real food. Not microwave popcorn food, but like BAKED bread, NYT recipe egg strata, oven roasted potatoes and onions, and buckwheat pancakes on the griddle. We need more of these men in our lives, no? I mean, it's been a while since a man made me French press coffee like this...


Well, we took the bread to the spa. Because that's what one does when olive oil is the spa theme. Here's a picture of girlfriend, Harmony, enjoying the fruits of a man's labor before the spa. (And check out her absolutely hilarious blog HERE.)


Now, tell me you wouldn't want to eat, drink, and be merry and then rubbed down with women who are probably going to cause problems in a nursing home with you one day...instead of making small talk with people you may not know over tissue paper and diapers (sorry Jolene).


Anyway, when I got back from Nashville, I started craving homemade bread again. Just like that. Even if the temperature has been in the 80s. Years ago, my good friend, Erinn, would make tomato basil bread in her breadmaker. It was delicious. And now years later, I miss it (and her, since we're discussing friends) and wonder what a rustic tomato-bread loaf would taste like. So, after playing around, the conclusion is that it is delicious and almost as easy if you don't mind waiting overnight (so worth it). I urge you to try my little experiment because I think it's going to turn out beautifully for you. And again, if you know me by now, you know...NO KNEADING!

This bread is the perfect transition between summer and fall. If you have basil growing on your porch like myself, give it a go. Read this slowly: This bread is idiot proof. I mean, it is RIDICULOUSLY EASY. 

All you need that's considered special equipment is a cast iron pot (a dutch oven if you will) like the ones Le Creuset or Staub makes. Even Aldi sells knock offs these days. You can find these pots on Amazon, at Target, TJMaxx, Marshalls, even Walmart. It is THE ultimate 'tool' in making rustic breads. You definitely need one. LOVE LOVE LOVE these pots.


RIDICULOUSLY EASY RUSTIC TOMATO BASIL PARMESAN BREAD


  • 3 cups all purpose flour
  • 3/4 tsp. yeast
  • 1 1/2 tsp. salt
  • 3 Tbsp. grated Parmesan cheese
  • 1 large handful of fresh basil, rinsed and patted dry
  • 5 sun-dried tomatoes, preferably NOT oil-packed
  • 1 1/2 cups water
  • *A DUTCH OVEN (I used a 3.5 qt size--which is about 3.3 L)

Using a food processor or large knife, process or chop finely the dried tomatoes and basil.

Using a stand mixer OR a medium to large sized bowl and spatula, mix all the ingredients, except the water. Then pour in the water and mix until the dough is shaggy and comes together easily. This should only take a minute or two.

Cover the bowl with plastic wrap and set aside for 12-18 hours. Overnight is really ideal.

When you are ready to bake the bread, place some flour on a clean kitchen towel. Dump your dough onto this floured towel and flip it over once or twice until it is a round shape and evenly covered with flour. Flip the towel to cover the round shape. Next, place a lidded dutch oven pot in the oven and turn the oven on to 450 degrees. When the oven has preheated, continue to let the pot heat or 'bake' on its own for another 10-15 minutes.

When the pot is good and hot, carefully take the pot out. Then, carefully lift up dough with edges of the damp cloth/towel and dump your dough into the hot dutch oven pot. Shake the pot gently side to side to let the dough even out in the pot. Cover with lid and bake for 30 minutes.

After 30 minutes, remove the lid and continue baking the bread for another 15 minutes until it is baked throughout and golden in color.


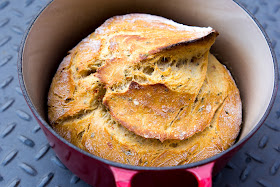
Check out the green and red flecks of color...


I made two loaves. So glad I did. And that's how you meet your neighbors in a big city.


Before I forget....some major things to keep in mind with the breads I post on this blog:
  1. If you want a crispy crust, store the bread in a paper bag.
  2. If you want a chewy crust, store the bread in a plastic bag after it has cooled. 
  3. I suggest refrigerating it after a couple of days and warming it up either in the oven (which can restore some crispi-ness, the microwave--which can restore some chewiness, or just toast it). Due to the fact that it doesn't have preservatives, the bread can spoil faster than store-bought breads.


And boys? Thanks again. You done good. Sorry I didn't take your picture as you smiled when you served us food. Your mommas would be proud. 


*You can use a bigger size pot, but the bread will be a bit thinner and spread out more. The 3.5 quart size is probably my favorite for rustic breads. I use the Le Creuset brands (mainly round shape) and if you have these brand of pots and don't know what size they are, check the number on the bottom of the pot. I found this little chart on a message board and it is helpful in understanding what size I'm dealing with--so if your Le Creuset pot has a 16 on the bottom of it, it's a 1.5 quart pot, etc. See below:

For Round Dutch Ovens:

16: 1.3 liters (L) = 1.5 quarts (qt) 
18: 1.8 L = 2 qt
20: 2.4 L = 2.5 qt
22: 3.3 L = 3.5 qt
24: 4.2 L = 4.5 qt
26: 5.3 L = 5.5 qt
28: 6.7 L = 7.25 qt
30: 8.4 L = 9 qt
34: 12.4 L = 13.25 qt

HAPPY BAKING!


Wednesday, August 22, 2012

Almond and Herb Crusted Roasted Heirloom Tomatoes


Alright, this is another one of those non-recipe-recipes that I urge you try. I know everyone's super busy with the kids going back to school and the cramming of the last bits of errands and family vacations and activities before this season is out. The last thing you may want to do is try something complicated for dinner. This is not a complicated side dish. Bear with me. I mean, really. TRY IT. Throw a piece of fish, steak, tofu, or chicken on the grill. Then boil some potatoes, nuke some frozen green beans or saute some spinach, and MAKE THESE TOMATOES! Because, they turned out INCREDIBLY delicious!

We've had a bumper crop of heirloom tomatoes because my parents have decided to turn their tiny backyard into a tomato sanctuary. They somehow manage to make time for these beauties despite their long work hours. They baby them. They worry about whether they get enough water. They love to share them. It's truly precious. And because of their nurturing, I get to share in this amazing bounty. But there's only so many tomatoes a person can eat before getting creative. So, after spying my pantry ingredients...it was either pistachios or almonds. I went with the almonds because I thought of the beloved Romesco sauce...check out the nutty coating:


So this side dish, is summer boiled down. Garden tomatoes. Herbs. Nuts. It's low-carb....it's vegan...it's delicious. We served these little veggie wonders with some hot crash potatoes (thank you Pioneer Woman--those are a dinner staple in our house), edamame, a Costco veggie souffle, and some ciabatta bread. Our little family loved them. LOVED them.

Try them with a variety of heirloom tomatoes for the best presentation--I had yellow, green, and red tomatoes. The savory crunch really compliments the flavor of the roast tomato. They shrink down a bit when you roast them...in fact, I'm making a double recipe next time because they were that good. And then I'm going to put the leftovers in a sandwich. Maybe with Havarti cheese and some turkey or veggie bacon.

*In my 'recipe,' I used a mixture of both fresh and dried herbs. Remember that if you're using dry herbs, use a little less than fresh herbs--dry herbs tend to be much more potent in flavor. 

My three year old wanted to 'take my picture'---the result is below. Have to encourage creative outlets...


ALMOND and HERB CRUSTED ROASTED HEIRLOOM TOMATOES
Loosely adapted from www.familyfreshcooking.com

Serves 2-4

  • 4 heirloom tomatoes, sliced in ~1/4 inch slices (or just slightly bigger)
  • 3/4 cup almonds (roughly)
  • One handful fresh herbs--your choice, rinsed and patted dry--(I used fresh basil, mint, rosemary, and dill and added a small dash of DRY parsley and oregano)
  • Sea salt & freshly ground pepper
  • ~1/2 tsp. garlic powder 
  • ~1/2 tsp. smoked paprika
  • Olive oil spray

Preheat oven to 375 degrees.

Spray a baking sheet with olive oil spray and set aside.

Place the almonds and herbs in the bowl of a food processor. Pulse until combined and the nuts have been made to look similar to bread crumbs. 

Place crumbs in a shallow bowl and add the rest of the seasonings (salt and pepper, garlic powder, and paprika). 

Dip each tomato slice in the nut mixture and pat the mixture on if it starts to come off. Place the tomato slices onto the baking sheet and spray the tomatoes lightly with olive oil. 

Bake for 15 minutes and then gently flip each tomato piece--being careful not to scrape off the herb-nut coating. Continue to bake for another 15 minutes. They should be browned and crispy. 

Serve the tomatoes warm or at room temperature.

Serves about 3-4 as a side dish OR 2 people if they are more of the main entree.


I think these tomatoes would be amazing with a piece of good cheese (layer with some goat cheese for a pretty presentation), some fresh bread, and a lovely Chardonnay. But they'll probably taste best if you eat them on the porch during a cooler August evening. 

Monday, August 13, 2012

Best & Easy Southern Peach Cobbler

Life is better than death, I believe, if only because it is less boring, and because it has fresh peaches in it.
― Alice Walker


I have been meaning to post on this recipe for a couple months but just haven't gotten around to it. This spring, we were able to enjoy our last peaches from the neighbors' tree. Those neighbors, who dropped by just to say hi, to bring us produce when they bought extra for us to enjoy, the ones to offered to babysit and watched our house when we were gone--you know the ones that you laugh, cry, and pray with--those neighbors had become our family. The peaches were just bonus. I'll never be able to eat another peach again without remembering Henry Groves back his truck into their driveway up the hill and raise my daughter up into the peach tree so she could pull the fruit off the branches.


Just look at these fuzzy little beauties!!! Their smell was simply intoxicating.


We eagerly awaited their harvest and battled the squirrels for the best ones. I asked what I could do to repay them for these gifts and Henry said, 'make me a cobbler.' I laughed. Of course, I'd only made one peach cobbler before in my life and it wasn't that good. So here went effort #2....it was worth it. I would like to thank Southern Living for a totally uncomplicated, straight-forward and easy recipe.

For the record, I think the best peaches are from Gaffney, South Carolina. You convinced me sisters-in-law. You really did. Here's the town symbol off the highway (image courtesy of wikipedia). It's right next to the outlets...so double the reason to go!!!


I've seen peaches these first couple weeks of August at the farmer's markets and produce stands so if you happen to find some good peaches, I suggest you try this easy and delicious peach cobbler recipe! I'd like to try it with some whole wheat pastry flour next time--I tried the light butter before, but the real butter really makes it better in this case. Splurge.

There is no need to peel the fruit and the reviewers say you can use frozen peaches too or any kind of berries you like! My daughter had fun watching the batter rise up around the fruit through the oven window. Enjoy this delicious dessert with some vanilla bean ice-cream or frozen yogurt.

EASY PEACH COBBLER
Adapted from Southern Living

Serves 8-10


  • 1/2 cup unsalted butter (1 stick)
  • 1 cup all-purpose flour
  • 2 cups sugar, divided (I used slightly less)
  • 1 Tbsp. baking powder
  • Pinch of salt
  • 1 cup milk 
  • 4 cups fresh peach slices (I used more like 5 1/2 cups)
  • 1 Tbsp. fresh lemon juice 
  • Ground cinnamon or nutmeg (optional--but I used a pinch of both--so worth it!)

  1. Melt butter in a 13- x 9-inch baking dish.
  2. Combine flour, 1 cup sugar, baking powder, and salt; add milk, stirring just until dry ingredients are moistened. Pour batter over butter (do not stir).
  3. Bring remaining 1 cup sugar, peach slices, and lemon juice to a boil over high heat, stirring constantly; pour over batter (do not stir). Sprinkle with cinnamon, if desired.
  4. Bake at 375° for 40 to 45 minutes or until golden brown. 
  5. Serve cobbler warm (pull out the ice-cream!) or cool.

Wednesday, August 8, 2012

Barbecue Rubbed Salmon


When we recently moved, I was going through my spice drawer and found this really good rub I had made months ago. I figured it would be the perfect little helper for some fish when we moved in when I need something fast but didn't want to make anything elaborate. I was right! It's sweet and smoky and has just the right spice blend. This barbecue rub is really an awesome thing to have on hand and would make for a good gift come holiday time!

I used these salts in my barbecue rub and if you're around a Trader Joe's...try them...they are so good! I'm addicted! (please excuse the horrible cropping)


You can make the barbecue rub ahead of time and just use a little bit on chicken or fish right before baking or grilling. It simplifies dinner considerably! Add more cayenne pepper for a kick, if you prefer. So, key words? EASY. FAST. And really, even healthy!

This isn't really a recipe more than a guideline....I roasted my fish, but you can easily grill it skin side down.

We served the salmon with steamed broccoli, fresh yellow tomatoes and a side salad of corn, beans, and green onions.


BARBECUE RUBBED SALMON

Servings vary based on how many fillets you use.

  • Salmon fillets (wild-caught if you can get them)
  • Olive oil spray
  • Basic barbecue rub (my recipe follows)--about 1/2 Tbsp. for each fillet can be used
  • Lemon or lime wedges for serving, optional


Preheat oven to 400 degrees.

Spray a shallow cooking sheet pan with some cooking or olive oil spray. Place salmon skin side down on sheet. (I like to line my pans with aluminum foil--sprayed with cooking spray--to make for an easier clean-up.) Spray salmon fillets with olive oil until they are evenly covered--generally, it ends up being about 1/2 a tablespoon of rub per fillet. Gently sprinkle and pat some barbecue rub until the fillets are lightly covered.

Bake for about 15-20 minutes. Every oven seems a little different, so check for 'doneness'--that fish flakes easily around 15 minutes.

Serve with lemon or lime wedges.


BASIC BARBECUE RUB


  • 1/4 cup firmly packed brown sugar
  • 1/4 cup smoked paprika
  • 3 Tbsp. black pepper
  • 3 Tbsp. smoked salt (or regular coarse salt)
  • 2 tsp. garlic powder
  • 2 tsp. onion powder
  • 2 tsp. celery salt
  • ½ tsp. cayenne pepper (or more if you wish)
  • ½ tsp. chili powder
  • ½ tsp. cumin

Mix all ingredients in a small bowl—a small whisk helps break up any lumps in the brown sugar. Store in an airtight container, away from heat and light. 

Rub will keep for months!!

Use on chicken or fish. (I'm sure it would do fine on red meat, but I haven't tried it.)

Makes about 1 cup.
**If you use 1/2 a Tablespoon of rub on a piece of meat, that will give you ROUGHLY about 32 servings, as 1 cup has 16 Tablespoons (thank you Google!).

Monday, July 23, 2012

Like Healthier Hostess Cupcakes: Flourless Double Chocolate, Peanut Butter, & Banana Mini Muffins


I have, again, been remiss in posting as our family has been living out of suitcases for a month or so and then moved across a few states. Life is chaotic most days, but I recently found myself craving the need to bake in a new home surrounded by boxes. Therefore, I am doing the second best option and posting something decadent and healthy for those that are willing to brave the summer heat by turning on the oven....if you're not willing to turn your oven on yet, bookmark this recipe, because they are truly worth trying! Even the kids love them!

I cannot get over how these delicious mini-muffins don't taste like they have healthy ingredients!--Ok, except for the chocolate chips on top. The best part is, the blender/food processor does all the work for you. Here is the original recipe from Dashing Dish that also shows nutritional information. Thank you for such an awesome recipe, Katie! I have adapted the recipe to use DARK chocolate cocoa, semi-sweet mini chocolate chips, (these latter two ingredients make it 'double dark') and added flaxmeal (this affects fat content a bit). Feel free to try it with peanut butter chips instead if you prefer more of a peanut butter flavor. Or skip the chips and frost for healthier cupcakes. Either way, the banana and peanut flavors make for terrific pairing with the chocolate. My daughter thinks she's getting cake when these come out.

Oh guys.....I am in awe of how delicious these muffins are--we are calling them chocolate 'treats' in our house. They have the softness and texture of a cupcake. I have made them several times now...you will think you are cheating on your diet when eating these...we even took them on a picnic in the mountains last month. Here are some pictures of that glorious day where the mini-muffins were just part of the delights:


And here are the mini-muffins (or cupcakes) thawing out from our cooler:


Flourless Double Chocolate, Peanut Butter, and Banana Mini-Muffins


Adapted from www.dashingdish.com

Yield: 12 regular sized muffins or 24 mini-muffins


  • 1 ¾ cups old fashioned oats
  • 3 egg whites
  • ¾ cup cocoa powder (I use Hershey’s Special Dark Chocolate Cocoa)
  • 1 ½ bananas (this makes ½ cup mashed banana)
  • ½ cup plain, fat-free Greek yogurt
  • ½ tsp. vinegar (or ½ tsp. cream of tartar)
  • 1 ½ tsp. baking powder
  • 1 ½ tsp. baking soda
  • ¼ tsp. salt
  • 1 cup hot water
  • ½ cup baking stevia OR 1 cup sweetener of choice that measures like sugar (I like raw sugar)
  • 1 Tbsp. ground flaxseeds (also called ‘flaxmeal’)
  • ½ cup creamy peanut butter, ‘natural’ preferred
  • 1 cup semi-sweet mini-morsels (or more)

Preheat oven to 350 degrees.

Line a 24 cup mini muffin pans with silicone mini muffin liners, or spray muffin tin with non-stick cooking spray. OR, you can use one 12 cup regular muffin tin pan. Set aside. 

Place the peanut butter in a mug or microwave safe bowl, and microwave for 30-45 seconds, or until melted.

In a blender, (or food processor), mix all of the ingredients together. Blend until oats are ground and mixture is smooth. (The batter will be sort of liquid-y, but that’s ok!)

Divide batter between muffin tins. Sprinkle each muffin top with mini-chocolate chips, dividing them evenly.

Place muffin tin(s) in the oven and bake for 12-15 minutes, or until a toothpick comes out clean. 

Cool muffins before removing from pan. ENJOY!!!

Thursday, May 17, 2012

Individual Breakfasts: Baked Eggs In Tomato Sauce


I first saw this idea years ago in a Self Magazine. What a neat concept--individual baked eggs with sauce! We love them because they are easy, delicious, and 'recipe' is so versatile. It's not much of an 'exact' recipe, so your imagination is key. This breakfast requires only a few ingredients and they're usually things you have on hand: cheese, tomato sauce, and eggs. Then you can dress them up with whatever seasonings you want. These eggs are one of those perfect breakfasts to make when having guests over because ALL the eggs come out at once and you don't have to make them to order--yet, they are still customizable.

I have only made them with an 'Italian' flavor (as described below), but have yet to try them with salsa, cumin/chili powder, and a Mexican cheese blend instead. I can't imagine that wouldn't be good!

You will love these--play around with different cheeses--for a sophisticated breakfast, I bet Talegio, vodka sauce & rosemary would be a good combo with some crusty ciabatta :) While your eggs are baking, you can brew coffee, make hash browns, and cut up fruit. Breakfast can be ready in 30 minutes from start to finish.

By the way, I HAVE noticed that the type of egg you use, does make a difference as I have made these with both organic and non-organic eggs. The organic eggs tend to taste a bit better--too bad the price isn't better also!


INDIVIDUAL BAKED EGGS 

Yield: Servings vary-see below.

Preheat oven to 375 degrees.

Grease as many ramekins (4 oz or 6 oz) as you plan to have portions.

For each serving--layer in this order:

  • 3 tsp. pasta sauce (any flavor)
  • ~2 Tbsp. Mozzarella cheese or 2 tsp. Parmesan cheese, or a little of each (preferable)
  • 1/8-1/4 tsp. dried basil or Italian herbs
  • Salt & pepper, to taste

Bake them for less time (15-18 minutes) if you like your centers running--bake them longer (22-24 minutes) if you prefer your yolks hardened like us.

Serve with buttered toast :)

NOTE: It's easier to place all the ramekins on a baking sheet and take the baking sheet in and out, than take each ramekin out one by one.

Enjoy!

Wednesday, May 9, 2012

Mississippi Comeback Sauce: Y'all Come Back, Ya Hear?


A few weeks ago, on Easter, our sweet friends invited us to go down to their family farm. We had an AMAZING day with their wonderful, tight-knit family. And it got me thinking about Southern food and traditions now that we are moving. And I realized that I've come to love a lot of things about the South--so much so, that I feel more at home down here than I do back in a big city environment of the North. They're all about Faith, Family, & Football. LOVE that. Even if I'm still struggling with the last one.

Anyway, here's a lovely view from Slayden, Mississippi.


And a couple other things that made me smile:


Since it was Easter, the kids were lucky enough to dye some eggs. Here's another great love the South has cultivated in me--MASON JARS!


So, with Mississippi on the brain, I had to try this Southern sauce I had heard about--it's origin is unknown--some say it was invented by a restaurant chain (Outback Steakhouse, I think) and others believe it was created by a Greek immigrant after the second world war. Whoever made it up was onto something GENIUS because this sauce is simply DELICIOUS! It goes with everything...like a pumped up version of Thousand Island dressing, sweet, salty, tangy, and just a tad spicy. We loved it with grilled vegetables, bread, and fish. It was awesome as a dipping sauce for chicken fingers. It would be terrific as a salad dressing or drizzled onto a baked potato as well. Or use it as a sandwich condiment.

You'll find new uses for it, surely. And, you really will keep coming back for it!


One of the ingredients is chili sauce. You can use this Heinz kind, but I used this Nestle Maggi kind. Southerners love Duke's mayonnaise, but I perverted the recipe by using my favorite vegenaise--so delicious! The sauce will keep for a couple weeks. In a Mason jar, of course.


COMEBACK SAUCE
Adapted & loosely changed from Southern Living


·         1/2 cup mayonnaise 
·         1/4 cup olive oil
·         3 Tbsp. chili sauce
·         2 Tbsp. ketchup 
·         1 Tbsp. water
·         1 tsp. lemon juice
·         1 tsp. white wine vinegar (optional)
·         2 tsp. Worcestershire sauce
·         2 tsp. prepared mustard (I used yellow-but I think they mean Dijon or ground mustard)
·         1 tsp. coarsely ground pepper
·         Dash of paprika (I prefer smoked paprika)
·         Dash of hot sauce
·         1 small onion, minced or grated (or 1/2 a medium onion)
·         1 garlic clove, minced or grated


Mix all ingredients together. Store, covered, in refrigerator.

This stuff is FABULOUS on fish! (that's salmon below) And some other things too. Hope you'll give it a try!


And yes, we do grill bread--it's amazing! Spray it with olive oil, rub some garlic on it, and grill away!


Hope you guys like this sauce as much as we do--I served it to my visiting dad who couldn't get enough.

Monday, April 16, 2012

Banana, Chocolate Chip, and Granola Cookies


So, with two months left until we leave our house and downsize to less than half of what we have now....I've got a myriad of foods and odds and ends ingredients that need to be used up. Powdered sugar, lentils, Swiss cheese, dried papaya, dehydrated mushrooms, corn flakes, etc. In fact, I got really creative this weekend and made waffles from random pantry items: coconut oil, quinoa flakes, eggs leftover from Easter, leftover buttermilk, sorghum, cornstarch, etc. My family ate them and ate them again. While I watched silently. And enjoyed the smell of coconut in my house. And then decided to tackle more ingredients...like granola.

What's a person to do with leftover granola when they're burned out on parfaits? Well, I saw these cookies online and had to try them. They are VERY good. Moist...flavorful...quite the treat. Glad I stumbled upon the recipe so that I can have another use for bananas and granola. 

The recipe below is my adapted version: I used less sugar (and brown, not white), a not-so ripe banana (so the pieces didn't get smushed), a different granola, and totally upped the amount of chocolate chips--and felt I could have even used more! Delicious.


BANANA, CHOCOLATE-CHIP, AND GRANOLA COOKIES
Adapted from www.biggirlssmallkitchen.com

Makes 3-4 dozen
  • 1/2 cup light brown sugar, packed
  • 1/2 cup dark brown sugar, packed
  • 1 cup butter (2 sticks), softened
  • 1 egg
  • 2 ¼ cups all-purpose flour
  • 1 tsp. baking soda
  • ½ tsp. salt
  • 1 1/2 cups semi-sweet chocolate chunks (or chips)
  • 3/4 cup Cascadian Farms Maple-Brown Sugar Granola (I used Nature's Path Pumpkin Flax Plus)
  • 1 medium banana, cut into chunks

Preheat oven to 375°F.
Mix sugars and butter in a large bowl. With a mixer, hand-held beater, or very strong arm, beat until creamy. Then beat in the egg until the batter is fluffy and light.
Stir in flour, baking soda, and salt and mix until basically combined. Using a rubber spatula, fold in the chocolate chips and granola. Now fold in the banana, being careful not to smush the pieces too much.
Drop dough by rounded tablespoonfuls about 2 inches apart onto ungreased cookie sheet (yes, I did add some more chips on top!). Bake 6-8 minutes or until just barely set.
Cool for 5-10 minutes on the cookie sheet, then remove to a rack or a plate to finish cooling.

Sunday, April 15, 2012

BEST Tofu Sandwich Spread. Like A Fabulous Chicken Salad for Vegetarians.


I have been wanting to try this tofu sandwich spread recipe for years! Recently, my mother in law mentioned she had it at a relative's house and wanted to make it herself. That sealed it--she makes the best sandwich spreads.

We have been in an whirlwind of chaos with life lately and I haven't been in the kitchen as much as I'd like. This is part of the reason--been selling a house! And all the super not-fun stuff that goes with it....if another realtor never calls me again, it will be too soon.


In fact, after discussing this with my funny, honest girlfriends, I realized that the last thing I made for my family was veggie burgers (from a can!) and toppings for Costco frozen pizza--in addition to take out orders. Big fat FAIL in meal-planning. But hey, sometimes you just gotta survive (and let's be honest, I've never been a meal-planning kind of gal--that would require dirty discipline). But, finally this was something quick, easy, and do-able to make that could sort of make me feel like I'm providing for my family. Because I had to make up for the lemon split peas I made from this recipe that my daughter spit out and said, 'GROSS, MOM!' and for the last load of whites I turned pink. Check out the lint proof/shame--anyone else do this since college?


Anyway, we absolutely LOVED this spread! And I think even tofu haters would like eat this spread on a sandwich. It tastes a lot like chicken salad. I imagine it would be delicious served alone on a bed of lettuce for those who like to do low-carb diets, but I'm anxious to try it in a tortilla roll-up.  I think even your kids will eat it...mine was last seen happily munching this and watching Veggie Tales.

The recipe below has been modified based on reviews I read and personalized. What I found to be helpful:


  1. Plan ahead--because you will need to freeze the tofu overnight. Something amazing happens when tofu is frozen and thawed--the texture changes considerably--more crumbly. I love to use it in lasagnas after it's been frozen. 
  2. To make it vegan, use Grapeseed Vegenaise brand--you can find it at health food stores like Whole Foods. It's the best tasting mayonnaise I've ever had--you will not think 'vegan' when you have it in food. 
  3. I used low-sodium soy sauce, and ended up needing to use more than 2 Tbsp. So, keep this in mind if using low-sodium soy sauce. I have not used Bragg's Liquid Aminos, but it may be a good substitute for the soy sauce.
  4. This recipe is a great jumping off point for other add-ins. Feel free to add chopped fresh parsley or cilantro. Add curry powder if you prefer. I felt it absolutely necessary to use garlic powder. 
  5. I added a little extra lemon juice and some pepper. Taste for seasonings.


TOFU SANDWICH SPREAD
Adapted from allrecipes.com

Makes 4-6 sandwiches (depending on how much filling you use)

  • 1 lb. firm tofu (1 package)
  • 1 1/2 stalks celery, finely minced
  • 2-3 green onions, chopped (white and green parts)
  • 1/2 cup mayonnaise 
  • 2 Tbsp. soy sauce (maybe more if using low-sodium soy sauce)
  • 2 Tbsp. fresh lemon juice
  • 1/2 tsp. garlic powder
  • 1/4 tsp. cracked black pepper


Drain the block of tofu. Wrap it in saran wrap or put it in a ziplock bag and freeze the tofu overnight. Then thaw it out--it's best to leave it out wrapped in paper towels to absorb the excess moisture. Squeeze out any moisture by hand--you can cut it into quarters to make it easier to squeeze out each section.

When the tofu has been dried out as much as possible, crumble it into a medium-sized bowl.

Add celery and green onion to the tofu. Stir in the mayo, soy sauce, lemon juice, and other seasonings until well blended.

Store leftover sandwich spread in the refrigerator.

Enjoy!