Tuesday, April 26, 2011

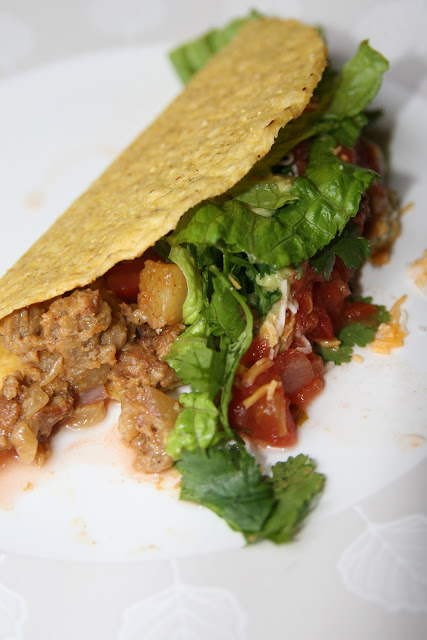
Potato & Veggie Sausage or Chorizo Crispy Dinner Tacos


Despite my picture....Yum, yum, yum, yum, yum, yum, yum. (Please understand that we don't get to eat dinner until 8 most nights, so the lighting is AWFUL and my pictures are thus awful!). They say necessity is the mother of invention. They are right. This has been dinner for a couple nights and it's a keeper. I like the variety from beans now and then...We even used a pre-made guacamole from Costco--it's not the greatest, but it's wonderful when mixed with a couple teaspoons of light sour cream, juice of one lime, some extra salt & pepper, and chopped cilantro. Then it's like a guacamole topping.

If I were making these for breakfast, I'd stir in a couple of whipped eggs in the last few minutes of the potato/onion mixture. Otherwise, these would make a delicious lunch or dinner. 


POTATO AND VEGGIE SAUSAGE OR CHORIZO CRISPY DINNER TACOS

Makes ~8 servings 

  • 1 large potato, peeled and diced small (or two smaller potatoes)
  • 1 large onion, diced and divided
  • ~1 cup water (read directions first)
  • salt and pepper to taste
  • 1/4 tsp. ground cumin
  • 1/2 tsp. chili powder
  • 3 cloves garlic, minced 
  • 4 Morningstar Farms brand sausage patties, crumbled (or 1 link of incased large soy chorizo--peel off the plastic wrap--try a Yves or a Trader Joe brand)
  • handful of cilantro, chopped
  • Crispy corn tortillas--the shaped stand-up ones (Trader Joe's makes great ones in a pack of 12)--you will probably use about 10 or so...depending on how much you fill them

 For taco toppings--use all or any you prefer:
  • salsa
  • sour cream
  • guacamole or chopped avocado
  • extra cilantro
  • shredded lettuce
  • diced tomato
  • olives
  • shredded cheese

In a large saucepan over medium heat, heat about a tablespoon of olive oil. Add potatoes and the diced onion and cook until lightly browned. Season with salt and pepper, spices, and minced garlic cloves. If needed, add water in 1/8-1/4 ounce increments so that it prevents the potatoes from sticking to the pan and also so that less fat is used. Cover with a lid--it will ensure quicker cooking. Cook for several minutes until the potatoes are fork tender.
Add the crumbled sausage patties OR soy chorizo to the pan and saute for a few minutes until the ingredients are hot and browned all over. Mix in the cilantro.

NOTES: vegetarian meat is pre-cooked and not raw like meat--so it's ok to add them in later (If you have never worked with soy chorizo before, you will need to cut off one end of the plastic casing and squeeze the "meat" out of it into your pan. It resembles ground taco meat and is orange/red in color.). If using real sausage, add it in much earlier so to ensure even and thorough cooking.

When everything is heated through, remove the mixture from heat. Spoon the potato/sausage or chorizo mixture onto warmed corn tortillas and top with salsa, guacamole, lettuce and extra cilantro, etc.

Serve warm. You will be very happy :)
Monday, April 18, 2011

Garlicky White Arugula Pizza With a Fantastic 30-Minute Pizza Crust


I'm in love...with a pizza. And I would like you to be too. There are worse things to be in love with for sure...but this pizza is simply DIVINE. Let's live a little and deviate from red sauce versions once in a while. The crust recipe below was loosely inspired from an allrecipes.com recipe--it's SUPER quick and easy to work with...the crust is crispy, chewy, and very flavorful. Seriously, you will LOVE this crust--you can make it the night before you make dinner. You may not want to share it...that's ok. By the way, I saw the topping on a Barefoot Contessa one time---but I did not look up her recipe. I'm giving credit where it's due though...

The only thing I might try next time we make this is to add some grilled chicken along with the cheese. I'm so glad I made a double recipe of this crust--because we are going to be having this garlicky white arugula pizza again for dinner--it's quickly becoming a favorite. (By the way, I don't trust people that don't like pizza...not liking chocolate is one insanity, but not liking pizza?! You may as well go through life with a straight jacket on....)

30 MINUTE EASY & FABULOUS PIZZA CRUST
  • 1/2 cup beer (warmed or room temperature)
  • 1/2 cup water (warm)
  • 1 (.25 oz) package active dry yeast (my package said 5/16 oz but it worked great in recipe!)
  • 1 tsp. sugar
  • 2 1/2 cups bread flour (OR, all purpose flour PLUS 2 tsp. vital wheat gluten)
  • 2 Tbsp. olive oil
  • 1 tsp. salt
  • 1 tsp. Italian seasoning
  • 1/4-1/2 tsp. garlic powder
  • Cornmeal (for dusting pan)
Preheat oven to 450 degrees F (230 degrees C).
In a medium bowl (or bowl of an electric mixer), dissolve yeast and sugar in the beer and warm water. Let stand until creamy, about 10 minutes.               
Stir in flour, salt and oil--as well as the Italian seasoning and garlic powder. Beat until smooth. Let rest for 5 minutes.

Turn dough out onto a lightly floured surface and pat or roll into a round. Transfer crust to a lightly greased pizza pan or baker's peel dusted with cornmeal.

Spread the crust with desired toppings and bake in preheated oven for 15 to 20 minutes, or until golden brown. Let baked pizza cool for 5 minutes before serving.      
        

GARLICKY WHITE ARUGULA PIZZA
  • 1 garlic clove, crushed
  • 1/8-1/4 cup olive oil
  • 1/4 tsp. crushed red pepper
  • 1/4 tsp. Italian seasoning
  • 3 slices provolone cheese
  • 1 cup shredded part-skim mozzarella cheese
  • 1/2 cup crumbled reduced fat-feta cheese
  • 1 recipe pizza dough
For topping:
  • 5 oz. baby arugula (washed and dried)
  • juice of half a lemon
  • 2-3 Tbsp. olive oil
  • salt & pepper, to taste

Preheat oven to 450 degrees. If you have a pizza stone, place it in the oven. If you don't have one, GET ONE.

In a small saucepan, over low heat, saute the garlic, crushed pepper, and Italian seasoning in the olive oil being careful not to burn the garlic. When the garlic starts to brown, turn off the flame.

Roll out pizza dough or press it out with your hands until it reaches a round of your liking (using hands is my favorite method). Brush the garlic olive oil over the crust. Place the provolone slices onto the crust (don't overlap). Sprinkle the feta cheese and mozzarella evenly over the pizza.

Gently pull out the oven rack with the pizza stone (if using) and gently sprinkle cornmeal onto the stone. Carefully transfer the pizza onto the cornmeal covered pizza stone (keep in mind the stone is HOT!).

Bake for approximately 15 minutes, or until cheese has melted and the crust is golden. Let cool a few minutes after removing it from the oven.

Meanwhile, while pizza is baking, toss together the arugula with the lemon juice, olive oil, salt and pepper.

Serve the pizza with the arugula salad on top. Heaven, folks, heaven!

Makes ~8 slices (how many that feeds is up to you).

Sunday, April 17, 2011

Minted Citrus Iced Tea


In preparation for the warm weather that is coming our way, I wanted to leave you all with a refreshing drink recipe. I first made a version of this a few years ago from a Better Homes & Gardens recipe. This week, while craving it, I could not locate that recipe, so I improvised and am happy with the result--preferring this honey version to the BH&G sugar version. If you're not a honey fan, try it with agave nectar. Or, you'll have to try it with a simple sugar syrup and find your own sweetness level (sorry). But try it with honey--haven't you read all the research that is coming out about local honey and the wonderful allergy relief?!

The craving for this minted citrus fruit tea started last weekend when we met my mother in law and our friends at one of my favorite lunch places in Nashville, Bread and Company. They make this amazing fruit tea that I used to stock up on whenever I have been in town for work over the last 8 years. I think my recipe comes really close to the B&C recipe. I LOVE LOVE LOVE it and prefer it to regular iced tea. If you like Arnold Palmers, you will love this. File it away for the hot days that are going to be upon us shortly....

I tried it with Tazo Zen Green Tea, but I like it equally well with orange pekoe black tea. Try making both versions and see which you prefer. It's going to go quick on hot day when you're taking a break from yard work....


MINTED CITRUS ICED TEA
  • 8 cups water
  • 8 black or green tea bags (orange pekoe is best, but flavored green teas are good too)
  • ~18 mint leaves or roughly about a 1/2 cup (washed)
  • 1 cup honey (local is preferred)
  • 3/4 cup freshly squeezed lemon juice
  • 1 1/2-2 cups orange juice (use a good quality brand or use freshly squeezed orange juice)
 Bring water to a boil. Add the tea bags and mint leaves; cover and let steep for 10 to 20 minutes. Remove tea bags and mint from the tea mixture.

Mix the warmed tea with honey in a 4-quart pitcher and stir well. Add the lemon and orange juices and stir.

Chill. Serve over ice. Garnish with mint leaves and/or lemon or orange slices, if desired.


Makes ~4 quarts. Should keep covered in the refrigerator for at least 1 week.

Saturday, April 16, 2011

The EASIEST & FASTEST Baked Cookies You Could Ever Make


I know what you're thinking...and yes, they do look like what you think they look like...believe me, it was NOT intentional. This is not some delayed Valentine's Day joke--it's a fun accident... First, a correction: the first easiest cookie you can bake is the one that comes in prepackaged dough. This is the second--from a cake mix...and it's really good! You can classify this recipe under 'redneck loves'...

The texture of these cookies was crispy, yet chewy at the same time. If you use a vanilla yellow cake mix (like I did), the cookies will taste buttery and finish with a full vanilla flavor. These cookies are crowd-pleasers. Make them anytime you are short on time, but are asked to bring something sweet to a social gathering.

CAKE MIX COOKIES
Adapted from the Duncan Hines website
  • 1 box ANY cake mix (I used vanilla yellow cake mix--but you could certainly use chocolate)
  • 2 eggs
  • 1/2 cup canola oil
  • ANY flavorings, nuts, chips, dried fruit, etc. (I used small peppermint patties pressed into dough before baking)

Add 1/2 cup oil and two eggs to one box of cake mix. Add chips, nuts, and flavorings if desired.

Drop by teaspoonfuls on a cookie sheet. Bake at 350 degrees for 10-12 minutes.
 
Makes ~36 cookies


Think about all the flavor possibilities!!! Almond flavoring and masaschino cherry halves, rum flavoring and chopped walnuts, orange zest and dried cranberries or chocolate chips, lemon zest and dried blueberries, etc., etc., etc....have fun with it!

Tuesday, April 12, 2011

Vegetarian Meatball Submarine Sandwiches

Too few people understand a really good sandwich. --James Beard


After some time at the beach and some really rich food...I know we are craving homemade cooking and fresh, healthier food--but I could not resist making a hearty sandwich for dinner. We loved it SO muchthat I had to share in case anyone else is looking for a dinner idea that pleases all ages. You don't need a fork for this dinner either. But get some napkins handy just in case.

You can make the vegetarian meatballs ahead of time--the meatballs themselves are vegan and if you use vegan cheese, this will make for a great vegan meal. There are a THOUSAND recipes for vegetarian meatballs and you can even use frozen meatballs, but I tried my own and they were very good--feel free to experiment with them. It's really hard to mess up using Morningstar Meal Starters.....You can find these products in the freezer section of your grocery store.

We served these hearty meatball sub sandwiches with pears, strawberries, and popcorn chips (yes, they're so good--get them at Costco!).


VEGETARIAN MEATBALL SUBMARINE SANDWICHES

Makes 3-4 big sandwiches or 6-8 half sandwiches

For the meatballs:
  • 1 (12 oz) pkg. Morningstar crumblers, defrosted
  • 3 green onions, chopped
  • 2 eggs
  • 1/3 cup bread crumbs (I used panko style)
  • 1 Tbsp. dried parsley
  • 1 clove garlic, minced
  • ~3 Tbsp. nutritional yeast (can be skipped if you don't have it)
  • 1 Tbsp. soy sauce (I used low sodium)
  • 1/4 tsp. ground cumin
  • 2 tsp. dried minced onions
  • 1/8 tsp. gound coriander seed
  • Lawry's seasoning salt & ground pepper, to taste--so, a few dashes of each
  • ~2 tsp. (or more) of flour (I used white whole wheat)
 To serve:
  • 3-4 whole wheat sub rolls
  • 6-8 slices of provolone cheese
  • ~1-2 cups marinara sauce of your choice
  • Italian seasoning (optional)

To make the meatballs: Preheat oven to 350 degrees. Mix all ingredients together. The flour is used more as a binding agent so if you feel you do not need it, you do not have to use it. Roll the meatball mixture out into meatballs--I wanted bigger meatballs, so I ended up with 13-14 meatballs. If you roll them smaller, you will end up with more meatballs.

Place them on a lined baking sheet and spray them with olive oil cooking spray. Bake for about 15 minutes and then try to flip them somewhat. Continue to bake them some more for about 8-10 more minutes. They should look crispy from the outside.

To assemble the sandwiches: Slowly heat the marinara sauce over the stovetop or in the microwave (remember to add a paper towel on top so the sauce doesn't splatter all over your microwave). Place 2 pieces of provolone cheese (can cut them in half to make it easier to lay into the sandwiches) into each sandwich--you may only want to use 1 piece for a half sandwich. Sprinkle with Italian seasoning, if desired. Broil until cheese melts and bread starts to get crispy and then take them out.

Spread the warmed marinara sauce on the other half of the bread (the one not covered with cheese) and lay your meatballs into the sandwich--you can reheat your meatballs in the microwave if they have cooled down. Serve open faced for the eater to close or close the sandwich on your own and serve.

Enjoy!! These sandwiches are marvelous and SO easy!

Monday, April 11, 2011

Quick Blackberry Jam with Agave Nectar


This is a small batch (one big jar or two smaller jars) jam. I made it right before we left for vacation and it is great to have for breakfast with toast (about the only things in our fridge now that we're back). There's something really wonderful about homemade jam...like the comfort of seeing your grandmother. Here's why you should try this recipe:
  1. It requires no special equipment besides a pot and a wooden spoon.
  2. It uses agave nectar which has been shown to be lower on the glycemic index, thus not raising blood sugar as much as white sugar (basically, sweetness without the sugar rush).
  3. It takes about 30 minutes.
  4. It will raise toast to new levels of greatness.
  5. You can mix a teaspoon or two of it in plain, fat-free yogurt and when you taste it you will think you are a genius.
  6. Kiss your regular peanut butter & jelly sandwiches goodbye--this will be way better than grape jelly!
  7. You can probably make this with blueberries, raspberries, or strawberries.
  8. When the in-laws come to visit, it will probably impress them when served with muffins or waffles. They can make believe they are at a bed & breakfast....with the grandkids. This should be reason #1, actually....
QUICK BLACKBERRY JAM WITH AGAVE NECTAR

  • 3 cups fresh blackberries, rinsed and patted dry
  • 3/4 cup agave nectar
  • **1 tsp. cornstarch
  • Juice of half a lemon
  • 2 tsp. spiced rum (optional--YES, the alcohol burns off. If you have creme de cassis, use that instead!)
  • 2 tsp. maple syrup (optional--but good)

In a medium cooking pot, over medium heat, stir the blackberries, agave nectar, AND maple syrup, if using. You can break up the berries (if you wish) with the back of a wooden spoon or spoonula.

Meanwhile, whisk together the cornstarch with the lemon juice and rum. Pour this mixture over the berry mixture and continue to stir the jam. Leave on the stove for approximately 30 minutes--mixing every few minutes.

The jam should be ready when it coats the sides of the pot and the spoon.

**If the texture is too runny, take out some of the liquid with a spoon and whisk it with a little more cornstarch and then add that mixture to the jam and continue to stir.

Friday, April 1, 2011

Blueberry Citrus Spelt Muffins

There is no secret about my love affair with Whole Foods muffins. Or Whole Foods for that matter...if I won the lottery, I'd only shop here. A girl can dream....

Maybe you're not thinking, 'what is spelt?'--but I certainly was when I eyed another strange flour in the Whole Foods bulk department. What, indeed, is spelt?! It is wheat. Used more commonly in Europe and apparently has found its place on the shelf  in health food markets along with other whole grain flours. And instead of boring you with science talk about it, here's a link you can use to learn more about it.

These muffins are definitely different than what I'm normally used to and I can't put my finger on it. I liked the texture. And aren't they pretty? We enjoyed them. If you are interested in trying something with spelt flour, give these a whirl. If you are interested in comparison baking between spelt flour and whole wheat flour, check out this really awesome blog post on it.


BLUEBERRY CITRUS SPELT MUFFINS


Makes 1 dozen muffins

The classic blueberry muffin gets an update with spelt flour and a flavor boost from orange juice and zest.
  • 4 tablespoons (1/2 stick) softened butter or canola oil (I used canola oil)
  • 2/3 cup sugar (I used 1/3 cup honey & 1/3 cup raw sugar)
  • 1/3 cup unsweetened applesauce
  • 2 eggs
  • 1/2 cup orange juice
  • 2 tsp. vanilla extract
  • 2 cups spelt flour
  • 2 tsp. baking powder
  • 1 tsp. grated orange zest
  • 1/4 tsp. salt
  • 2 cups fresh blueberries

 
Preheat oven to 375°F.

Butter a 12-cup muffin tin or line with paper muffin liners. In a large bowl, cream together butter or oil and sugar. Stir in applesauce, eggs, orange juice and vanilla.

 
In a second large bowl, whisk together flour, baking powder, zest and salt. Stir flour mixture into butter-egg mixture until just combined. Gently stir in blueberries.

Spoon batter into muffin cups and bake until a toothpick inserted in the center of a muffin comes out clean, about 30 minutes (but check to see a few minutes earlier).


(I had to bust out the Mexican pottery in anticipation for our next Mexican vacation. Also, sorry if I'm driving you crazy with too many muffin posts. I think I'm obsessed with trying a new muffin recipe every 6-8 weeks. They're the perfect vehicles for whole grain flour experiments and baked fruit/nuts PLUS breakfast on the go or afternoon snack with tea. Surely I can't be alone in muffin-love?!....)