Showing posts with label citrus. Show all posts

Wednesday, March 28, 2012

Old-Fashioned Blackberry Orange Cake (with or without Ground Almonds)


Now that spring is here and the weather has been so divine, it was about time to post something lovely and inspiring. And that's just what I find this old-fashioned orange-blackberry cake to be.

Thought I'd post some shots I took so far that have made us welcome spring:


There's something about this weather that makes a person want to be outside. So take this cake outside with your loved ones after dinner and enjoy the feel of warmer breezes, the sound of birds chirping, and the smell of new grass growing. And yeah, don't forget to bring the allergy medicine.


I have made this cake several times over the last few months and love it. It's particularly good in the morning too with a hot cup of coffee if you can stare out your window in silence for a few moments before the day's activities overwhelm you. This cake makes me nostalgic. It is a simple recipe that, again, reminds me of the kind of dessert my mother or grandmother would make that highlights the season's best fruits.

If you prefer lemon extract instead of orange, you could easily substitute that. Or replace the blackberries with raspberries. Or you could skip the raw sugar topping and make a glaze of powdered sugar and fresh orange or lemon juice to drizzle on top of the cooled cake--there are several possibilities.


OLD-FASHIONED BLACKBERRY ORANGE CAKE (WITH OPTIONAL GROUND ALMONDS)


Serves 6-8

  • 1 cup sugar
  • 1/2 cup butter
  • 2 eggs
  • 1 tsp. fresh orange zest (zest of about 1 orange)
  • 1 cup flour
  • 1 tsp. baking powder
  • 1/4 cup ground almonds (optional-but oh so good!)
  • 1 cup fresh blackberries (or slightly more)
  • 2 Tbsp. raw sugar, for sprinkling on top


Preheat oven to 350°F.


Combine sugar and butter, then beat for 3 minutes on medium-high speed with paddle. Add in the flour, baking powder, eggs and zest. Scrape bottom of mixing bowl, then continue to mix for 2 minutes at medium speed.

 
Pour this batter into greased and floured tart pan with removable bottom or cake pan with removable sides. Drop berries over the top of the cake as evenly as possible. Then, sprinkle the raw sugar over the berries.
 
Bake cake until it tests done in center or until the cake pulls from the side of the pan, about 50 to 60 minutes depending on oven.
 
Let cake cool for about 10 minutes in the pan and then gently loosen edges of removable tart pan. When cooled, lift from the bottom on the tart pan or simply un-mold the cake pan sides.
 
Dust with powdered sugar or brush with a light glaze of your choice. (totally optional!)
 
This is a delicious cake served with vanilla or blackberry ice-cream. Enjoy!


Tuesday, October 11, 2011

Orange Garlic Broccolini with Almonds


I wanted to share my new favorite vegetable--it's not exactly a NEW vegetable, just MY new favorite vegetable. I usually toss this with lemon juice, but on a whim, I tried orange juice and this vegetable was elevated from good to GREAT! I much prefer broccolini this to broccoli--more crunch, more mellowness.

 Broccolini is like broccoli's cousin. It's a cross between regular broccoli and Chinese kale. It's also been called 'baby broccoli' and all you need to know is that if it prepared right (basically, not overcooked), it is DELICIOUS. Unfortunately, it's slightly more expensive than broccoli for the same quantity. Most recipes call for broccolini to be blanched before sauteeing, but I don't know why. I skip that step and still seem to have success. If anyone knows why it is boiled or blanched first, please enlighten me.

When I told my mom about it (because any new creation gets blabbed to her or my aunt), she said, 'So it's like Chinese broccoli?'...well, not sure...but maybe if you added ginger? Try it and let me know. Or I might beat you to it...this was the first time my child actually request and ate anything related to broccoli in the last year so I will be making it again. And again. And again.


ORANGE GARLIC BROCCOLINI WITH ALMONDS


Serves ~4 as a side dish

  • 1 Tbsp. olive oil
  • 1 clove garlic, minced
  • 1 bunch broccolini, rinsed (stems trimmed)
  • 1 small orange, juiced
  • Salt & pepper, to taste
  • 1/4 cup (or slightly less) of sliced almonds

In a large saute pan, heat the olive oil. Add the garlic, broccolini, and orange juice. Season with salt and pepper. Saute for a few minutes until the broccolini is bright green. When the broccolini becomes bright green, add the almonds and toss together with the vegetables. Continue to cook for a minute longer and turn off the heat. (We like ours a little crunchy so cook longer if you prefer softer vegetables.)

Serve warm. Goes great with rice or potatoes and chicken or fish.

Saturday, October 1, 2011

Parmesan Chicken Picatta


I LOVE chicken picatta! And I think you will too. I had never made it before, but since I wanted to make something special now that my husband was coming home after a few weeks away in training, I decided to play around with my friend Nancy's chicken picatta recipe and Rachel Ray's recipe and this is what I came up with below. I didn't have fresh parsley (which I think is truly the traditional way to make it--but will try that next time), so I used dried parsley in the breading and it was very good). Also, Rachel Ray's recipe uses a lot more Parmesan cheese--but I chose to cut it down significantly and still feel you could taste the cheese in the final outcome. We really enjoyed this dinner and will definitely be making it again sometime soon.

Our dinner comprised of this chicken, cumin & chili roasted cauliflower (recipe to follow), lima beans, and a Harvest Grains blend by Trader Joe's (Israeli couscous blend--see below--very delicious!). You would probably do well to serve it with a salad and potatoes also. This is an awesome weeknight dinner that is still special enough to serve to company. YUM!

 
 (photo courtesy of 'food for conversation')


PARMESAN CHICKEN PICATTA

Serves 4

  • 3/4 - 1 cup panko bread crumbs (you may not need the whole cup)
  • 2-3 Tbsp. Parmesan cheese (freshly grated if you can get it)
  • 1 tsp. dried parsley
  • 4 chicken cutlets (mine were THIN cut and just under 1 pound total weight for all 4)
  • Salt & pepper
  • 3/4 - 1 cup all purpose flour (you may not need the whole cup)
  • 1 egg
  • 2 Tbsp. oil (I used a combination of olive oil and safflower oil)
  • 1/3 cup dry white wine (this means NOT a sweet white wine like Riesling)
  • 2 garlic cloves, minced
  • 1/2 cup chicken broth
  • 2-3 Tbsp. freshly squeezed lemon juice
  • 2 Tbsp. capers, drained
  • 1 or 2 Tbsp. butter
  • 1 lemon, sliced
  • Fresh parsley (can omit the dried if you have fresh)

In a small-medium sized container, mix the Panko bread crumbs with the dried parsley and Parmesan cheese. Set aside. Put your flour in another small-medium sized container. And lastly, in another container or bowl (about same size as the other two), whisk your egg.

Rinse cutlets (no need to pat dry).

Your first step will be to dredge cutlets through the flour. The second step will be to dip the cutlets in the egg and then press them into the Panko breadcrumb mixture. Set them aside.

Heat oil in a large saute pan and saute the cutlets for about 3 minutes on each side or until they are golden brown and cooked through (turn them over gently so as to not remove the breading). The thicker the cutlets, the more time they will need to cook--probably another 3-4 minutes (or more). Keep your eye on them and take them out when they get golden brown and are thoroughly cooked.

Set the cooked chicken breasts aside. At this point, I removed any burned bits inside the pan with a paper towel--but if you are comfortable doing so, leave them in.

Deglaze pan by pouring in the wine and garlic. My garlic was finely minced and cooked super fast, but it might take a minute or two until most of the liquid is evaporated and the garlic has cooked through.

Pour in the chicken broth, lemon juice, capers, butter, and lemon slices. Stir. When the butter has melted, return the cutlets to the pan and let them cook for another minute or two (careful when flipping them to leave the breading on).

Serve a cutlet on each plate. Evenly distribute any leftover sauce from the pan over each cutlet before serving. Serve with freshly chopped parsley on top of chicken (if you have it).

Serve warm.


We found this chicken to be salty, tangy, tender, slightly crispy, and basically all around delicious. Hope everyone else will enjoy it too!


Tuesday, August 30, 2011

Teresa Giudice's 'Amazing Arugula Salad'


Well, after some more horrific episodes of my guilty pleasure (Real Housewives of New Jersey)--aka, self-esteem check, I decided to try another one of Teresa's recipes. She made it on a morning talk show in Los Angelos. For a complicated woman, this was a super fast and easy salad. And not with a lot of 'ingredientses,' as she says. It is exactly the kind of salad we would make on a given weeknight with regular lettuce and a few more vegetables. This arugula version is wonderfully basic, goes with just about any entree, and makes for a refreshing side.

Try it with roasted tilapia and a mixed wild rice medley. I love it and had to share it with you guys. I'll be making it again and again and again. Did I mention it was healthy? Thanks, Teresa. Now please go make up with your family--your fighting is stressing me out.

AMAZING ARUGULA SALAD
Adapted from Fabulicious

Makes 4 servings
  • 2 Tbsp. freshly squeezed lemon juice
  • 3 Tbsp. extra-virgin olive oil
  • 1/4 cup freshly grated Parmigiano-Reggiano cheese
  • Salt, to taste 
  • 6 ounces baby arugula, washed and dried
  • 1 cup cherry or grape tomatoes, halved (I used 1 large tomato, diced)

Pour the lemon juice into a small bowl. Gradually whisk in the oil. Whisk in the Parmigiano cheese and season with salt.

Combine the arugula and tomatoes in a large bowl. Add the dressing and toss to coat. Serve immediately.

Monday, August 29, 2011

The South is Calling Again: Sweet Tea Icebox Tart


I may have become a Southerner....for the most part. Except for my disdain of humidity--any and all humidity. But that may be the thorn to the rose that is The South. When people hear me speak back in IL, they say I 'talk' like a Southerner. When they hear me speak in TN, they ask where I'm from. So a transplanted Southerner. My first boss down in Chattanooga told me he really liked me so he would call me his 'Yankee' instead of his 'damn Yankee.' Why, thank you. I guess. And living here in Memphis is a little bit of the South and a little bit of the North. No Steel Magnolias set-up here, but there is still a great deal of Southern history here. And they still love their sweet tea.


However, since I left the Midwest for the South (14 years ago), I have fallen in love with kudzu and Spanish moss, wrap-around porches, old Coca-Cola signs on barns, windy/hilly country roads, being greeted like a friend in small town shops, cotton fields, fried green tomatoes, the sound of cicadas at night, pick-up trucks, boiled peanuts off the side of the road, their comfort with shotguns, the way a Southern woman takes pride in her hair and make-up (my new blogging friend, Stephanie, claims the higher the hair, the closer to God), the miles of imperfect coastline, their love of SEC football, jukeboxes in diners, cheese grits, and bluegrass music.
  
Saw this in a local shop and realized I couldn't have said it better (click on it to enlarge if you can't read it):


And as you can see, tea is mentioned first. Sweet tea is a staple down here. And though I like it, I just can't drink it by the gallon like some we know (you know who you are!). I'm so humored to see the delight my brother has whenever he visits us and exclaims, 'yes! we can get sweet tea again!' So far, the best sweet tea I've had is from Ice-Cream & Coffee Beans in Spartanburg, SC (live here long enough and you'll find most good things come out of TN & SC--don't shoot me friends!). It's a strawberry flavor and since my sister in law gave it out as a wedding favor, I've been hooked. So, of course, we served it at our wedding too. If you find yourself in the Spartanburg area--make a stop!

Recently, Southern Living did an article on recipes using sweet tea. My transplanted Southern soul almost did a back-flip when I saw this tart recipe--couldn't get it out of my mind all summer. Finally, I made it and it is wonderful! My changes are in italics. Try it! We LOVED it--almost like a sweet tea version of key lime pie...can't wait to make it for my in-laws. And for my brother. And for my Northern peeps.

SWEET TEA ICEBOX TART
Adapted from Southern Living

Yield: SL says 12 servings, I say ~8-10

*For crust:
1 1/2 cups crushed gingersnap cookies
5 Tbsp. butter, melted (I found this too be WAY too much--I'd do 4 Tbsp. next time...maybe even 3 Tbsp.)
2 Tbsp. light brown sugar (I skipped this and didn't miss it at all)
1/4 tsp. ground cinnamon

For filling:
2 Tbsp. unsweetened instant iced tea mix (Lipton is a good brand)
2 Tbsp. water (I used lemon juice)
1 (14-oz.) can sweetened condensed milk (I used low-fat)
1/2 tsp. orange zest
1/2 tsp.  lime zest (I used lemon zest)
1/3 cup fresh orange juice
1/4 cup fresh lemon juice
2 large eggs, lightly beaten

For topping:
1 cup heavy cream
3 Tbsp. sugar

Topping Note: if you’re feeling extra lazy, you can use Cool Whip like I did—but I’m sure the real stuff is WAY better.

Garnishes: lemon or orange slices, fresh mint sprigs

To make crust: Stir together all ingredients. Press mixture into a 9-inch tart pan with removable bottom.

To make filling: Preheat oven to 350°. Stir together iced tea mix and 2 Tbsp. water (or lemon juice) in a large bowl. Whisk in sweetened condensed milk and next 5 ingredients until blended. Place gingersnap crust on a baking sheet; pour in milk mixture.

Bake at 350° for 20 to 25 minutes or just until filling is set. Cool completely on a wire rack (about 1 hour). Cover and chill 4 to 24 hours. Remove tart from pan, and place on a serving dish. 

To make topping: Beat cream and sugar at medium speed with an electric mixer until stiff peaks form. Pipe or dollop on top of tart; garnish, if desired.


*2 (4-oz.) packages ready-made mini graham cracker piecrusts may be substituted.

Note: You may also bake this tart in a 14- x 4-inch tart pan with removable bottom; increase bake time to 25 to 28 minutes or until filling is set.

Tuesday, August 2, 2011

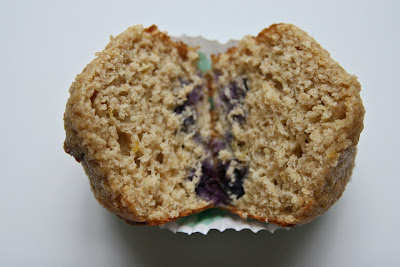
Muffin Mania (The Obsession Continues): Berry Oat Bran

I haven't posted anything in a while because we've been super busy! Also, I have had several of failures trying some new things: vegetable strata, peanut butter & banana muffins, corn fritter patties, etc. Sometimes it is disappointing to have high hopes & have a string of failures. But, without failing, how would you ever appreciate success? In the end, you find some gems....

I believe the world to be a muffin pan, and there certainly are a lot of muffins here. -Aaron Funk

Behold the modern muffin. It's not as sexy as the glazed donut, but it hasn't quite let itself go the way shredded wheat cereal has. It walks the tightrope between cupcake and cardboard. And when nibbled, the eater is torn between guilt and comfort. I get it. The muffin is my friend. Perhaps because I am a housewife. Perhaps because I have a muffin top. If you aren't perfecting your balancing skills, you may not appreciate this lowly little baked good. Maybe that is why I post so much on them--I'm championing the appreciation of the AVERAGE.


Well, the following are more than average to me  and quite DELICIOUS. I love love love them. Probably because I feel closer to comfort than guilt when eating them--they have only 2 Tbsp. of oil for a dozen and made with fat free Greek yogurt and whole grain oat bran (LOVE the crunchy, nutty, chewiness of this grain). So, now you're thinking...'oat bran'? What is 'oat bran?'  It is the outer husk of the oat grain. It has the most dietary fiber and nutrients of oats. (Keep in mind fiber helps you feel 'full' and is an important tool in weight loss.) Oat bran looks like this (photo from Google):

You can find oat bran in the bulk food section of natural food health stores. But recently, while on the hunt for mason jars (random), I found a bag of Bob's Red Mill Oat Bran for $2 at Big Lots (I know you're thinking I'm so classy right now):

I have made the muffins three times in the last month (yes, I definitely share with others). And enjoyed them just as much with fresh raspberries and almonds as with fresh blueberries and lemon zest. And they come out lighter in color than a lot of whole grain muffins. So you can still feel like you're cheating.

BLUEBERRY OAT BRAN YOGURT MUFFINS
Adapted from www.chocolateandzucchini.com

Makes one dozen muffins
·         1 cup oat bran (apparently wheat bran may be substituted--but your muffin will come out darker)
·         1 cup flour (I used whole wheat pastry flour)
·         1 tsp. baking powder
·         1/2 tsp. baking soda
·         ~1/4 tsp. salt
·         1/2 cup unrefined cane sugar (or regular sugar)
·         1 cup blueberries (no need to thaw them if frozen)
·         1 cup plain yogurt (apparently buttermilk can be substituted--but I use Greek fat-free yogurt)
·         2 Tbsp. vegetable oil (I used some nut oils with great success, but apparently sunflower oil works well too—if you have it)
·         1 tsp. pure vanilla extract
·         *2 eggs, at room temperature


Preheat the oven to 360°F and line a muffin pan with paper liners.

In a large mixing bowl, whisk together the bran, flour, baking powder, baking soda, salt, and sugar, until no lump remains. Add the blueberries and toss gently to combine.

In another bowl, whisk together the yogurt, oil, vanilla, and eggs. Pour this mixture into the dry ingredients, and fold it in gently with a spatula until no trace of flour remains. The mixture will be lumpy, but resist overmixing.
Pour the batter into the prepared muffin tray, filling each muffin mold by about three quarters (apparently to minimize the mess, but I fill them all as equal as I can until I use up all the batter & I have no problems with spillage). Bake for 12 to 16 minutes, until set and golden.

Serve slightly warm or at room temperature. (I store them in the refrigerator and before I eat it, I pop it in the microwave for 15 seconds--makes all the difference!)

*I have a trick for this--because I don't have time for my eggs to get to room temperature since I don't always plan ahead, I put really hot tap water in a bowl and set my eggs in there while I measure out the dry ingredients and take them out to crack when I'm ready to use them.


I love you little guy! (as my 2 year old daughter says)


For a Raspberry-Almond Oat Bran Muffin (really delicious), substiute raspberries for blueberries and add ~3/4 cup of sliced almonds to the batter with the raspberries. Otherwise all ingredients and directions remain the same.


I just added a few almonds slices to the top--I think using just two slices to make a heart would be wonderful for Valentine's Day.

Friday, June 24, 2011

Mediterrean Lentil Salad


Now that the heat is here, I like whole grain summer salads for quick meals. I found this recipe on allrecipes.com, but changed it up a bit to suit my needs--for instance, less fat, the addition of a tomato, and since I didn't have fresh parsley, I added dried parsley to the lentils cooking and then used fresh mint and basil to mix in at the end. I also liked the addition of a little bit of cheese--just a bit takes it over the top. I'm sure you can substitute the feta for Parmesan or another cheese and it will be amazing. Or, skip the cheese for a vegan meal.

This earthy salad is very delicious and filling. It would make a wonderful meal to take to work or as an addition to a picnic. The salad travels well, and if you don't use the cheese, you can leave it out for several hours without fear that it will spoil or 'go bad.' I really enjoyed it the texture of the lentils, the tartness of the lemon, and the intense flavor of the fresh herbs. It's also a great way to squeeze in some vegetables!

MEDITERRANEAN LENTIL SALAD
Adapted from www.allrecipes.com

Serves 8
  • 1 cup dry brown lentils
  • 1 cup diced carrots (~2.5 carrots)
  • 1 cup red onion, diced (about 1 red onion)
  • 1 tomato, diced
  • 2 cloves garlic, minced
  • 1 bay leaf
  • 1/2 tsp. dried thyme
  • 2 Tbsp. lemon juice (I used the zest too)
  • 1/2 cup diced celery (about 1.5 stalks)
  • *1/4 cup chopped parsley (or 1/2 tsp. dried that you can add to the lentils during cooking-see note below)
  • 1 tsp. salt
  • 1/4 tsp. ground black pepper
  • 1/4 cup olive oil (I used less)
  • 1/4-1/3 cup reduced fat feta, crumbled or grated (optional)

In a saucepan combine lentils, carrots, onion, tomato, garlic, bay leaf, and thyme. Add enough water to cover by 1 inch (this was about 3-4 cups for me).

Bring to boil, reduce heat and simmer uncovered for 15 to 20 minutes or until lentils are tender but not mushy. (I needed to boil my lentils for about 8-10 minutes longer to get the right tenderness in the lentils)              

Drain lentils and vegetables and remove bay leaf. In a medium sized bowl, add olive oil, lemon juice, celery, parsley (or any other fresh herbs of your choice-see note below), salt and pepper to the lentils. Then add the feta, if using. Toss all the ingredients together and serve at room temperature.               

*One handful of chopped herbs--a combination of mint, basil, and parsley is particularly delicious

Sunday, April 17, 2011

Minted Citrus Iced Tea


In preparation for the warm weather that is coming our way, I wanted to leave you all with a refreshing drink recipe. I first made a version of this a few years ago from a Better Homes & Gardens recipe. This week, while craving it, I could not locate that recipe, so I improvised and am happy with the result--preferring this honey version to the BH&G sugar version. If you're not a honey fan, try it with agave nectar. Or, you'll have to try it with a simple sugar syrup and find your own sweetness level (sorry). But try it with honey--haven't you read all the research that is coming out about local honey and the wonderful allergy relief?!

The craving for this minted citrus fruit tea started last weekend when we met my mother in law and our friends at one of my favorite lunch places in Nashville, Bread and Company. They make this amazing fruit tea that I used to stock up on whenever I have been in town for work over the last 8 years. I think my recipe comes really close to the B&C recipe. I LOVE LOVE LOVE it and prefer it to regular iced tea. If you like Arnold Palmers, you will love this. File it away for the hot days that are going to be upon us shortly....

I tried it with Tazo Zen Green Tea, but I like it equally well with orange pekoe black tea. Try making both versions and see which you prefer. It's going to go quick on hot day when you're taking a break from yard work....


MINTED CITRUS ICED TEA
  • 8 cups water
  • 8 black or green tea bags (orange pekoe is best, but flavored green teas are good too)
  • ~18 mint leaves or roughly about a 1/2 cup (washed)
  • 1 cup honey (local is preferred)
  • 3/4 cup freshly squeezed lemon juice
  • 1 1/2-2 cups orange juice (use a good quality brand or use freshly squeezed orange juice)
 Bring water to a boil. Add the tea bags and mint leaves; cover and let steep for 10 to 20 minutes. Remove tea bags and mint from the tea mixture.

Mix the warmed tea with honey in a 4-quart pitcher and stir well. Add the lemon and orange juices and stir.

Chill. Serve over ice. Garnish with mint leaves and/or lemon or orange slices, if desired.


Makes ~4 quarts. Should keep covered in the refrigerator for at least 1 week.

Friday, April 1, 2011

Blueberry Citrus Spelt Muffins

There is no secret about my love affair with Whole Foods muffins. Or Whole Foods for that matter...if I won the lottery, I'd only shop here. A girl can dream....

Maybe you're not thinking, 'what is spelt?'--but I certainly was when I eyed another strange flour in the Whole Foods bulk department. What, indeed, is spelt?! It is wheat. Used more commonly in Europe and apparently has found its place on the shelf  in health food markets along with other whole grain flours. And instead of boring you with science talk about it, here's a link you can use to learn more about it.

These muffins are definitely different than what I'm normally used to and I can't put my finger on it. I liked the texture. And aren't they pretty? We enjoyed them. If you are interested in trying something with spelt flour, give these a whirl. If you are interested in comparison baking between spelt flour and whole wheat flour, check out this really awesome blog post on it.


BLUEBERRY CITRUS SPELT MUFFINS


Makes 1 dozen muffins

The classic blueberry muffin gets an update with spelt flour and a flavor boost from orange juice and zest.
  • 4 tablespoons (1/2 stick) softened butter or canola oil (I used canola oil)
  • 2/3 cup sugar (I used 1/3 cup honey & 1/3 cup raw sugar)
  • 1/3 cup unsweetened applesauce
  • 2 eggs
  • 1/2 cup orange juice
  • 2 tsp. vanilla extract
  • 2 cups spelt flour
  • 2 tsp. baking powder
  • 1 tsp. grated orange zest
  • 1/4 tsp. salt
  • 2 cups fresh blueberries

 
Preheat oven to 375°F.

Butter a 12-cup muffin tin or line with paper muffin liners. In a large bowl, cream together butter or oil and sugar. Stir in applesauce, eggs, orange juice and vanilla.

 
In a second large bowl, whisk together flour, baking powder, zest and salt. Stir flour mixture into butter-egg mixture until just combined. Gently stir in blueberries.

Spoon batter into muffin cups and bake until a toothpick inserted in the center of a muffin comes out clean, about 30 minutes (but check to see a few minutes earlier).


(I had to bust out the Mexican pottery in anticipation for our next Mexican vacation. Also, sorry if I'm driving you crazy with too many muffin posts. I think I'm obsessed with trying a new muffin recipe every 6-8 weeks. They're the perfect vehicles for whole grain flour experiments and baked fruit/nuts PLUS breakfast on the go or afternoon snack with tea. Surely I can't be alone in muffin-love?!....)

Sunday, March 20, 2011

Simple Strawberry-Mint Sorbet

Ice-cream, eat your heart out and make room for something lighter: strawberry mint sorbet!!

Thanks to Brooke at http://www.bakingwithbasil.com/ for the inspiration on making sorbet. It's as if she was reading my mind...I have clipped about 5 sorbet recipes and when I saw her post on mango sorbet, I had to jump on the bandwagon. So, I threw away all my other versions with sugar and decided to try the sorbet with agave nectar--brillliant idea!

This dessert will make use of the strawberries that are almost in season. It's fat free, smooth, icy, and wonderfully delicious! The mint also adds a superb cooling element (VERY essential to us since our air conditioning went out and we are having 80+ degree weather in March--I know, can't really complain...yet...). I'll have to try Brooke's mango-lime version sometime--right after pineapple-mint. And maybe even try it in the ice-cream maker to compare texture.

Either way, try this sorbet--it's so EASY! You won't even feel guilty giving it to your kids...I think.


STRAWBERRY-MINT SORBET
  • 4 cups strawberries, rinsed, hulled, and chopped (or 32 oz. frozen strawberries)
  • 1/4-1/2 cup freshly squeezed lemon or lime juice (I used 1/3 cup lemon juice)
  • 1/2 cup agave nectar
  • 1 small handful of fresh mint, rinsed (about 1/4 cup)
If using frozen strawberries, let them thaw for a few minutes. If using fresh strawberries, freeze them for a couple hours.

In a blender, add the agave nectar, citrus juice, strawberries, and mint; puree until smooth. You can add more lemon/lime juice or water if you need to thin it down enough for the food processor to do its job.

Place the strawberry-mint puree in a shallow pan or bowl (I used an 11 X 8 inch glass pan).

Freeze for about 45-60 minutes and try to stir the strawberry mint puree every 15 minutes or until you are ready to serve it.

Makes about 5-6 portions (possibly 4, if you're restrained).

Saturday, March 19, 2011

Vegetable Ceviche


Sometimes eating vegetarian is just dreamy. Try this recipe and I think you you will agree. This dish is great for days when it's too hot outside to turn on your oven.

Last May, my husband and I vacationed in Cabo San Lucas. We had a great time and decided to celebrate our anniversary dinner a little early at a posh restaurant with NO menu. It was a 7 course meal and the chef was informed of any exclusions in our diet. So when the first course came out as sea bass ceviche, I was a deer in headlights--here was RAW fish. (By the way, here's the scoop on ceviche.) Even when I do eat meat, I don't want to see blood on the plate and I certainly didn't expect raw fish outside of a sushi roll. One would say, I am limited. But one would be wrong--because I ate that raw fish and it was fantastic! Needless to say, the rest of the meal was one of the most amazing culinary experiences we have ever had.

And now that spring is here again, I have been dreaming of that ceviche and wondering how to make a vegetarian option. The result below is very, very good. And incredibly healthy. I ate about half the recipe by myself. But, it would make a great starter option or even as a side dish to grilled fish.

Next time I make this, I will try it with bell pepper and serve it on a lettuce bed with pita chips. It's almost like salsa (is what you're thinking.....)


VEGETABLE CEVICHE

Makes approximately 4 cups (Can probably serve 4-6 as a small starter)
  • 1 can (14 oz) artichoke hearts, drained and roughly chopped
  • 1/3 pound (about 6 ounces) of mushrooms, cleaned and chopped
  • 1 large tomato, slightly drained or 1 cup sliced grape tomatoes
  • 1/2 red onion, diced (or 1/3 cup scallions, chopped)
  • 1 large clove garlic, crushed
  • 1/4 cup lime or lemon juice (I juiced only half a lemon & it was enough)
  • 2 Tbsp. olive oil
  • Salt & pepper to taste
  • 1 avocado, peeled, pitted and chopped
In a medium bowl, combine all ingredients EXCEPT for the avocado. Cover and refrigerate for at least 30 minutes. When thoroughly chilled, stir in avocados. Taste and adjust seasonings, if necessary.

Serve cold and with pita chips.

Friday, March 4, 2011

Crispy Black Bean Tacos with Feta & Cabbage Slaw


A wonderful thing happened to me. Because of Facebook, I got reacquainted with an old classmate--former pastry chef & friend extraordinaire, Julie. I have never forgotten my sweet friend and now we talk about motherhood and recipes instead of boys and Banana Republic. Anyway, long story short--she sent me this amazing recipe that she makes for her family--this should go in your 'what are we having for dinner?' file ASAP (Julie, please send me more-this recipe was UNBELIEVABLY GOOD!).

These black bean tacos with cabbage slaw & feta are relatively fast, cheap, and healthy. Plus, you won't miss the meat. Serve with Spanish rice if you want. Easily double or quadrulple the recipe for more people. Really, this is one of my most favorite meals--love, love, love it!
(By the way, I tried them with regular queso/Mexican cheese and feta and the feta won out in the taste department--it may sound strange, but it works beautifully!)


CRISPY BLACK BEAN TACOS WITH FETA & CABBAGE SLAW
Adapted from Smitten Kitchen & Une-Deux Senses

Yields: 6 tacos, 2 servings

For the black beans:
  • 1 (15 oz.) can black beans, drained
  • 1/2 a small onion, thinly sliced
  • 2 garlic cloves, thinly sliced (or chopped however)
  • 1/2 tsp. ground cumin
  • salt and freshly ground black pepper, to taste
 For the cabbage slaw:
  • 2 tsp. olive oil (I skipped this & didn't miss it)
  • 1 Tbsp. freshly squeezed lime juice
  • *2 cups coleslaw mix
  • 2 green onions, chopped
  • 1/3 cup cilantro, chopped
  • 1 Tbsp. mayonnaise or sour cream (optional)
  • salt and freshly ground black pepper, to taste (try a smoked salt for a real punch of flavor!)
 For the tacos:
  • 2 Tbsp. olive oil
  • 6 corn OR flour tortillas
  • ~1/3-1/2 cup crumbled feta cheese (reduced fat is fine!)
  • Hot sauce, for serving (optional)
 To make the bean mixture: In a medium pan, heat the oil over medium-high heat. Once hot, add the onion and garlic and saute until translucent, about 3 minutes. Add the black beans, cumin, and salt and pepper to taste. Use a fork to slightly mash the beans and cook until heated through, about 3 minutes.

To make the cabbage slaw: Mix 2 tsp. of olive oil and lime juice in a medium bowl. Add the coleslaw, green onions, cilantro and toss to coat. If desired, you can also add the sour cream/mayonnaise for a creamier slaw. Season with salt and pepper, to taste.

For tortillas: Heat 1 tsp. of olive oil in a large nonstick skillet over medium heat (I used cooking spray--but keep your vent on). Add three tortillas in a single layer. Once golden brown, flip, then spoon 1/4 of the bean mixture onto each tortilla and cook for 1 minute or until golden brown. Repeat with the remaining tsp. of oil (or cooking spray) and tortillas.

To serve: Fill the tacos with feta and slaw. Serve with hot sauce, lime wedges and sour cream.


*To make your own cabbage slaw mix: combine equal parts of shredded green & purple cabbage--(adding shredded carrots or radishes is totally optional).

Sunday, October 17, 2010

Something to Write Home About: Lemon Ricotta Cornmeal Waffles


I'm a  waffle girl. If given a choice between waffles and pancakes, it's waffles everytime and twice on Sunday. All those little grooves to get syrup in...the crispy outside that only soften with syrup--but not enough to get soggy....yum!! I like this particular recipe because the cornmeal adds another crispy dimension--I sort of combined several recipes to make it my own. We have visiting friends and the waffles were a HUGE, HUGE hit.

I imagine these would be great to feed a big group if you doubled or tripled the recipe. The great thing about waffles is that they can be made ahead and reheated directly on an oven rack at about 350 degrees until heated through.


LEMON RICOTTA CORNMEAL WAFFLES

1 1/2 cups flour (I have not tried whole-grain yet, but figured cornmeal was enough whole-grain)
1/2 cup cornmeal
2 1/2 tsp baking powder
1/2 tsp baking soda
1/2 tsp salt
1 cup part-skim ricotta (no need to drain)
2 eggs
1 egg white
4 tablespoons melted light butter
1 cup fat-free yogurt (plain or vanilla flavored-I used Greek style vanilla flavored)
1/4 cup skim milk
Zest of one lemon

Combine the dry ingredients in a bowl. In another medium sized bowl, combine the wet ingredients and lemon zest. Add the dry ingredients to the wet mixture and combine until just smooth (don’t over mix).

Bake the waffles in a waffle maker till golden brown. Serve with pure maple syrup.

Served 4 very hungry people (and 2 babies)--we also had Morningstar sausage patties, coffee au laits, and fruit. Here they are with peach-strawberry syrup:


Leftover waffles freeze beautifully; just re-crisp in a toaster or toaster oven before serving.