Thursday, December 30, 2010

Pop On Over for Popovers


But you should probably call first...to make sure we're presentable. Not necessarily a given at this home.

Since my husband got home from work sometime during the wee hours of the morning, I felt like he should be rewarded in some small way, but was also itching to dust off the popover pans (an impulsive buy from my I-have-a-real-job days). If any of you want an idea for a special breakfast during a holiday weekend, try these light, hollow rolls made from an egg batter. 

With the exception of the baking time, these popovers are relatively easy and require very few ingredients. I believe you can use a muffin pan to make them, but I cannot speak about those results since I have never tried it. The best part: the batter can be made up to 4 days ahead and stored covered in the fridge until ready to use (just remix prior to using).

They are called 'popovers' because of how the batter 'pops' over the the baking tins while they are baking--and are apparently of American origin, but related to the English's Yorkshire pudding. Popovers have a crisp outside and a soft, chewy inside. These below can be made savory or sweet. We like to serve them with butter and jam, but you can dust them with powdered sugar too.

Here is my first tried and true recipe attempt I found on Amazon years ago with standard white flour. The article will tell you about pan substitutions, if you are interested. Below is my version (through my pseudo 'healthification' process--possibly called 'recipe perversion' by purists). They're still fantastic tasting--and best straight out of the oven.

You can double the recipe (to make twelve) and freeze the popovers that you don't eat.*


POPOVERS

Makes only 6 in a popover pan (recipe can be doubled)

1 cup whole milk (or 3/4 cup skim milk and 1/4 heavy cream)
2 extra large eggs or 2 large eggs + 1 egg white (or eggbeaters)
1.5 Tbsp. light butter, melted
1/4 tsp. salt
1/2 cup whole wheat pastry flour
1/2 cup all purpose flour

Place your ungreased popover pan(s) (or muffin pan) into oven. Preheat oven to 450 degrees. Your pans will heat while you prepare the batter.

In a blender (don't ask me why I do it this way, I just do), puree the milk, eggs, salt, and melted butter. Add the flour(s) and blend JUST until ingredients are mixed.

Remove the hot pan(s) from oven. Lightly grease with butter-flavored cooking spray.

Fill each cup about halfway full with batter. Bake WITHOUT opening oven door for 18-20 minutes (until pale golden). Lower heat to 350 degrees and continue to bake until they are 'rich brown' in color--anywhere from 10-15 minutes (in my experience).

Serve warm.

*As noted in Amazon.com article, frozen popovers can be warmed in 325 degree oven until heated through, about 5-10 minutes.

Wednesday, December 29, 2010

Stuffed Mushrooms (with Soy Chorizo and Cheese)


Even your vegetarian friends will like this recipe...that's how good they were. You can probably make them with real chorizo (just cook longer), but if you use vegetarian soy chorizo, you don't even have to tell them the mushrooms don't have meat (I know, SO mean!). These mushrooms are savory, sweet, and smoky.

In a desperate attempt to use both leftover mushroooms & some soy chorizo I impulsively purchased, this was my solution--stuffed mushrooms. I first saw something similar at Trader Joe's (on a handout), but theirs did not have onion, seasonings, or bread crumbs & they pureed the filling. I think we had them done in 30 minutes from first chop to out of oven. You can find soy chorizo at most grocery stores these days--either in the refrigerated produce section or the 'health food' section of a traditional grocery store (probably Yves brand). Whole Foods & Trader Joe's both sell soy chorizo.

Just a tip-you can make a double batch of the filling and freeze it for later use and that way you can use an entire block of cream cheese and all of the soy chorizo package so you are not stuck with leftover ingredients. I hate it when that happens to me! The filling should last a couple months in the freezer.

SOY CHORIZO & CHEESE STUFFED MUSHROOMS

1 Tbsp. olive oil
1 small onion or half a big onion, chopped
20 oz. baby bella mushrooms (larger-sized mushrooms make stuffing them easier)-about 18-22 mushrooms
6 oz. soy chorizo, casing removed (half of one package)
1/2 tsp. dried parsley or about 1/4 cup fresh parsley, chopped
1/2 tsp. garlic powder
salt & pepper, to taste (probably about 1/2 tsp. each)
2-4 oz cream cheese, at room temperature (your choice on how creamy you want them)
1/3 cup grated Parmesan or Romano cheese
1 egg
1/2 cup bread crumbs (I used Panko-the crispy Japanese kind)

Preheat oven to 375 degrees F.

Clean the mushrooms by brushing off any dirt from the caps. Chop the stems and set aside.

In a medium saute pan (frying pan), heat oil and saute onion until softened (a few minutes). And since I'm a one-pan-girl, add the mushroom stems and saute for a bit longer. Then add your chorizo and break up with a spatula. Leave on heat for a minute or two and then add the rest of your ingredients. Turn off the heat and mix everything well. The cream cheese will melt into the hot filling. If you like your mushroom filling really pureed, you can add this mixture to a food processor and then use it to fill your mushrooms. (I am not that person because I don't want to add one more step and have more dishes to clean.)

Using a teaspoon, place filling into each mushroom cap. (Now, most recipes will tell you to be careful not to overfill and that the filling should be about even with sides of mushroom and not overflowing. As you can see from my pictures, I piled it on high and disregarded traditional instructions.) Place mushrooms in a baking dish or sheet pan.

Bake for approximately 20 minutes, or until mushrooms have softened (they will release some of their liquids and appear 'wet' at their base as well as darken in color-this is TOTALLY NORMAL), and filling is bubbly. Serve hot.

Yield: Will serve about 8-10 as an appetizer (no promises-that would give each person about two), but you can probably serve about 6 people if you were to make them your main entree.

Saturday, December 25, 2010

What Santa Ate Last Night: Peppermint Bark Chocolate Fudge Cookies


These are AMAZING!!!!!!!!!!!!!! Your taste buds will click heels in joy :) What a wonderful idea to use brownie mix--really cuts down on time! We've all decided this is definitely going to be a family favorite recipe that we're going to make continually at Christmas time.

SOME NOTES on what I've learned making this recipe: The original recipe calls for 2 Tbsp. flour, but we felt that the dough was very liquid-y & could maybe use another tablespoon of flour. Also, our family likes to use salted butter because the bark is sweet & the mix is sweet and the combination could be too much sugar. We made the mistake (possibly) of using extra large eggs...not sure if that made the cookies spread thinner than I'm used to. Next time I make these, I will chill the dough before baking to see if that makes a difference--if you try it, let me know how it works for you.

PEPPERMINT BARK CHOCOLATE FUDGE COOKIES
adapted from Costco Connection

1 (20 ounce) bag of brownie mix (I highly recommend Ghiradelli brand)
8 Tbsp. salted butter (1 stick), melted
2-3 Tbsp. all-purpose flour
2 large eggs
2-2 1/2 cups finely chopped peppermint bark (about 1/4 inch pieces)--divided in half

Preheat oven to 350 degrees. Grease 2 cookie sheets (or use a silpat) and set aside.

In a large mixing bowl, mix the melted butter with the brownie mix, flour, and eggs until the ingredients are just mixed (30-60 seconds---haha! Who really times these things?!). Gently stir in 1 1/4 cup of peppermint bark into the batter (this is half the total amount needed for recipe). Consider chilling the batter for about 15 minutes at this point.
Using a small scoop or spoon, drop cookie dough by generous tablespoons or 1-inch balls about 2 inches apart on the cookie sheets. Press a heaping 1/2 tsp. of the remaining peppermint bark into the top of each cookie.

Place the baking sheets one at a time into the oven and bake for about 10 minutes. Remove from the oven when done and let the cookies cool on the pan for about 2-3 minutes. Gently transfer the cookies onto another surface (or wire racks) to cool.

Serve warm or let cool 20 minutes before storing.

Makes about 4 dozen cookies.


Tuesday, December 21, 2010

Quick Dinner: Potato-Corn-Lima Bean Chowder & Spinach Cheddar Rolls


If you have 30-45 minutes, try this delicious and comforting meal. Created when I was in a jam: My husband was going to be home in less than an hour and my daughter needed to be fed...desperate to get dinner made fast, I was inspired by a Southern Living corn and potato chowder recipe--yet changed it up to make it healthier by using fat free half and half and adding creamy, but healthy, lima beans. Also, it seemed to crave a 'bacon' flavor and the rolls below seemed to be perfect with the soup (and used up my spinach!).

POTATO CORN LIMA BEAN CHOWDER
Makes 4 servings

~1 tsp. olive oil
1 onion, chopped
2 potatoes, diced (I used gold or 'Yukon')
1 1/2-2 cups water
1 tsp. seasoning (such as 'Old Bay')
2 cups frozen corn
2 cups frozen lima beans
1 small green bell pepper, diced
1 Tbsp. dried parsley, or 1/4 cup chopped fresh parsley
~3/4 tsp. salt
~1/8 tsp. pepper
1 cup half and half (fat free is fine)
3 Tbsp. bacon-flavored bits (such as Betty Crocker Bacon Bits)

To serve (OPTIONAL):
Green onions, chopped
Shredded cheese--your choice on what kind (about 1/2 cup)

Heat olive oil in a dutch oven or medium sized soup pot on medium-high heat. Saute onion and potato for about 5 minutes. Raise heat to high. Add water if the potatoes or onion start to stick to the pot. Add the rest of the water and seafood seasoning. Bring to a boil.

Add the corn, bell peppers, lima beans, parsley, salt and pepper. Cover, reduce heat, and simmer for about 10 minutes or until the potatoes are cooked and tender. Add the half & half  and bacon bits. Mix these in gently until soup is completely heated through-about a minute or two (being careful not to boil).

Garnish each soup serving with chopped green onions and ~2 Tbsp. shredded cheese.

Makes about 4 servings.


SPINACH CHEDDAR CRESCENT ROLLS

1 tube reduced-fat crescent dough rolls (such as Pillsbury brand)
1 cup fresh spinach, chopped
4 oz. shredded Cheddar cheese (freshly grated is particularly wonderful)
2 green onions, chopped (OPTIONAL)
Salt and pepper

Preheat oven to 375 degrees.

Spray a muffin pan with olive oil cooking spray. Set aside.

Unroll the crescent dough roll and pinch seams (perforations) together and flatten dough out with your hands until the dough is connected and pulled together, yet flat--shaped like a rectangle.

Add the chopped spinach and cheddar cheese over the crescent dough and season with salt and pepper. Add green onions if using. Gently roll lengthwise. Slice into ~1 inch pieces, being careful to keep the spinach and cheese filling in the dough. You should have about 10 rolls.

Place the spinach-cheese rolls into the muffin pan and bake for about 13-17 minutes, or until dough turns golden brown.


Makes 10 rolls. Serve with soup.

Monday, December 20, 2010

Oh Oh Oh Oat 'N' Toffee Grahams


Here's another fun holiday recipe that is a bit different than what you may or I may be used to around Christmas time. These toffee grahams are a cross between cookie and candy. I love the sweet and salty combination and the crunch of these treats.

The original recipe called for smoked almonds, but I only had smoked pecans on hand and it still turned out wonderful! I prefer to use salted butter so the grahams aren't cloyingly sweet. In addition, I've been out of white sugar for a while and using all brown sugar did not seem to affect the taste either.

OAT 'N' TOFFEE GRAHAMS
adapted from Better Homes & Gardens

12 whole graham crackers (rectangles)
1-1/2 cups rolled oats
3/4 cup sugar
3/4 cup packed brown sugar
3 Tbsp. all-purpose flour
2/3 cup butter, melted
1 egg, lightly beaten
1 tsp. vanilla extract
1 12-oz. pkg. semisweet chocolate pieces/chips
1/2 cup smoke-flavored whole almonds, coarsely chopped (I only had smoked pecans)

Preheat oven to 350 degrees F.

Line a 15x10x1-inch baking pan with foil, extending foil beyond edges of pan. Arrange whole graham crackers in a single layer in prepared pan.

In a large bowl combine the oats, sugars, and flour. Stir in melted butter, egg, and vanilla until well combined. Spoon over graham crackers and spread evenly to edges of pan to cover graham crackers.

Bake for 20 to 25 minutes or until oat mixture bubbles and is lightly browned on top.

Remove from oven and sprinkle with chocolate pieces. Return to oven for 1 minute (or until chocolate has melted somewhat to become easier to spread). Spread melted chocolate over top to cover. Evenly sprinkle with almonds/pecans. Cool in pan on a wire rack.

Use foil to lift from pan. Remove foil. Cut or break into bars.


Makes 32 bars. Store in the refrigerator in a container that has waxed paper or parchment paper between the graham crackers. I absolutely LOVED them the second day after they had been stored in the refrigerator.


Sunday, December 19, 2010

Pumpkin Snickerdoodle Cookies


My friend, Sara, recenly inspired me to make these cookies...I traced the recipe through blog after blog until I reached the origin (apparently a LOT of people like these cookies). The cookies come out a little cakier than other cookies due to the moistness of the pumpkin puree. They were described as 'mini muffins of heaven and spice and crackly sugar.' I'm taking them to our holiday ugly-outfit themed party tonight...hope I don't come home with any...


PUMPKIN SNICKERDOODLE COOKIES
Adapted from www.woundedchef.com
  
1/2 cup butter, softened (1 stick)
3/4 cup sugar 
1 large egg
1/2 cup pumpkin puree
1/2 tsp. vanilla extract
2 cups all purpose flour
1 tsp. cinnamon
3/4 tsp. baking soda
1/2 tsp. salt
1/2 tsp. grated nutmeg (freshly grated would be ideal...but come on!)
1/2 tsp. ginger

Other Ingredients:

1/2 cup sugar
1 tsp. cinnamon
Dash of grated nutmeg

Combine the sugar, cinnamon and nutmeg in a small bowl until mixed thoroughly.

For cookies:
In a large bowl, beat butter until fluffy. Add the sugar and egg then beat until mixed thoroughly; add pumpkin puree and vanilla and then mix again.

Combine the flour, cinnamon, baking soda, salt, nutmeg and ginger together in a bowl. Slowly add the flour mixture to the pumpkin mixture until well combined. (The dough will be sticky. To make it easier to work with, chill the dough in the refrigerator for about 20-30 minutes.)

Preheat the oven to 350 degrees. Place a silpat mat (or some for of nonstick surface that is heat-proof) on a baking sheet.

Scoop out balls of dough (it will be sticky) and roll into the cinnamon/sugar mixture. Place on a baking sheet then flatten them a bit with the palm of your hand. Bake for 9-10 minutes or until golden brown.
 
Let the cookies cool. Should make a couple dozen. (I sorta wish I had doubled the recipe and frozen some dough....)
 
Enjoy!
   

Friday, December 17, 2010

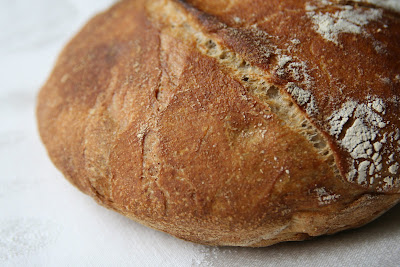
The Original NYT No-Knead Bread (A Rustic Loaf)


I've mentioned this bread in earlier posts on this blog and it's time I introduced you guys to it. This bread has rocked my world. It's true. And if you ask my family, it has rocked theirs too. The first time I made this, my parents were visiting. They couldn't believe it was homemade. Heck, I couldn't believe I made it. It was as if we had gone to a bakery and picked out a loaf....it's the kind of bread they serve you at authentic Italian restaurants (no, not like Olive Garden). Enough good things cannot be said about it, and when this bread recipe was first published in the New York Times (2006), it shook up the food world of internet bloggers. Here's the original article--it appeared in Mark Bittman's "The Minimalist" section.

Now, with that kind of introduction, doesn't it just make you want to attempt it?! If I can make bread, ANYBODY can do it! And this loaf requires ONLY FOUR ingredients: yeast, water, flour, salt. That's it. But (of course there has to be a 'but'), you will need to plan ahead--some waiting time is required. And if you're going to wait that long, you well as make two loaves at a time (I don't think I'd double the recipe-I think I'd just make two separate loaves). This recipe results in a bread with a chewy interior and crispy crust--the kind you make when you want to impress the neighbors, the in-laws, or yourself (we all need a little confidence boost now and then....).

I like to bake this bread in my beat up red Le Creuset dutch oven (purchased back in college on clearance for $34--I don't know how I got such a steal--it's the most regularly used item in my entire kitchen. If you've never owned a Le Creuset cast iron dutch oven....I highly recommend you save up and get one. You will never ever regret it--I'm no pro and if I say that, it must be true for you real cooks!) But, any 6-8 quart, cast iron, enamel, Pyrex or ceramic dish will suffice for this bread.

The biggest challenges are 1) waiting all those hours and 2) not tearing into it when it first comes out of the oven. Good luck.


NO KNEAD BREAD
adapted from Jim Lahey, Sullivan Street Bakery

  • 3 cups all-purpose or bread flour, more for dusting (I use 1 cup whole wheat flour + 2 cups all purpose flour)
  • 1 5/8 cup water (the recipe I first found stated 1 1/2 cups warm water & that's how I've always made it)
  • ¼ teaspoon instant yeast
  • 1¼ teaspoons salt (recipe I first found stated 1 1/2 tsp. salt & that's how I've always made it)
  • Cornmeal or wheat bran as needed (optional-you can use more flour)

1. In a large bowl combine flour, yeast and salt. Add the water, and stir until blended; dough will be shaggy and sticky. Cover bowl with plastic wrap. Let dough rest at least 12 hours, preferably about 18, at warm room temperature, about 70 degrees. (I like to leave it for 18 hours)

2. Dough is ready when its surface is dotted with bubbles. Lightly flour a work surface and place dough on it; sprinkle it with a little more flour and fold it over on itself once or twice. Cover loosely with plastic wrap and let rest about 15 minutes.


3. Using just enough flour to keep dough from sticking to work surface or to your fingers, gently and quickly shape dough into a ball. Generously coat a cotton towel (not terry cloth) with flour, wheat bran or cornmeal; put dough seam side down on towel and dust with more flour, bran or cornmeal. Cover with another cotton towel and let rise for about 2 hours. When it is ready, dough will be more than double in size and will not readily spring back when poked with a finger.

4. At least a half-hour before dough is ready, heat oven to 450 degrees. Put a 6- to 8-quart heavy covered pot (cast iron, enamel, Pyrex or ceramic) in oven as it heats. When dough is ready, carefully remove pot from oven. Slide your hand under towel and turn dough over into pot, seam side up; it may look like a mess, but that is O.K. Shake pan once or twice if dough is unevenly distributed; it will straighten out as it bakes. Cover with lid and bake 30 minutes, then remove lid and bake another 15 to 30 minutes, until loaf is beautifully browned. Cool on a rack.


Yield: One 1½-pound loaf.


Serve this heavenly simple rustic loaf with real butter or dip it into the best extra virgin olive oil you can afford.

Thursday, December 16, 2010

For Cold Weather Mornings: Hot Cracked Wheat Cereal (with Coconut & Sesame Seeds)


Looking for an alternative to oatmeal that still delivers the same nutritional punch and sticks with you? Then try this really delicious hot cereal from the Weimar Institute. My mother in law has been making it for years and now it's become our Saturday morning breakfast.

We like to make it with soymilk--it adds a real creaminess. But you can make it with milk. The cracked wheat (look for it in the bulk foods section of your natural health food stores or prepackaged by Bob's Red Mill brand) adds a chewy texture and a nutty flavor. You will love the slight crunch from the sesame seeds and the natural sweetness brought by the dates (no extra sugar or honey is needed). I suggest using a nonstick pan, but any saucepan will do.

My toddler can't seem to get enough, but kids and adults all seem to like this.You can make it ahead of time and just reheat it and a little milk or soymilk (makes delicious leftovers).


HOT CRACKED WHEAT CEREAL
adapted from the Weimar Center of Health & Education

1 cup cracked wheat
2 Tbsp. unsweetened shredded coconut
2 Tbsp. raw sesame seeds
8 pitted dates, chopped (note: these add sweetness)
½ tsp. salt
4 cups water (preferable to use milk or soymilk instead for a creamier texture)
Dash of cinnamon (optional)

Toast wheat and coconut by stirring constantly in dry saucepan over medium heat for several minutes, until lightly browned.

Add the remaining ingredients to the saucepan and bring to a boil. (WATCH so the pot doesn't overflow and make a mess on your stove).

Reduce heat and simmer for about 30 minutes.

Serves about 4.

Wednesday, December 15, 2010

Creamy Mushroom Spinach Chowder


I grew up with a mom that made cream of mushroom soup as soon as the cold weather hit. In Romanian fashion, we'd often eat it with polenta. I crave a creamy mushroom soup the way that other people crave chicken noodle soup for comfort. This is a recipe I've come up with and used the last couple winters that has has seemed to stick with our family. Sure, it's not fat-free, but it's a LOT less rich than the standard recipes I've seen for 'cream' of anything...and that's my consolation (ha).

I have made this soup with both Provolone and Swiss cheese--our favorite may be a combination of the two--but you can do one or the other. I used baby portabella mushrooms--but regular white mushrooms will do just as good. Also, you can use fresh or frozen spinach and it's good either way. If you prefer, you can increase the amount of spinach if you prefer for a more nutritional punch. OR you can completely skip the spinach altogether!

CREAMY MUSHROOM (SPINACH) CHOWDER

2 Tbsp. butter
5 cups fresh mushrooms, sliced
1 onion, chopped
5 Tbsp. flour
2 cups chicken broth
2 cups skim milk
½ tsp. salt
black pepper
1/4 tsp. ground nutmeg
1 cup half and half-light or fat-free is fine (OR, 2-3 oz. light cream cheese, softened and cut in cubes)
1 cup grated Provolone cheese (or Swiss, or a combination of both)
1 package fresh baby spinach-about 6 oz. (rinsed & chopped) OR, 1/2 pkg. frozen chopped spinach, thawed and drained well

Melt the butter in a large saucepan. In it, slowly sauté the mushrooms and onion until tender. Add flour and stir until flour is cooked, a couple of minutes.

Whisk in first chicken broth and then milk, stirring until thickened. Add salt and pepper, nutmeg, and the cheeses. Stir until just melted. Then stir in spinach. Heat and stir very gently. Season to taste.

Serve hot.

Makes about 6 servings.


NOTE: If you have leftover soup that you refrigerate, please keep in mind that this soup will condense somewhat and you can either add more broth or water to dilute it, or the best option is to reheat it gently and add some more milk to it until it reaches your desired consistency (either on stovetop or in microwave).

Saturday, December 11, 2010

Greek/Mediterranean Layered Dip


This is a WONDERFUL appetizer when you're looking for something fresh --or a change from the traditional 7-layer Mexican dip. You can buy hummus at any grocery store these days, or you can make your own. Here's my new favorite hummus recipe (in a previous post). I had read about something like this in a magazine years ago but I didn't have a recipe--just used whatever I had on hand, so ingredients are approximate. I think you guys will really LOVE it!

GREEK/MEDITERRANEAN LAYERED DIP

Should serve about 6-8 people

2 cups hummus
1/2-/4 cup Feta cheese, crumbled (about 4 oz.-I used a reduced-fat version)
1/4 of a red onion, minced finely (you can use more if you want)
1 heaping cup Kalamata olives, pitted and sliced
1/2 an English cucumber, diced (no need to peel)
5 oz of grape tomatoes, quartered (this is half of a 10-oz grocery store package)
1/4 cup freshly grated Parmesan cheese
1/2 tsp. dried oregano
2 Tbsp. extra virgin olive oil
Salt & pepper, to taste

To serve:
Pita chips (preferred) or bread rounds or Melba toast or crackers

Layer all ingredients through the Parmesan cheese in an 8 or 9 inch dish (round or square or rectangle--whatever you wish. I used an 8X8 glass casserole dish, but anything about that size would do). Sprinkle with oregano, drizzle with good-quality olive oil, and season with salt and pepper.

Serve chilled or at room temperature with pita chips or something hearty enough to withstand a hearty dip!


Friday, December 10, 2010

Chocolate Creme de Menthe Cookies


Mint & Chocolate....how can you go wrong? I just made these for a holiday cookie exchange with our neighbors by combining several recipes (out of desperation to use what I have and not run out to the store one more time this week). They turned out soft, decadent, and delcious. I had to share because they are quite 'Christmas-y'....yum!

CHOCOLATE CREME DE MENTHE COOKIES

2 1/4 cups all-purpose flour
1/2 cup cocoa
1 teaspoon baking soda
1/2 teaspoon salt
1 cup (2 sticks) butter or margarine, softened
1 3/4 cup packed brown sugar (or 1 cup regular white sugar & 3/4 cup packed brown sugar)
1 teaspoon vanilla extract
2 large eggs
1 10-oz pkg Andes brand creme de menthe baking chips

Preheat oven to 375° F.

Combine flour, cocoa, baking soda and salt in a small bowl. Beat butter, brown sugar (and granulated sugar, if using), and vanilla extract in a large mixing bowl until creamy. Beat in eggs for about 2 minutes or until light and fluffy. Gradually beat in flour mixture. Stir in morsels.

Drop by rounded tablespoon onto ungreased baking sheets.

Bake for 8 to 10 minutes or until cookies are puffed. Cool on baking sheets for 2 minutes; remove to wire racks to cool completely.

Makes about 3 dozen cookies (rough estimate).

Thursday, December 9, 2010

This Spud's For You! How to Make the Perfect Baked Potato

Looking for a cozy comfort meal? Pair baked potatoes with soup or salad for a wonderful cold-weather meal. Get ready for a simplistic post....

Last night, I made the closest I've ever come to the PERFECT baked potato. Just like at a steakhouse....This is one of those dinners that you can customize with whatever toppings you have on hand. Below is my research--maybe you can use it too. Despite all my wording below, it's a RIDICULOUSLY easy process. But yes, it does take time. You have to plan ahead a bit.

I don't know about you guys, but I have always wrapped my baked potatoes in foil before throwing them in the oven. Apparently, that just STEAMS the potatoes instead of actually BAKING them (resulting in mushy crust).

 A couple of tips:
  1. Use Russet or potatoes labled as 'baking' potatoes--they are white fleshed and starchy (which gives the their 'fluffy' texture). This will ensure that you have a mild tasting and not overly sweet.
  2. Make sure the potatoes are smooth, hard to the touch, and do not have roots (sprouts) protruding from them.

THE PERFECT BAKED POTATO
  • Russet or baking potatoes
  • Olive oil
  • Coarse salt (or kosher)
Preheat your oven to 400 degrees. Scrub your potatoes clean with COLD water (hot water starts them cooking and then the rest won't catch up) and dry them off with paper towels. Do not soak the potatoes in water either--it will make them soggy.

Poke your potatoes with a fork 8-12 times--you need to give steam an opportunity to escape. If not, they can explode (imagine that mess!).

Lightly rub your potatoes with oil (some people like canola, but I prefer the taste of olive oil). They should be shiny, but not dripping with oil. This also helps regulate the moisture in the potato and also create a crispy skin. Sprinkle the potatoes or roll them in salt.

Now there are two ways to do this--1) You can place the potato directly on the top rack in the center of the oven. You will have to place a baking sheet underneath the rack where you place the potatoes so that you can catch any of the moisture/oil dripping (and therefore prevent a mess). 2) You can place the potatoes directly onto a baking sheet. This is the only method I have tried and my results were great!

Depending on the heat of your oven and size of your potatoes, they will be done within 60-90 minutes--if you have a few small potatoes, they can sometimes be ready in as little as 45 minutes--but check first. To check for 'doneness', use fireproof gloves and give the potatoes a squeeze. If the skin feels kind of crunchy but the middle feels tender, the potatoes are ready!

And to serve--cut them in half lightly and squeeze the ends while slightly pushing them inward (this is after letting the potatoes cool for a few minutes, or using fireproof gloves).

And here's the fun part--TOPPINGS!!!!

Topping Options:
  • Butter
  • Sour Cream
  • Salt & pepper
  • Green onions and/or chopped chives
  • Chili
  • Cooked broccoli and cheddar cheese
  • Bacon
  • Beans
  • Salsa
  • Cottage Cheese, Parmesan cheese, blue cheese, feta, or any other kind of cheese!
  • Mushrooms
  • Greek Yogurt
  • Caramelized onions
  • Smoked salmon
  • ETC., ETC., ETC
You are only limited by your imagination.....
  

Sunday, December 5, 2010

Traditional with a Twist--Grape Nuts Chocolate Chip Cookies


I found this recipe recently in my file and since it's cookie season, I figured that we had to start with a twist on the most traditional cookie of all--the chocolate chip cookie. We really enjoyed them, but the only thing I would do differently the next time is take out a few tablespoons of flour since the grape nuts cereal add enough of a starch element--trust me on this one--a few tablespoons less of flour will result in a better cookie.

The result is a cookie with a crisp outside and a chewy interior with just enough of a texture difference to make you raise your eyebrows in delight :) Use the best quality chocolate chips you can--it makes a difference. The healthy aspect of the Grape Nuts cereal sure make me feel justified in eating them....

GRAPE NUT CHOCOLATE CHIP COOKIES (aka Cynthia Gorney's cookies)
adapted from Oprah magazine

1 cup (2 sticks) softened butter (don't toss the wrappers)-I used salted butter
1 1/2 cups all-purpose flour (MINUS 2-3 Tbsp.!!!!!--to prevent over-drying)
1 cup old-fashioned or rolled oats
1/2 cup Grape-Nuts cereal
1 tsp. baking soda
1/2 tsp. salt
3/4 cup brown sugar
3/4 cup granulated sugar
2 large eggs
1 1/2 tsp. pure vanilla extract
1 bag (12 ounces) dark chocolate chips

Preheat oven to 375°F (if you want them really crispy, jack up the oven to 400°F).

Use the butter wrappers to grease 2 cookie sheets. Combine the flour, oats, cereal, baking soda, and salt in a bowl.

In a second, large bowl, combine the butter, brown sugar, granulated sugar, eggs, and vanilla. Gradually stir flour mixture into the butter-sugar mixture. Stir in chocolate chips.
 
Drop batter by rounded tablespoons, not teaspoons (you can use a small ice cream scoop), about 2 inches apart onto prepared pans.
 
Bake until light golden brown, 10 to 12 minutes. Use a spatula to remove cookies to a wire rack to cool.

Should make about 3 dozen cookies.
*I froze 2/3 of my dough for later uses....much less tempting that way (haha). Enjoy!!!!

Saturday, December 4, 2010

Hueveos Rancheros

Want a fun and different weekend breakfast? We just got back from California and I was craving these huevos rancheros that we had in a little bistro near the ocean in Santa Monica. I can't even believe that the version below was better than what we ate out, but it was. And it's so easy!

You can easily double the recipe for more people and you can also use refried beans, if you prefer. You can also skip the beans or eat them on the side. If you don't have salsa, just use some Rotel diced tomatoes and chilies-you can doctor it up with cilantro or corn if you're feeling adventurous.


HUEVOS RANCHEROS
Serves 2

2 large or extra large eggs
4 small corn tortillas
~1/2 cup black beans (Cuban style, if you can find them) or pinto beans
~3/4 cup salsa (I mixed a more watery hot salsa with some Rotel tomatoes & chilies), warmed
~1/2 cup shredded Mexican cheese blend

Cook your eggs to your liking--you can scramble them or cook them sunnyside up the way I did above (we don't like runny yolks, but different strokes for different folks, right?). Add salt and pepper to the eggs as they are cooking. When cooked, cover and keep warm (you can keep the eggs warm by covering with aluminum foil in a preheated oven--about 200-250 degrees).

Using some Pam or coooking spray, heat up the corn tortillas until they start to bubble (flip) and slightly brown (just slightly).

On two separate plates, add a couple tablespoons of salsa. Put 2 heated and crisped corn tortillas on top of the salsa. Divide the beans evenly atop the tortillas and add one egg on top of these tortillas. Sprinkle with cheese and top with more salsa. (You can add fresh chopped cilantro or diced avocado as well).

Makes 2 amazingly delicious servings.

Thursday, December 2, 2010

Green Bean Salad with Walnuts, Fennel, & Goat Cheese

This salad has made an appearance at my Thanksgiving for a couple years now--a lighter approach to the traditional green bean casserole. I particularly like this dish for the holidays because you don't have to make room for one more thing in the oven--it can be served chilled or at room temperature. I think there is room for both types of green beans next year :)

The fennel adds a wonderful flavor and crispness to the salad. You should be able to find fennel in the produce section of your grocery store (it looks like a root with green fronds--often called 'anise').

Hope you enjoy it--even though Thanksgiving is over, this green bean salad would made a great side dish to a steak and potatoes any other night of the week for dinner.


GREAN BEAN SALAD WITH WALNUTS, FENNEL, AND GOAT CHEESE
adapted from Real Simple magazine

1 1/2 tablespoons Dijon mustard (or as we used above, whole grain or stone ground mustard)
2 tablespoons white wine vinegar (or champagne vinegar)
3/4 teaspoon kosher salt, plus more for the water
1/2 teaspoon freshly ground black pepper
1/3 cup extra-virgin olive oil
2 pounds green beans, trimmed
1 small fennel bulb, thinly sliced into half-moons (1 1/4 to 1 1/2 cups)
3/4 cup walnuts, toasted and coarsely chopped
1 4-ounce log fresh goat cheese, crumbled

In a medium bowl, whisk together the mustard, vinegar, salt, and pepper. Gradually add the oil and whisk until well combined; set aside.


Bring a large saucepan of salted water to a boil. Add the green beans and cook until just tender, 6 to 8 minutes. Drain, run under cold water to cool, and set aside until you're ready to assemble the salad.

In a large bowl, combine the green beans, fennel, and walnuts. Add the goat cheese and vinaigrette just before serving. (NOTE: I like to add the goat cheese last so it doesn't get as mushed up and stays in clumps for easier eating and a more intact flavor).

Toss the salad well and serve at room temperature or chilled.


Serves 8-10 as a side dish.