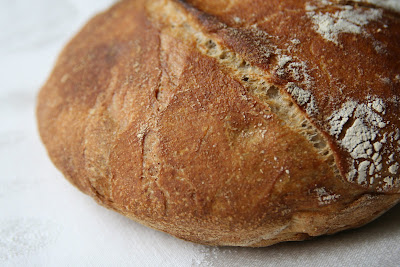
Now, with that kind of introduction, doesn't it just make you want to attempt it?! If I can make bread, ANYBODY can do it! And this loaf requires ONLY FOUR ingredients: yeast, water, flour, salt. That's it. But (of course there has to be a 'but'), you will need to plan ahead--some waiting time is required. And if you're going to wait that long, you well as make two loaves at a time (I don't think I'd double the recipe-I think I'd just make two separate loaves). This recipe results in a bread with a chewy interior and crispy crust--the kind you make when you want to impress the neighbors, the in-laws, or yourself (we all need a little confidence boost now and then....).
I like to bake this bread in my beat up red Le Creuset dutch oven (purchased back in college on clearance for $34--I don't know how I got such a steal--it's the most regularly used item in my entire kitchen. If you've never owned a Le Creuset cast iron dutch oven....I highly recommend you save up and get one. You will never ever regret it--I'm no pro and if I say that, it must be true for you real cooks!) But, any 6-8 quart, cast iron, enamel, Pyrex or ceramic dish will suffice for this bread.
The biggest challenges are 1) waiting all those hours and 2) not tearing into it when it first comes out of the oven. Good luck.
NO KNEAD BREAD
adapted from Jim Lahey, Sullivan Street Bakery
- 3 cups all-purpose or bread flour, more for dusting (I use 1 cup whole wheat flour + 2 cups all purpose flour)
- 1 5/8 cup water (the recipe I first found stated 1 1/2 cups warm water & that's how I've always made it)
- ¼ teaspoon instant yeast
- 1¼ teaspoons salt (recipe I first found stated 1 1/2 tsp. salt & that's how I've always made it)
- Cornmeal or wheat bran as needed (optional-you can use more flour)
1. In a large bowl combine flour, yeast and salt. Add the water, and stir until blended; dough will be shaggy and sticky. Cover bowl with plastic wrap. Let dough rest at least 12 hours, preferably about 18, at warm room temperature, about 70 degrees. (I like to leave it for 18 hours)
2. Dough is ready when its surface is dotted with bubbles. Lightly flour a work surface and place dough on it; sprinkle it with a little more flour and fold it over on itself once or twice. Cover loosely with plastic wrap and let rest about 15 minutes.
3. Using just enough flour to keep dough from sticking to work surface or to your fingers, gently and quickly shape dough into a ball. Generously coat a cotton towel (not terry cloth) with flour, wheat bran or cornmeal; put dough seam side down on towel and dust with more flour, bran or cornmeal. Cover with another cotton towel and let rise for about 2 hours. When it is ready, dough will be more than double in size and will not readily spring back when poked with a finger.
4. At least a half-hour before dough is ready, heat oven to 450 degrees. Put a 6- to 8-quart heavy covered pot (cast iron, enamel, Pyrex or ceramic) in oven as it heats. When dough is ready, carefully remove pot from oven. Slide your hand under towel and turn dough over into pot, seam side up; it may look like a mess, but that is O.K. Shake pan once or twice if dough is unevenly distributed; it will straighten out as it bakes. Cover with lid and bake 30 minutes, then remove lid and bake another 15 to 30 minutes, until loaf is beautifully browned. Cool on a rack.
Yield: One 1½-pound loaf.


I was JUST at a friends' house this weekend reading the book about this bread and my friends were raving about it. I will have to give it a try! Looks super easy and delicious.
ReplyDeleteAfter reading many comments on many pins, of this recipe, I tried it using 3/4 tsp. salt, 1 1/2 cups water and remaining ingredients as listed. I also used parchment paper to put the wet dough on to work and rest and put the dough into the cooking pot for the 2 hour rise. The cold pot then went into the hot 450 degree oven to bake. Results are fabulous! My problem has become how to stop eating it! I better not make this to often or my husband ,who is diabetic, and I, who need to lose more than a few pounds, are really going to have a problem! :-))
ReplyDeleteIf you add 1 tblsp apple cider vineger and a little beer in place of some of the water you will think you are in San Francisco. This makes the perdect bread bowl for New England Clam Chowder.
ReplyDeleteWhat an interesting idea! Did you make it like that? I will have to try that. Thanks.
ReplyDelete