Sunday, October 31, 2010

BEST, BEST Tomato Basil Soup--from Nordstrom Bistro Cafe


I've been making this soup since our first year of marriage. We absolutely love it-no really, it's the best. and easiest tomato basil soup I have ever eaten. No peeling of fresh tomatoes either. If you have an immersion blender, this soup is a total breeze and requires minimal clean-up.

If you've ever eaten at Nordstrom Cafe and had this soup, you'll know why it's the best. Then again, their recipe (as seen below) calls for 2 cups of heavy cream--no wonder it's amazing. I just can't do that--so I lightened it up and it's still wonderfully delicious. Usually, I only use 1 cup of fat-free half & half. My changes are in italics below. This soup is particularly delicious with a grilled (fresh) mozzarella sandwich. ENJOY!!!!

Adapted from Nordstrom Cafe Entertaining at Home Cookbook: Delicious Recipes for Memorable Gatherings.

NORDSTROM TOMATO BASIL SOUP

1/3 cup olive oil (I used a little less)
5 carrots, peeled and chopped (I used 4 the last time and the soup was still terrific)
1 large yellow onion, chopped
1 Tbsp. dried basil
3 cans (28 oz) whole Italian-style tomatoes in puree (really, that is too specific-any canned tomatoes will do)
1 can (14.5 oz) chicken broth (I usually seem to need a bit more)
Salt & pepper, to taste
A dash of garlic powder (not in original recipe)
2 cups heavy cream (to lighten, use half & half or as I use, fat free half &half)

Saute carrots and onions in olive oil until tender. Add basil. Stir occasionally and cook for 10-12 minutes. Add the tomatoes and chicken broth and season with salt and pepper (to your liking). Bring the soup to a boil.

Reduce heat and simmer uncovered for 20 minutes. (I cover mine to prevent splattering and it turns out just fine)

Puree soup in a food processor or blender (and if you're lucky enough to have a stick blender, just puree the soup in the pot). Then, add the heavy cream or half & half.
Garnish soup with slivered basil leaves.

Serves 10-12.

P.S. This soup freezes great!

Friday, October 29, 2010

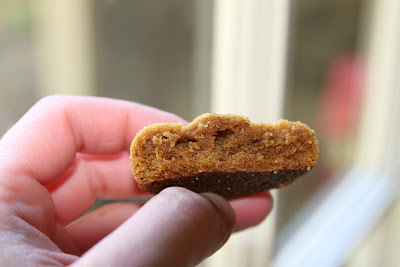
Jen's Best Ever Chewy Gingersnaps


I inherited this amazingly chewy molasses gingersnap cookie recipe from my sister in law, Jen (big thanks). I think she won a contest in college for these cookies....yes, they're THAT good. I look forward to making them every time the weather turns cooler. Everyone loves them!

The only thing I do differently is to use 1/2 cup of sugar in the dough--I like things less sweet--plus, you roll them in sugar anyway. If you can, use organic can sugar-I can tell a difference-but regular sugar is fine too. I'm tempted to try them with half whole-wheat pastry flour the next time I make them...but I'm not sure if it's worth messing with perfection. Enjoy!


JEN'S GINGERSNAPS

3/4 cup - 1 cup sugar (I use 1/2 cup)
2 cups all-purpose flour
1/2 tsp. salt
1 tsp. baking soda
1 tsp. cinnamon
1 tsp. ginger
1 tsp. cloves
3/4 cup shortening or butter, slightly softened (we always use salted butter)
1/4 cup molasses
1 egg, slightly beaten
Bowl of sugar

Combine the dry ingredients (stir lightly). Cut in shortening/butter to resemble coarse crumbs. Stir in molasses and egg.

(Helpful hint: Place the dough in the refrigerator for a few minutes--it makes it less sticky, and easier to work with for the next step.)

Shape dough into 1-inch blass and roll them in sugar. Place on un-greased baking sheets. Bake at 350 degress for about 10 minutes. (NOTE: Underbake slightly by a minute or two for chewy cookies).

Remove cookies from baking sheets immediately. Cookies will firm as they cool.

Yield: Approximately 3.5-4 dozen.

Check out the delicious chewy texture below:


Wednesday, October 27, 2010

Changes Are Coming....

Pursue some path, however narrow and crooked, in which you can walk with love and reverence.
-Henry David Thoreau


Just wanted to let you all know whatmy goals are for this blog by the end of the year: I'm looking at changing websites (goodblye blogspot?)--so look for a new host soon. Hopefully this change will allow for bigger pictures, as well as a way to add a 'print' feature for the recipes.

Two of the things I believe: 1) There is always room for improvement. 2) Those who do not enjoy food, do not really get to enjoy life at its fullest either.

Thanks for following along publicly and privately--as well as for your patience and all the fun feedback from phone calls and emails. Hope the holidays ahead will be rewarding for you all!

Tuesday, October 26, 2010

EASY Vegetarian Chili: 2 Methods-Fast & Slow


Here's another easy, healthy recipe for cold weather days--my favorite recipe for use in the slowcooker (crock pot).

This recipe comes to me by way Janet Kurzynske--the mom of a my great friend, Heather. Dr. Kurzynske is a nutrionist, and a really good cook. I love this chili almost as much as I love Heather--we used to sit indian style on the floor of her kitchen with big bowls of this chili in our lap, talking about all our college drama. Maybe it will comfort you the way it comforted us.

Without the cheese, this chili is fat-free, vegan, and amazingly delicious.

We often serve this chili as a vegetarian option alongside our turkey chili in the winter when we want to do easy entertaining. Just set up a "toppings" bar with green onions, cheese, sour cream, corn, fresh tomatoes, cilantro, olives, tortilla chips, etc., and serve with cornbread. Everyone can serves themselves and go back for more.

This recipe makes a big pot and I often freeze half the recipe. You can use it later as a topping for baked potatoes, or in tamale pie, or as a dip with sour cream, cheese, and layered onions, etc. (Google "skyline chili".) For other great ideas-check out this site.


EASY VEGETARIAN CHILI


  • 1 large onion, diced
  • 1-2 cloves garlic, chopped (optional)
  • 2 large green bell peppers, diced
  • 1 bag frozen vegetarian crumbled burger (I use the Morningstar brand)
  • 2 cans diced tomatoes
  • *2 small cans plain tomato sauce or 1 bigger can (small cans are about 8 oz-bigger cans are about 14 oz.)
  • 1 can black beans, drained
  • 1 can kidney beans, drained
  • 1 can navy beans, drained
  • 1 bay leaf
  • 1 tsp. chili powder (I add some 'taco' seasoning as well)
  • Salt and pepper
  • Cooked small pasta or a can of drained corn (both optional)
  • Shredded cheese (Mexican blend or Cheddar works best)
*NOTE: If you do not like this much 'tomato-ness' in your chili, feel free to skip the tomato sauce and use some chicken/beef broth and/or beer. We often use beer for half the tomato sauce


Toppings of your choice (green onions, chopped raw onions, olives, shredded cheese, fresh cilantro, corn, olives, etc.)

METHOD 1: CROCK POT

Mix all ingredients in a crock pot. Simmer for at least 4 hours.

METHOD 2: STOVE TOP

Over medium heat, saute onion in a large pot until translucent. Add the bell peppers and sauté until tender. Add the vegeburger, tomatoes and sauce (also the bay leaf). Mix and heat through.

Gently stir in the beans and chili powder. Season with salt and pepper.

Lower heat and simmer for 30 minutes, gently stirring occasionally to ensure there isn’t any sticking to the bottom of the pan. Mix in corn and pasta (if using) and heat through.

Serve with shredded cheese (cheddar or a Mexican blend) and any toppings desired. Remove bay leaf (not to be eaten).

Serves about 8-10.

Leftovers freeze beautifully.

Tuesday, October 19, 2010

The Only Way I'll Make Macaroni & Cheese From Now On


Here's another 'healthier' approach--even though I added more cheese to the original recipe. I am SO glad I stumbled upon this gem of a recipe! My dinner guests asked if I was covering this recipe on the food blog....they didn't have to ask...first bite was heaven and my daughter asked for 'more' three different times when offered leftovers. Who knew that you could 'hide' squash in a decadent comfort food?!

The only thing I might to different next time is to add a little more milk in the filling--since I added more topping, it seemed to need it. (Think about it-the crispy topping is one of the best things about mac & cheese...) Here are most of your ingredients:

Try this recipe. You will be so glad you did--and sorry vegans, this is one of those recipes that reminds me why I could give never give up cheese.

SQUASH MACARONI WITH FOUR CHEESES
Adapted from Elie Krieger--below is my version, but here is original

1 pound elbow macaroni (I used whole grain rotini pasta)
2 (10-ounce) packages frozen pureed winter squash
2 cups milk (skim worked fine)
4 oz. extra-sharp Cheddar, grated (about 1 1/3 cups)
4 oz. Monterrey jack cheese, grated (about 2/3 cup)
1/2 cup low fat cottage cheese
1 tsp. salt
1 tsp. powdered mustard
1 tsp. garlic powder
1/8-1/4 tsp. cayenne pepper
8 Tbsp. Panko bread crumbs (regular is fine-but Panko adds better 'crunch')
6 Tbsp. grated Parmesan cheese
2 Tbsp. olive oil
1 cup cheese of your choice for topping (optional-I used a 4 cheese blend)

Preheat the oven to 375 degrees F. Coat a 9 by 13-inch baking pan with cooking spray.

Bring a large pot of water to a boil. Add the macaroni and cook until tender but firm, about 5 to 8 minutes. Drain and transfer to a large bowl.

Meanwhile, place the frozen squash and milk into a large saucepan and cook over a low heat, stirring occasionally and breaking up the squash with a spoon until it is defrosted. Turn the heat up to medium and cook until the mixture is almost simmering, stirring occasionally.

Remove the pan from heat and stir in the Cheddar, Monterrey Jack cheese, cottage cheese, salt, mustard, garlic powder, and cayenne pepper. Pour cheese mixture over the macaroni and stir to combine. Transfer the macaroni and cheese to the baking dish.

Combine bread crumbs, Parmesan cheese, and oil in a small bowl. Sprinkle over the top of the macaroni and cheese (This is also the point I added a big handful of shredded cheese--go ahead and judge).

Bake for 20 minutes, then broil for 3 minutes so the top is crisp and nicely browned.

Serves 8 with a vegetable side and a protein.

Sunday, October 17, 2010

Something to Write Home About: Lemon Ricotta Cornmeal Waffles


I'm a  waffle girl. If given a choice between waffles and pancakes, it's waffles everytime and twice on Sunday. All those little grooves to get syrup in...the crispy outside that only soften with syrup--but not enough to get soggy....yum!! I like this particular recipe because the cornmeal adds another crispy dimension--I sort of combined several recipes to make it my own. We have visiting friends and the waffles were a HUGE, HUGE hit.

I imagine these would be great to feed a big group if you doubled or tripled the recipe. The great thing about waffles is that they can be made ahead and reheated directly on an oven rack at about 350 degrees until heated through.


LEMON RICOTTA CORNMEAL WAFFLES

1 1/2 cups flour (I have not tried whole-grain yet, but figured cornmeal was enough whole-grain)
1/2 cup cornmeal
2 1/2 tsp baking powder
1/2 tsp baking soda
1/2 tsp salt
1 cup part-skim ricotta (no need to drain)
2 eggs
1 egg white
4 tablespoons melted light butter
1 cup fat-free yogurt (plain or vanilla flavored-I used Greek style vanilla flavored)
1/4 cup skim milk
Zest of one lemon

Combine the dry ingredients in a bowl. In another medium sized bowl, combine the wet ingredients and lemon zest. Add the dry ingredients to the wet mixture and combine until just smooth (don’t over mix).

Bake the waffles in a waffle maker till golden brown. Serve with pure maple syrup.

Served 4 very hungry people (and 2 babies)--we also had Morningstar sausage patties, coffee au laits, and fruit. Here they are with peach-strawberry syrup:


Leftover waffles freeze beautifully; just re-crisp in a toaster or toaster oven before serving.

Wednesday, October 13, 2010

Eggplant Rollatini with Goat Cheese Filling & Tomato Sauce


This is one of our favorite dishes. My husband and I have been making this recipe for about 8 years--the original idea came from Bon Appetit magazine. It's a cross between lasagna and eggplant parmigiana without the frying. Most rollatini recipes call for frying, but the first time we made this, we just grilled the eggplant and it was delicious. Then every time afterwards, we discovered that baking it was just as good--and easier since there was less chance of burning through the thinner sections of the slices.

The recipe seemd a bit daunting to me at first, but after you make it the first time, it's really very straightforward and goes by quicker. This recent time we had it, I was surprised that it fell together pretty quickly and dinner was ready in an hour (30 min baking). The most time consuming part was cutting the eggplant: it is absolutely fine if you cannot cut the eggplant slices all evenly-I never can--just roughly the same thickness and even if you get half slices, that's fine too. I put them together by sometimes overlapping the thinner ones somewhat. Once the filling is on top, roll the slices--easier to do than it sounds, really. I'm no Mario Batali and this dish always ends up great regardless of how the eggplant is cut.

I suggest that you use a marinara sauce such as these by Bertolli. This dish is SO delicious. They eggplant is not soggy, the cheese melts in the middle, and you can control how much sauce you use--but definately serve it with crusty European bread. We always serve this eggplant rollatini with couscous--a perfect pairing actually, the aforementioned hearty bread and a green vegetable (in this case spinach).


EGGPLANT ROLLATINI

2 medium eggplants (sliced lengthwise into 1/4-1/3 inch slices-and no I never measure)-do NOT peel
8 oz. part-skim ricotta (1 cup)
8 oz. goat cheese (1 cup)
1 pkg. part-skim mozzarella
1 egg, beaten
1 cup freshly grated Parmesan cheese (divided into half--1/2 cup goes in filling, 1/2 cup gets sprinkled on top)
handful of basil leaves, chopped
1-2 garlic cloves, minced
2 green onions, chopped (optional)
Salt and pepper, to taste

1 jar of marinara sauce (I used a really big jar, but about 3 cups should cover the dish--we just like a lot of sauce)
1 box of couscous (Near East is the brand sold at most grocery stores)--I think 10 oz. is the size I used--get one that serves at least 6 people.

Preheat oven to 350°F.

Spray 3 baking sheets and one 13x9x2-inch glass baking dish with OLIVE OIL nonstick spray. Arrange eggplant slices in single layer on prepared sheets and lightly spray them. Season the slices with salt and pepper. Bake them for 10 minutes, turning once, until the slices are tender. They may stick slightly on the pan, so turn them over gently. It's ok if they tear--you can do a 'patch job' afterwards. Below are what mine looked like--the good and the 'bad'.


In a medium bowl, mix mozzarella cheese, ricotta cheese, egg, basil, green onion and 1/2 cup Parmesan cheese. Season filling with salt and pepper.

Divide this filling among eggplant slices (about 3 tablespoons per slice); spread evenly. Starting at 1 short end, roll up eggplant slices, enclosing filling. Arrange rolls, seam side down, in prepared baking dish. (Can be made 1 day ahead. Cover and chill. If I'm not entertaining, I divide among 2 smaller containers and freeze one pan).


Spoon marinara sauce over rolls; sprinkle with remaining 1/2 cup Parmesan cheese (if you wish-or you could use it all in the filling). Bake, uncovered, until rollatini are heated through and mozzarella cheese melts, about 30 minutes.

While the eggplant bakes, you can prepare the couscous according to package directions. Serve the couscous on the side with the eggplant or serve the eggplant rollatini on top of the couscous.

Serves about 8 (if you serve the rollatini with bread and a vegetable, a 6 serving box of couscous should be sufficient for 8 people).

Friday, October 8, 2010

GOING BANANAS: Our House Banana Bread (With More Coconut!)

The original recipe comes from Mark Bittman--author of one of my favorite cookbooks-"How To Cook Everything". What's even more flattering is that my mother in law, Carol, loves it. I'm not sure if I've mentioned this before, but my mother in law and mother and aunt are amazing cooks. So anything they love that I make....well, that just elevates my self esteem to new heights :):) But, this is not about me...this is about the BANANA BREAD....and I have made many. I love this one because it isn't very sweet.

The recipe below has been modified--Bittman uses 1 1/2 cups all purpose flour and 1/2 cup whole wheat flour. I have used 1 cup whole wheat pastry flour and 1 cup all purpose flour. Also, I use LIGHT butter and you just can't tell the difference! Do NOT use sweetened coconut---it will taste artificial. I made two mini-loaves this time and froze one....but you can just make on standard size loaf.


BANANA BREAD
Adapted from How to Cook Everything by Mark Bittman

8 tablespoons butter (I use 'light' butter)
1 cup all-purpose flour
1 cup whole wheat pastry flour
1 teaspoon salt
1 1/2 teaspoons baking powder
3/4 sugar (I like to use natural/Turbinado sugar)
2 eggs
3 very ripe bananas, mashed with a fork until smooth
1 teaspoon pure vanilla extract
1/2 cup chpopped pecans or walnuts
1/2 grated dried unsweetened coconut

Preheat the overn to 350 degrees F. Grease a 9×5 inch loaf pan.

Mix together the dry ingredients. Cream the butter and beat in the eggs and bananas--please note that if you use 'light' butter, it will not cream as well. It will be a little bit lumpy--as if it won't quite blend completely. This is OK. Stir this mixture into the dry ingredients; do not mix more than necessary--otherwise your bread will be tough. Gently stir in the vanilla, nuts, and coconut.

Pour the batter into the loaf pan and bake for 45 to 60 minutes, until nicely browned. A toothpick inserted in the center of the bread should come out fairly clean. Note that this banana bread may be more moist compared to other breads--so try not to overcook. Cool for 15 minutes before removing from the pan. To store, wrap in waxed paper.


This banana bread is particularly exquistite tasting when toasted. Try it! It's a staple in our house.
 

Spicy Pecan Pumpkin Butter--Another Glorious Taste of Autumn


Every fall, I like to wander in an over-priced kitchen store (Williams-Sonoma) and gaze at all the fancy shiny products as if I were Tiffany's. I covet Deruta pottery, panini makers, Italian espresso makers, cookbooks, kitchen tools, and Le Creuset pots the way other women covet diamonds. And I'm not a woman that covets much of anything (except free time!!!). But, the smells of that store...it's pure inspiration during the cold weather/holidays.....anyway, a few years back, I sampled one of the cakes at said over-priced store. It was wonderful. Problem was that you have to buy the product (pecan pumpkin butter) in order to make the cake. And here's the kicker: a small jar cost $10!!! Then, a couple years ago, my sister in law, Jen, brought home some Muirhead pecan pumpkin butter for the holidays. And again, I was hooked.....so what to do this year until I can meet up with Jen again?!

Well, google the original recipe. Result: not available. So, back to the kitchen, and based on the ingredients listed on the product, time to tinker. The result is truly delicious. I literally could stand over the stove and eat it off the wooden spoon. And despite the name, there is NO butter in this recipe....you must try.

My concoction may be less sweet (the molasses was my addition-not Muirhead's). Since I didn't have any oranges or lemons on hand, I used pure lemon and pure orange extract. It was PERFECT. The extracts were fantastic--just don't use 'imitation' extracts--or you can use the grated zest and fresh juices of a lemon and orange. I suggest that you play around with your spices and add or subtract as you like your flavor--for example, some people prefer a stronger cinnamon flavor. I didn't have allspice used the substitution with great results.

This pecan pumpkin butter really shouldn't take you that long if you go the shortcut route of canned pumpkin & extracts. It has a creamy, velvety texture. Now, I have to go learn about 'canning'. Ha!


SPICY PECAN PUMPKIN BUTTER

1 (15 oz) can pumpkin puree--or about 2 cups of pumpkin puree made from roasted pumpkin
4-5 tsp. pumpkin pie spice
1/2-1 cup of pecans (up to you how nutty you like it-mine was closer to 1 cup)
1/4 cup molasses
1/4 cup brown sugar
1/2 tsp. pure orange extract
1/2 tsp. pure lemon extract
pinch of salt
1/2 tsp. -1 tsp. allspice (if you don't have this, use equal amounts of cloves, nutmeg, cinnamon & black pepper)
*extra cinnamon & nutmeg (if you prefer--I preferred)
1/4 cup water

Toast the pecans in the microwave for about 2 minutes....making sure to check that the nuts do not start to blacken and burn. Or, you could roast them in the oven at 350 degrees for about 7 minutes...but again, check to make sure they do not burn. Then, process the pecans in the food processor.

When, the majority of the ground nuts stick to the side of the food processor bowl--turn off the machine. If you mind the texture of nuts or want your pumpkin butter smoother, process the pecans for a longer amount of time.

Place all ingredients in a heavy pot and gently heat until the pumpkin butter has reached the consistency you desire. I only 'cooked' it for 5-10 minutes and it was perfect--but I read that some people cook their fruit butters for 20-30 minutes on low heat .


Spread pecan pumpkin butter on muffins, toast, waffles, or use this the Muirhead site to incorporate it in their recipes for cakes, pies, etc. I heard this stuff makes the most amazing pumpkin pie ever (based on the food blogs). This stuff tastes decadent! I hope you will love it as much as I do.  (Should keep for a couple weeks in the fridge)

Makes about 3.5 cups. (roughly) If you know how to can, then you are ahead of the game and can stock up. It won't last that long in our house :)

Thursday, October 7, 2010

How to Roast a Pumpkin (EASY-just try it!)


I know what you're thinking.....it's the same thing I was thinking....why would you want to roast a pumpkin when you could just buy Libby's? Well, because it tastes AMAZING! And it's fairly easy....with the exception of scooping out pumpkin flesh and seeds....I used the one all the way to the left (purchased for $2 at the Nashville Farmer's Market).


Try roast pumpkin with butter, salt and pepper or butter, cinnamon and sugar. Or puree it and use it the way you'd use Libby's canned pumpkin or any way you'd use butternut squash. YUM!

Pumpkin is low in fat and calories, low in carbohydrates, and is full of fiber, antioxidants, and many other health benefits. Here's a link to some of pumpkin's benefits.

Thanks to my good friend, Misha, for teaching me such a wonderful skill! Ha! She always teaches me cool things!

ROASTED WHOLE PUMPKIN

1 sugar pie pumpkin (NOT a jack-o-lantern)
1 baking sheet (like a 'half' sheet--heavy duty)
some water

Preheat oven to 350 degrees.

Wash the pumpkin. Then, cut it in half and scoop out the flesh and seeds. Place cut side down on the baking sheet and fill the baking sheet about 1/2 way to 3/4 way full of water. This will help 'steam' the pumpkin while it bakes and prevent it from drying out.

Bake for 60 minutes.

Let the pumpkin cool a while--maybe 10-15 minutes. The skin will peel off VERY EASILY! Here is what mine looked like:


Enjoy! Roast pumpkin is really something wonderful. I pureed mine in the Vitamix with a little bit of water and it had the most amazing velvety texture. I hope I recall this correctly--but a small-medium pumpkin (such as the one I used), made about 2 cups of puree. I plan to make some pecan pumpkin butter with this puree. Although the next time I roast a pumpkin, I am going to try some pumpkin soup--such a decadent fall dish....

Fall Apple Dip

Recently, I reconnected with an old friend and she reminded me of this wonderful taffy apple dip her mom used to make for us when we were in high school. I have changed it up a bit to incorporate another fall flavor-maple-instead of the brown sugar and made it slightly less sweet, but also added a new dimension as a nod to my family's love of toffee.

Serve this wonderful dip with crisp, tart apples. Would be wonderful at a bridal or baby shower, game night, or church potluck. Or heck, serve at your fall cocktail party :)


FALL APPLE DIP (Sommerville Version)

8 oz. light cream cheese
1/4 cup pure maple syrup
1/2 tsp. cinnamon
1 tsp. pure vanilla extract
1/3-1/2 cup chopped pecans (or walnuts)
1/3 cup Heath toffee chips
*About 2-3 tart apples, sliced (Granny Smith or Pink Lady are best, but Gala, Braeburn, or Fuji are good too)

Thaw cream cheese (or pop in the microwave for a minute or so). Gently fold all the other ingredients into the cream cheese. You can also use an electric mix to whip the cream cheese to make it more 'fluffy' and then fold in all the other ingredients.

*You can dip sliced apples in water and lemon juice to prevent browning. Or, as I recently discovered, toss them with a little orange juice.


Makes about 1.5-2 cups (depending on if you 'whip' it). Serves 4-6 people--if it makes it out of your kitchen.

Sunday, October 3, 2010

Sweet Potato Cranberry (Pear) Whole Wheat Muffins--SO GOOD!


If Autumn could have a flavor-this would be it-cinnamon, nutmeg, cloves....if you don't care for any of these (or would prefer a ginger flavor), you can subtract a spice or two. Tailor these muffins to your liking.When you have sweet potatoes that are going bad, you can peel them and cut off the soft spots. Then, you can boil them and puree for uses in baked goods--like muffins. I will post on a vegan sweet potato roll later next month using this type of puree.

The streusel topping really makes these muffins--in fact, I doubled the streusel topping ingredients (below is singular)--it didn't seem to be sufficient for all the muffins and I'm glad I did. But, by doing so, I think I may ALSO skip the honey and the sugar from the muffin ingredients the next time I make them. The cranberries and the raw sugar in the topping provide plenty of sweetness. Recipe courtesy of ungourmet.com via Taste of Home.


SWEET POTATO CRANBERRY PEAR WHOLE WHEAT MUFFINS

1 ¾ cup whole wheat pastry flour
¼ cup packed brown sugar (I’m skipping this next time)
1 tsp. baking powder
½ tsp. baking soda
½ tsp. salt
1 tsp. ground cinnamon
½ tsp. ground nutmeg
¼ tsp. ground cloves
½ cup dried cranberries
2 eggs
1 cup mashed sweet potatoes
¼ cup chunky pear sauce (if you click on it, there's a link on how to make it, but I’m sure applesauce will do)
½ cup skim milk
½ cup honey
¼ cup canola oil

Streusel Topping:
2 Tbsp. whole wheat pastry flour
2 Tbsp. oats
1 Tbsp. raw sugar (like Turbinado)
½ tsp. ground cinnamon
1 Tbsp. cold butter (I used Brummel and Brown spread with yogurt)

Preheat oven to 350 degrees. Line a muffin pan with paper liners. Lightly spray the paper liners with a Pam-type spray.

In a large bowl, combine the flour, sugar (if using), baking powder & soda, salt, cinnamon, nutmeg, cloves and cranberries.

In another bowl, whisk together the eggs, sweet potatoes, pear sauce (or applesauce), milk, honey, and oil. Stir the liquid/egg mixture into the flour mixture JUST until moistened. Try not to overmix.

Fill baking cups 2/3 full. (I just fill all the 12 muffin cups until all of the mix is used) Sprinkle the streusel topping over the muffins.

Bake for 16-18 minutes until golden and toothpick inserted into the center of muffins comes out clean. Cool for 5 minutes in pan before transferring to a wire rack.


Makes 12 muffins.

HAVE AN AWESOME FALL!!!!