Showing posts with label Appetizer. Show all posts

Saturday, February 18, 2012

Garlicky Sunflower Seed Spread with Parsley


I got this intriguing sunflower seed recipe from my friend, Carla, after she posted a great picture of it on Facebook. She got it from Ligia Pop, a Romanian raw food chef. I was a bit unsure about trying it because I'm not familiar with raw recipes...however, this was SO delicious! This fabulous dip/spread only requires a  handful of ingredients and tastes nutty, fresh, creamy, salty, tart, and sweet (that almost covers it all, doesn't it??).

It was a delicious spread on the pumpkin, sunflower & flax seed bread I just posted on. Carla said it is terrific served on cucumber slices as an appetizer. But, I liked dipping my carrots in it and my daughter liked dipping her crackers in it--so yes, you can use it as a dip! I imagine this sunflower seed spread would be wonderful drizzled with olive oil, if you preferred, or sprinkled with some smoked paprika before serving. I can't wait to try it again with different kinds of herbs. I especially would like to try it this summer with fresh basil instead of the parsley, spread on crostini, and topped it with fresh sliced heirloom tomatoes--YUM!


GARLICKY SUNFLOWER SEED SPREAD WITH PARSLEY

Adapted from my friend, Carla, who got it from www.ligiapop.com

  • 1 cup raw sunflower seeds (I used 1/2 cup raw sunflower seeds & 1/2 cup roasted sunflower seeds)
  • 2 garlic cloves
  • 3 Tbsp. fresh lemon juice
  • 1/4 tsp. agave nectar
  • 1 small handful fresh parsley, rinsed & lightly patted dry
  • ~1/4-1/3 cup water
  • Salt & pepper, to taste (cracked sea salt is particularly good)

In a food processor or blender (I used my Vitamix), blend/process all ingredients. Add more water, if necessary, until the texture is to your liking.


All I can say--is YUM!

Friday, February 10, 2012

Feta Avocado Salsa Dip


What did you eat during Superbowl Sunday? I had intended to post on this ahead of time, but of course I ran out of time. We had this feta-avocado salsa and it is too wonderful not to share! We all have trouble taking more than a couple bites. It's fresh, creamy, and salty--with just a little bit of crunch from the onion. 

Feel free to add more onion if you like! I'm tempted to add some olives next time I made it. TIP: Try to use avocados that are just on the shy side of ripe--the more ripe the avocado, the more they fall apart and the salsa starts to look more like guacamole--but that's fine too (it will still taste good)! I just like to see and taste the texture of a less ripe avocado. 

This is a great salsa/dip to make when you have friends over, but would also be a terrific topping to a grilled chicken breast in the summer. I'm confident you'll really love this salsa/dip!


    FETA AVOCADO SALSA DIP

Serves 6-8

  • 3 plum tomatoes, chopped
  • 1 1/2 ripe avocado - peeled, pitted and chopped (semi-firm work best)
  • 1/4 cup finely chopped red onion
  • 1 clove garlic, minced
  • 1 handful chopped fresh cilantro
  • ½ tsp. dried oregano
  • 1 Tbsp. olive oil
  • 1 Tbsp. red wine vinegar
  • 4-5 ounces crumbled feta cheese (reduced-fat is fine to use)
  • Salt & pepper, to taste


    In a bowl, gently stir together tomatoes, avocados, onion, and garlic. 


    Mix in cilantro and oregano. Gently stir in olive oil and vinegar. Then stir in feta. Taste, and season with salt & pepper.


    Cover, and chill for at least 2 hours (but no more than 6 hours). Serve with tortilla chips.


Friday, October 28, 2011

Blue Moon Inn Spread


I had never heard of the Blue Moon Inn in Montgomery, Alabama, but 'pinned' this recipe online. Apparently, this inn has since closed, but their recipes live on--they have a Junior League style cookbook. I've seen this dip/spread also called Famous Blue Moon Inn Pimento Cheese.

When we were in Knoxville a few weekends ago, my mother in law graciously let me play in the kitchen while she watched my daughter and I got to try some new recipes. Here are some pictures that remind me of how much I miss East TN....no matter how many things I have found to enjoy in West TN, there is quite nothing like the feel of God's country--and East TN is God's country (of course many would object and that's totally ok! haha). The fields, the farm stands with mums, the little churches, the farms, the mountains, the century old homes with wrap-around porches, the wild walnuts, the openness...


This dip was one of my trials in the kitchen and we really liked it. It was delicious with pita chips and I think it would be delicious to have as a grilled cheese filling too. We had it on sandwiches with soup one night after we got home. Really good basic dip/spread recipe.

BLUE MOON INN CHEESE SPREAD (OR DIP)
Adapted from Southern Living

Yield: 8 Servings
  • 1/2 cup pecans
  • 3/4 cup mayonnaise 
  • 1/2 cup pimiento-stuffed Spanish olives, chopped
  • 1/3 cup bottled chili sauce*
  • 1 teaspoon Worcestershire sauce
  • 1 (10-oz.) block sharp Cheddar cheese, finely shredded

Garnish: 
  • Sliced pimiento-stuffed Spanish olives
  • Assorted vegetables and crackers

    Preheat oven to 350°. 
    Bake pecans in a single layer in a shallow pan 8 to 10 minutes or until toasted and fragrant. Cool 5 minutes; finely chop pecans. (I actually used chopped pecans and baked them a minute or two less)
    Stir together mayonnaise and next 3 ingredients until well blended. Stir in cheese and pecans. Garnish, if desired. 
    Serve with vegetables and crackers. (I think serving it with a sweet vegetable like red bell pepper strips would be super ideal!)
*We did not have chili sauce and used salsa instead--seemed wonderful with it too!


Thursday, October 27, 2011

A Quick Taste of Sweet Fall: Creamy Pumpkin Dip


We spent the evening carving pumpkins last night. Don't you just LOVE pumpkins??

Here is my group hard at work (with a power tool for 'stars'):


And our end results:


While working on carving these pumpkins, I remembered to post this creamy pumpkin dip recipe that had my Bible study girls intrigued earlier this week when I hosted. This dip may not look like much, but it is SUPER good! The recipe was requested by several girls, so thought I'd share. Someone said it tasted like a creamy pumpkin pie. I guess pumpkin pie must be a theme to my baking lately...hmmmm...a bit obsessed? Possibly. Yet, this little dip is worth trying--and no, I'm not calling it healthy, but doesn't Halloween count as the beginning of holiday eating?

I made this sweet dip with a basic pumpkin butter I had made last week in an attempt to make the perfect flat-crispy-chewy chocolate chip pumpkin cookie (BIG FAT FAILURE, by the way--ended up 'cake-like' anyway), but I've made it with canned pumpkin and it works equally well..I imagine this dip would also do well with the addition of chopped pecans...just a thought. And if anyone is wondering about how to make a pumpkin butter similar to Williams-Sonoma's, here's my post on spicy pecan pumpkin butter. Hope to make a new batch by the end of the week--I crave it as soon as the weather turns cooler.

The dip is very simple to make, requires only a handful of ingredients, comes together in a snap, and pleases the masses. Make this as a dessert to enjoy with friends or on girls' night in...your kids will love dipping their graham crackers into it too!


CREAMY PUMPKIN DIP

Makes enough to serve 8 people (at least)

  • 6 ounces reduced fat cream cheese (this is 3/4 of an 8 oz. block), thawed to about room temperature
  • 1/3 cup powdered sugar
  • 1/2-3/4 cup canned pumpkin or pumpkin butter
  • 1/2 tsp. cinnamon
  • 1/4 tsp. nutmeg
  • 1/8 tsp. cloves
  • 1 (8 oz.) container reduced fat Cool Whip


In the bowl of a stand mixer (or any mixer), beat cream cheese and powdered sugar. Add the canned pumpkin or pumpkin butter and spices. Fold in the Cool Whip container.

Serve dip with gingersnaps and/or graham crackers. It's seriously delicious!


Thursday, October 20, 2011

Roasted Red Pepper Hummus


Sorry this is another hummus post--but, I just love hummus. I have expressed it before, but seriously, I REALLY really love hummus. My mom and I made roasted red peppers last time she visited me and we froze them. While going through my freezer, I decided to make a roasted red pepper hummus because those pita chips looked awfully lonely. It turned out excellent.

Moments after this picture was taken, my child tried to inch closer to the hummus and in trying to help her, I pushed the container over the edge and precious dip spilled all over the kitchen floor. My toddler burst into tears. 'What's wrong? Did that scare you?', I asked. 'All my hummus is gone!', she wailed. Well, luckily for her, this made a double batch--I'm freezing some (Yes, the recipe below makes a double batch of any of my other hummus recipes--but you can halve it. We just eat a lot.). 

It's just on the slight side of spicy, but you can use less crushed red pepper.

ROASTED RED PEPPER HUMMUS

Serves a big crowd as an appetizer

  • 1/2 cup roasted red peppers
  • 2 (15 oz.) cans garbanzo beans (chickpeas), drained (reserve 1/2 cup of liquid)
  • 1/2 cup freshly squeezed lemon juice
  • 4 Tbsp. tahini (sesame seed paste)
  • 3 Tbsp. extra virgin olive oil
  • 3 medium garlic cloves
  • 1 tsp. dried parsley
  • 1 1/2 tsp. salt (sea salt preferred)
  • 1 tsp. crushed red pepper flakes
  • 1/4 tsp. smoked paprika
  • 1/4-1/2 tsp. ground cumin

Strain the beans, reserving portion of liquid.

Using a food processor or blender, combine all ingredients and mix until smooth, stirring to ensure even mixing consistency if necessary.

Spoon into covered container and refrigerate overnight before serving, if possible. Store in refrigerator. Hummus will keep for about 2 weeks. 

Hummus can be served alone or with pita chips and/or veggies.

(Having trouble with blogger so if part of my font seems 'off'--sorry! I've been working on it, but can't seem to find a solution yet.)

Wednesday, September 28, 2011

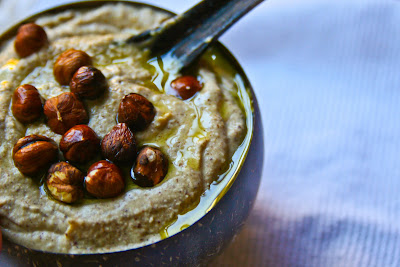
Hazelnut Hummus


I have been remiss in posting. Which is because I haven't spent much time in the kitchen for the last few weeks. We've been BUSY. And gone. A lot. I'm guessing you guys have been busy too! Now that we have officially reached the first couple days of fall, I am craving fall foods. And happy times in the kitchen with the doors wide open (with no fear of flies), the smell of cinnamon, the new Bon Iver album playing, and the sound of little girl chatter in the background...

While going through my fall decorating box in the attic (one of the few that the squirrels living in my attic have not gotten to yet), I found a bag of hazelnuts I used as filler. And it got me thinking....the poor hazelnut is like the stepchild of the peanut or the pecan--but its taste magnificent. Besides coffee creamer, I don't see too many foods including the hazelnut--maybe because the hazelnut is an expensive nut. But it is my favorite nut. I ADORE it. If you like Frangelico, you understand.

So, when I ran across a picture of hazelnut hummus online here, I decided to try my hand at it with the shelled, roasted hazelnuts waiting in my freezer. I can't believe how good it turned out. It's not like traditional hummus--no garlic. It's a spicy, sweet and salty dip/spread and it is amazing and definitely sings 'Fall is Here!' The only thing that would have put this over the top would be to use hazelnut oil instead of olive oil. Hazelnut oil has amazing flavor and depth. However, it is pricey, needs to be stored in the fridge, and might be harder to find (Whole Foods sells it). If you like a more subtle nut flavor, use olive oil--I loved it!

Serve this hazelnut hummus with pita chips or on crostini with blue cheese alongside crisp apples and pears and spiced cider. I can't wait to make this again--think it would be an amazing appetizer to a girls get-together.


SAVORY-SWEET SPICED HAZELNUT HUMMUS 
 Inspired by www.babble.com

  • 1 (15 oz.) can chickpeas, UN-drained
  • 1 cup shelled and roasted hazelnuts
  • 2 Tbsp. sesame 'tahini' paste
  • 2-3 Tbsp. extra-virgin olive oil, PLUS more for drizzling on top of finished hummus
  • 2 Tbsp. pure maple syrup
  • 2 Tbsp. freshly squeezed orange juice (or freshly squeezed lemon juice--but orange works so well with the nutty and maple flavors)
  • 1 tsp. sea salt
  • 1/4 tsp. cayenne pepper (use less if you don't care for much heat)
  • 1/4 tsp. ground cinnamon
  • 1/4 tsp. ground nutmeg
  • 1/8 tsp. smoked paprika (optional-but good)

Using a heavy duty blender, process all ingredients until smooth (a Vitamix works awesome for this!). Spoon out into a serving dish and drizzle with more olive oil or hazelnut oil. Garnish with hazelnuts, if desired.

Makes enough to serve a small group (4-6 people) as an appetizer.

Wednesday, August 17, 2011

Italian Toasts with Roasted Grape Tomatoes

Lately, we seem to be really busy. And I haven't had time for fussy meals. Sometimes we need something a little bit lighter with a piece of grilled chicken, or a summer salad, or some fruit. This dish fits the bill. I can still remember my husband making me cheese toasts in college with processeed cheese and topping the toasts with slices of fresh tomatoes. But, after we got married, we started to use the real stuff--Cheddar (what does Maya Angelou say? When you know better, you do better?).

And we've always served roasted tomatoes as a vegetable side dish, but on night I decided to combine these two things and we really enjoyed this as a light dinner. The crispiness of the bread pairs well with the savory melted cheese and the light sweetness and pop of the tomatoes.


Roasting the tomatoes takes some time, but you can probably them ahead of time and reheat them in the microwave before making the toasts (which take a few minutes only). Otherwise, the dish is super easy. I love it if I have extra tomatoes the next day after I roast them--they are delicious tossed in a salad or in a pasta dish.

By the way, I've never made SLOW roasted tomatoes, but when the weather cools down, I definately want to try Smitten Kitchen's idea. See here.


ITALIAN TOASTS WITH GRAPE TOMATOES

Serves 4 as part of the main entree or 6-8 as an appetizer.
  • 1 package grape tomatoes or a mixture of yellow and red teardrop tomatoes, rinsed (no need to dry off)
  • 2-3 cloves garlic, minced
  • 2 Tbsp. olive oil
  • Salt & pepper to taste (1 tsp. coarse sea salt + ½ tsp. cracked black pepper)
  • 4-8 pieces of country multi-grain bread (the hearty stuff—like La Brea brand, not the soft sandwich type bread, although I'm sure that might work ok, just not as good for this recipe)
  • 4-8 pieces of provolone cheese (smoked is fine)
  • ~2 tsp. Italian seasoning OR 1 handful of freshly chopped basil leaves


Preheat oven to 400 degrees F. 

Place the tomatoes on a large baking sheet. Drizzle with olive oil. Add the garlic, salt and pepper. Using your (clean) hands, roll the tomatoes around until they are even covered by all the ingredients.

Roast for 20 minutes, and then stir. (I had read somewhere that if your tomatoes seem to dry, to add 2 to 3 tablespoons of hot water, but mine have always seemed fine).

Meanwhile (during the time you're waiting to stir the tomatoes), place the bread on another large baking sheet. Top each piece of bread with a slice of provolone and sprinkle the Italian seasoning over the toasts. (If using fresh basil—wait to use it until the toasts are assembled).

Return the tomatoes to the oven and cook for about 20 to 30 more minutes (but before they turn black).

In addition, add the toasts to the bottom rack simultaneously. Let the edges of the toast crisp up and the cheese melt before taking the toasts out (this should about 5 minutes or so—depending on your oven—but keep an eye so they do not burn). Take the bread out and set aside.

When the tomatoes are ready, they will have begun to shrivel.
 

You can assemble the toasts by placing one or two pieces per plate and adding a few roasted tomatoes on top—best if tomatoes are still warm. If you have fresh basil around, top the toasts with some slivered pieces and serve immediately.

Sunday, June 12, 2011

Summer Staple: Black Bean & Corn Salad (or Salsa)


One of my greatest buddies, Lila, posted this recipe on FB recently. She's an amazing cook. She was my college suite-mate and we used to have 'fancy dinner nights'. I miss her cooking. She recommended it from http://www.allrecipes.com/ and here is the original recipe. But, in the interest of time and availability, I had to make do today and the result was still very delicious. Thank you Lila for the recipe and I will make the original sometime soon with peppers and avocado (but with a little less oil). Below is my abbreviated, in-a-bind, version. We couldn't stop eating it--hope you all make Lila's version first!

This is the PERFECT picnic food. Also, a salad you can make a day or so ahead of time before serving. When my friend Kelly and I used to travel for business outside of Charleston (Mount Pleasant, SC), we would always have lunch at this cute place called Square Onion at I'On--a lovely little casual lunch bistro in an idealistic community where you could eat on the sidewalk and see how the other side lived. In our case, the 'other side' were the posh stay at home moms that seemed to have nannies, perfect hair in sweltering 95 degrees, and shopped as a sport. Kelly and I would arrive, hurried, sweaty in our business attire, carrying some file folder that we'd try to sort out over caprese sandwiches and this delightful black bean and corn side salad and figure out who would get the coordinator to write up the adverse events and who would bribe the medical records lady with food for extra files that we realized we needed. Makes me miss you Kelly! Can't eat this salad without thinking of those times....

Hope you all will enjoy this summer staple--salty, tart, spicy, and full of flavor. A great side to sandwiches or quiche or a delicious dip with crispy tortilla chips.


BLACK BEAN AND CORN SALAD

Serves 4

  • 1 can black beans, rinsed and drained
  • 1 can corn, drained
  • 2 Roma tomatoes, diced
  • 2-3 green onions, chopped (use both white and green parts)
  • 1 handful of fresh cilantro, chopped (I used a cilantro 'cube' from Trader Joe's)
  • 1 clove garlic, minced
  • 1 lime, juiced
  • 1 Tbsp. olive oil
  • 1/2 tsp. ground cumin
  • 1/8 tsp. chili powder
  • 1/8 tsp. cayenne pepper
  • Salt & pepper, to taste
Toss all ingredients together and serve as a side dish or with chips as a salsa. Taste for seasonings. You can serve the salad either cold or at room temperature.

Store leftovers, covered, in the refrigerator.

Monday, June 6, 2011

Hello Summer! Mini Caprese Skewers


A word about summer entertaining: Why would you complicate your life in this triple digit heat index weather with complicated food when having company over? You wouldn't. My mother in law taught me a long time ago that most people are just happy to be together--they don't need fancy meals or pristine homes. They want to feel wanted and any effort most always goes appreciated. It took me YEARS to get this. And I thank her from the bottom of my heart as Eastern European entertaining seems to be a bit more complicated--even mom these days has given way to making her life a bit easier. These 'warehouse clubs' have impacted our lives for the better.

Hence, these summer days, we have been known shove all our messes in closets or drawers, buy Costco salmon burgers to throw on the grill, serve chips as a side, make one signature fun drink, and accept our guests' offers to bring a dessert or salad. Amazingly enough, my stress level has plummeted and everyone is relaxed and happy (except for the next day when I have to pull out the messes from the closets-what to do with all the ironing and mail?!).

This is one of the reasons I grow basil in the summer....caprese salads, caprese pizzas, caprese sandwiches, caprese bruschetta, caprese skewers....plus, it makes my husband fall in love with me all over again (yes, it's that easy when it comes to 'caprese' things). Below is a caprese sandwich we ate on the Amalfi Coast of Italy a few years ago (Positano):


So as my neighbor, Patsy, says: I've said all that to say.....that this is an amazing and easy, non-recipe recipe to remember for when you want to have people over. We made these babies for a friend's bridal shower over a year ago and it was a hit. Most of you have tried them, but it doesn't hurt to be reminded. It's a lot easier to eat things on 'sticks' when you're walking around--no need to carry those forks for this favorite salad of many. And YES, you can still make it with regular mozzarella if you can't find buffalo (fresh) mozzarella or want to save a little cash. No one will say no! It's the Italian flag!


MINI CAPRESE SKEWERS

What you will need:

  • Grape or cherry tomatoes
  • Fresh buffalo mozzarella, cubed (OR regular mozzarella, cubed)
  • Fresh basil leaves
  • Toothpicks
  • OPTIONAL: Extra virgin olive oil, balsamic or red wine vinegar, and salt & pepper--OR Italian dressing
Thread or pierce one of each tomato, mozzarella cube, and basil leaf. I prefer to use smaller tomatoes (like the 'grape' variety) so that we don't have explosive red messes on people's clothes when entertaining. But if you have cherry tomatoes, you can always halve them too. Fold the basil leaves before threading if they are too large. The key is to try and cut the cheese about the same size as the tomato that it the skewer is easier to eat.

ONLY if you wish, drizzle with the olive oil, balsamic vinegar, and sprinkle with salt and pepper. Keep in mind that this may make them a little messier if people are eating while standing or walking around. (Some people like to serve these with pesto sauce, but I find that the basil flavor can be too overpowering).

For bigger skewers, use mozzarella balls and cherry tomatoes. Make them REALLY big skewers (more of a caprese salad skewer) with bamboo sticks.


ENJOY!
 
You can also cut the tomatoes in half and thread one half first and one half last (after the cheese and basil) to make little 'sandwiches' like we did for a bridal shower last year--our friend, Kate, enjoyed them ;). Group the skewers together (as it seems much more impressive looking-ha!)--here is what I mean:


LASTLY (how do I have this much to say over something so ridiculously simple? LOVE), you can make these little skewers with variations:
  • Use strawberries instead of tomatoes (or blackberries)
  • Use smoked mozzarella or provolone
  • Thread on a cube of toasted bread for a panzanella skewer (panzanella is Italian bread salad)
  • Thread on a roasted or grilled mushroom
  • Thread on a cube of grilled chicken
  • Try a strawberry, mint, cheese skewer
  • Thread on some tortellini instead or with the cheese

The possibilities are pretty plentiful.....have fun--this idea is pure genius and obviously not mine!

Saturday, May 14, 2011

New Wave Bruschetta

Yes, I made that name up. If you've never had raw zucchini, you're missing out--it has amazing texture and a very mild flavor that can be enhanced with whatever seasoning or oils you use. I love to toss it in salads.
This recipe came about on a whim when I ran out of time to bring a snack to Bible study. Now I want to make it again. It was a fun variation on the traditional bruschetta. And a great way to use up zucchini if you have a bumper crop. The bruschetta is crispy, creamy and has a fresh flavor--ideal for summer entertaining.


NEW WAVE BRUSCHETTA

Serves 6-8 as an appetizer
  • 1 large multigrain baguette, sliced into ~1/4 inch slices
  • Olive oil cooking spray (or some regular olive oil and a pastry brush)
  • 1 (8 oz.) pkg of reduced fat cream cheese, softened
  • 2 Tbsp. reduced fat sour cream or fat-free Greek yogurt
  • 1 medium garlic clove, minced
  • 1 small handful of basil, chopped
  • Salt & pepper, to taste
  • 1 medium zucchini, washed well, dried and diced small
  • 2 tomatoes, rinsed, dried and diced--drained in colander if possible (I like the vine ripened variety)
  • 1/3 cup Kalamata olives, sliced or chopped (yes, you may use Spanish ones if you don't like this variety)
  • 1/4-1/3 cup freshly grated Parmesan cheese
  • 1-2 Tbsp. lemon juice (I used half a lemon)
  • 1-2 Tbsp. extra virgin olive oil
Preheat oven to 450 degrees.

Place the bread slices on a cooking sheet. I sprayed each bread slice with a little bit of olive oil spray--if you don't have olive oil spray, coat each slice with olive oil with a pastry brush.  Toast the bread slices in the top rack in your oven--this may require you to do the little slices in a couple batches depending on the size of your oven.

Toast for approximately 5-6 minutes, until the bread just begins to turn golden brown. Let cool.

In the bowl of a small food processor, mix the sour cream or yogurt with the cream cheese, minced garlic, and basil. Season with salt and pepper and process until smooth. If you don't have a food processor or are in a hurry, go ahead and mix it by hand (I just wanted the basil fully incorporated). Set cream cheese mixture aside.

In a medium bowl, mix the zucchini, tomatoes, olives, Parmesan cheese, olive oil, and lemon juice. Season with salt and pepper and taste--adjust seasonings if necesssary. Stir gently.

JUST prior to serving, spread a little bit of the cream cheese mixture on each bread slice. Scoop some of the tomato-zucchini-olive mixture on top of the cream cheese. Serve the toasts immediately.

Saturday, March 19, 2011

Vegetable Ceviche


Sometimes eating vegetarian is just dreamy. Try this recipe and I think you you will agree. This dish is great for days when it's too hot outside to turn on your oven.

Last May, my husband and I vacationed in Cabo San Lucas. We had a great time and decided to celebrate our anniversary dinner a little early at a posh restaurant with NO menu. It was a 7 course meal and the chef was informed of any exclusions in our diet. So when the first course came out as sea bass ceviche, I was a deer in headlights--here was RAW fish. (By the way, here's the scoop on ceviche.) Even when I do eat meat, I don't want to see blood on the plate and I certainly didn't expect raw fish outside of a sushi roll. One would say, I am limited. But one would be wrong--because I ate that raw fish and it was fantastic! Needless to say, the rest of the meal was one of the most amazing culinary experiences we have ever had.

And now that spring is here again, I have been dreaming of that ceviche and wondering how to make a vegetarian option. The result below is very, very good. And incredibly healthy. I ate about half the recipe by myself. But, it would make a great starter option or even as a side dish to grilled fish.

Next time I make this, I will try it with bell pepper and serve it on a lettuce bed with pita chips. It's almost like salsa (is what you're thinking.....)


VEGETABLE CEVICHE

Makes approximately 4 cups (Can probably serve 4-6 as a small starter)
  • 1 can (14 oz) artichoke hearts, drained and roughly chopped
  • 1/3 pound (about 6 ounces) of mushrooms, cleaned and chopped
  • 1 large tomato, slightly drained or 1 cup sliced grape tomatoes
  • 1/2 red onion, diced (or 1/3 cup scallions, chopped)
  • 1 large clove garlic, crushed
  • 1/4 cup lime or lemon juice (I juiced only half a lemon & it was enough)
  • 2 Tbsp. olive oil
  • Salt & pepper to taste
  • 1 avocado, peeled, pitted and chopped
In a medium bowl, combine all ingredients EXCEPT for the avocado. Cover and refrigerate for at least 30 minutes. When thoroughly chilled, stir in avocados. Taste and adjust seasonings, if necessary.

Serve cold and with pita chips.

Sunday, February 13, 2011

Savory Swiss Cheesecake


My husband loves cheesecake. But, when it's just the two of us, it's hard to make a whole cheesecake. However, being that it is almost Valentine's Day....I needed some kind of cheesecake--the man works hard after all! I first made this appetizer years ago when hosting a girls' night in and it was very well received. When the boys came home to get their girls, they inhaled the leftovers and said, 'You have to make that again.' And thus the savory cheesecake has made a permanent place on our family favorites list.

I love the idea of a savory 'cheesecake'--it's a wonderful first entree to serve with crackers and veggies while sipping on something sweet and waiting for dinner to come out. Or, I can see a slice served on top of a green salad with some crusty bread.

And the best thing is that you make it the day before! The original recipe is from http://www.allrecipes.com/, but I have changed it a bit. I hope you like it!


SAVORY SWISS CHEESECAKE
Adapted (changed) from www.allrecipes.com

Can probably serve 10-12 as an appetizer.

For thin crust:
1 cup finely crushed crackers (original recipe says 'thin wheat' but any crackers will do)
3 Tbsp. light butter, melted

For cheesecake:
12 oz. reduced fat cream cheese (1/3 less fat), softened
2 8-oz. containers plain fat-free yogurt, Greek style preferred (sour cream will work also)
1 egg
1 egg yolk (I use about 1/4-1/3 cup eggbeaters)
1/4 tsp. dried basil
1/8 tsp. dried rosemary
1/4 tsp. salt
1/4 tsp. pepper
2 cups shredded Swiss cheese
1/4 cup freshly shredded Parmesan cheese (optional)
3 green onions, chopped--green and white parts

To Serve:
Assorted crackers
Fruit or vegetables

In a small bowl, combine cracker crumbs and butter. Press onto the bottom of a 9-in springform pan; set aside.

In a large mixing bowl, beat cream cheese until smooth. Add the yogurt, egg, yolk (or whites), basil, rosemary, and salt & pepper; beat on low speed just until blended. Stir in Swiss cheese, green onions, and Parmesan cheese (if using).

Pour cheesecake mixture into prepared springform pan. Place the pan on a baking sheet. Bake at 350*F for 40-50 minutes or until center is almost set.


Cool on a wire rack for 10 minutes. Carefully run a knife around edge of pan to loosen; cool 1 hour longer.

Refrigerate overnight. Remove sides of pan. Cut into wedges; serve with crackers.


Refrigerate any leftovers.

Monday, January 10, 2011

A Hungry's Woman's Snack: Italian Nachos


If Italians made nachos, this is what I imagine they would be like...

It was created from hunger. And it was AWESOME. By accident. Sometimes, like myself, you may have an impulsive buy on something random like...Italian toasts (aka Panetini). And then halfway through the bag, you start to wonder what else you can do with them.

Feel free to add other ingredients--sausage or veggie sausage would be delicious on these too. And if you don't have fresh mozzarella, regular shredded mozzarella.

But, once again...I have no measurements for this recipe. If you are so regimented that you cannot cook without precise measurements, you are wasting your time on this blog--because I am not a regimented person. You'll have to use your judgement and put more or less of what you like and don't like into this 'creation' (for lack of a better term). Somehow, I feel like I might have insulted the Italians with this creation. Sorry.

ITALIAN NACHOS

Italian toasts or panetini (Nonni brand is very good)
Bruschetta topping (or a homemade concoction of diced tomatoes, dried basil, garlic salt, and olive oil)
Red onion, chopped
Mushrooms, chopped and sauteed
Basil pesto
Kalamata olives, chopped
Fresh (Buffalo) mozzarella, roughly chopped
Parmesan cheese, freshly grated
Salt & pepper, to taste
Extra virgin olive oil (optional)

Layer all ingredients in a pan (I used a small non-stick sheet pan). Start with the toasts and layer all the ingredients--dropping bruschetta topping and pesto onto the ingredients and ending with cheese(s). Feel free to season and drizzle with olive oil.

Broil (on low if you can) or roast until the cheese melts and starts to slightly brown.

Makes a really good appetizer. I hope you like it.


Saturday, January 8, 2011

Roasted Italian Portabellas


This is another example of what happens when we are hungry and throw together ingredients we love. Result: Fantastic. Thought I'd share in case anyone else had these ingredients and loved mushrooms as much as we do. Sorry--I don't have precise amounts :)

These mushrooms can be made into a main meal with some sauteed/steamed broccoli rabe and hearty bread. Or, you can serve them as an appetizer to be shared--make as many or as little as you want.

ROASTED ITALIAN PORTABELLAS

Portabella mushrooms, rinsed, stemmed
Marinara Sauce
Basil pesto
Fresh (buffalo) mozzarella
Pine nuts
Cracked pepper

Preheat oven to 400-425 degrees F.

For each mozarella cap, add a couple tablespoons of marina sauce in each portabella mushroom. Add a tiny bit of pesto (a little goes a long way and most store-bought pestos already have salt in them so no extra salt is needed).

Top with a couple slices of fresh mozzarella and sprinkle with pine nuts and pepper.

Roast for about 20 minutes or until cheese gets bubbly and melts (but before cheese starts to burn-a little brown is ok).

Serve hot with crusty bread.


P.S. You can assemble these mushrooms ahead of time and leave them in the fridge for up to 24 hours ahead of time. Just take them out and bake them.