Showing posts with label desserts. Show all posts

Monday, August 13, 2012

Best & Easy Southern Peach Cobbler

Life is better than death, I believe, if only because it is less boring, and because it has fresh peaches in it.
― Alice Walker


I have been meaning to post on this recipe for a couple months but just haven't gotten around to it. This spring, we were able to enjoy our last peaches from the neighbors' tree. Those neighbors, who dropped by just to say hi, to bring us produce when they bought extra for us to enjoy, the ones to offered to babysit and watched our house when we were gone--you know the ones that you laugh, cry, and pray with--those neighbors had become our family. The peaches were just bonus. I'll never be able to eat another peach again without remembering Henry Groves back his truck into their driveway up the hill and raise my daughter up into the peach tree so she could pull the fruit off the branches.


Just look at these fuzzy little beauties!!! Their smell was simply intoxicating.


We eagerly awaited their harvest and battled the squirrels for the best ones. I asked what I could do to repay them for these gifts and Henry said, 'make me a cobbler.' I laughed. Of course, I'd only made one peach cobbler before in my life and it wasn't that good. So here went effort #2....it was worth it. I would like to thank Southern Living for a totally uncomplicated, straight-forward and easy recipe.

For the record, I think the best peaches are from Gaffney, South Carolina. You convinced me sisters-in-law. You really did. Here's the town symbol off the highway (image courtesy of wikipedia). It's right next to the outlets...so double the reason to go!!!


I've seen peaches these first couple weeks of August at the farmer's markets and produce stands so if you happen to find some good peaches, I suggest you try this easy and delicious peach cobbler recipe! I'd like to try it with some whole wheat pastry flour next time--I tried the light butter before, but the real butter really makes it better in this case. Splurge.

There is no need to peel the fruit and the reviewers say you can use frozen peaches too or any kind of berries you like! My daughter had fun watching the batter rise up around the fruit through the oven window. Enjoy this delicious dessert with some vanilla bean ice-cream or frozen yogurt.

EASY PEACH COBBLER
Adapted from Southern Living

Serves 8-10


  • 1/2 cup unsalted butter (1 stick)
  • 1 cup all-purpose flour
  • 2 cups sugar, divided (I used slightly less)
  • 1 Tbsp. baking powder
  • Pinch of salt
  • 1 cup milk 
  • 4 cups fresh peach slices (I used more like 5 1/2 cups)
  • 1 Tbsp. fresh lemon juice 
  • Ground cinnamon or nutmeg (optional--but I used a pinch of both--so worth it!)

  1. Melt butter in a 13- x 9-inch baking dish.
  2. Combine flour, 1 cup sugar, baking powder, and salt; add milk, stirring just until dry ingredients are moistened. Pour batter over butter (do not stir).
  3. Bring remaining 1 cup sugar, peach slices, and lemon juice to a boil over high heat, stirring constantly; pour over batter (do not stir). Sprinkle with cinnamon, if desired.
  4. Bake at 375° for 40 to 45 minutes or until golden brown. 
  5. Serve cobbler warm (pull out the ice-cream!) or cool.

Monday, April 16, 2012

Banana, Chocolate Chip, and Granola Cookies


So, with two months left until we leave our house and downsize to less than half of what we have now....I've got a myriad of foods and odds and ends ingredients that need to be used up. Powdered sugar, lentils, Swiss cheese, dried papaya, dehydrated mushrooms, corn flakes, etc. In fact, I got really creative this weekend and made waffles from random pantry items: coconut oil, quinoa flakes, eggs leftover from Easter, leftover buttermilk, sorghum, cornstarch, etc. My family ate them and ate them again. While I watched silently. And enjoyed the smell of coconut in my house. And then decided to tackle more ingredients...like granola.

What's a person to do with leftover granola when they're burned out on parfaits? Well, I saw these cookies online and had to try them. They are VERY good. Moist...flavorful...quite the treat. Glad I stumbled upon the recipe so that I can have another use for bananas and granola. 

The recipe below is my adapted version: I used less sugar (and brown, not white), a not-so ripe banana (so the pieces didn't get smushed), a different granola, and totally upped the amount of chocolate chips--and felt I could have even used more! Delicious.


BANANA, CHOCOLATE-CHIP, AND GRANOLA COOKIES
Adapted from www.biggirlssmallkitchen.com

Makes 3-4 dozen
  • 1/2 cup light brown sugar, packed
  • 1/2 cup dark brown sugar, packed
  • 1 cup butter (2 sticks), softened
  • 1 egg
  • 2 ¼ cups all-purpose flour
  • 1 tsp. baking soda
  • ½ tsp. salt
  • 1 1/2 cups semi-sweet chocolate chunks (or chips)
  • 3/4 cup Cascadian Farms Maple-Brown Sugar Granola (I used Nature's Path Pumpkin Flax Plus)
  • 1 medium banana, cut into chunks

Preheat oven to 375°F.
Mix sugars and butter in a large bowl. With a mixer, hand-held beater, or very strong arm, beat until creamy. Then beat in the egg until the batter is fluffy and light.
Stir in flour, baking soda, and salt and mix until basically combined. Using a rubber spatula, fold in the chocolate chips and granola. Now fold in the banana, being careful not to smush the pieces too much.
Drop dough by rounded tablespoonfuls about 2 inches apart onto ungreased cookie sheet (yes, I did add some more chips on top!). Bake 6-8 minutes or until just barely set.
Cool for 5-10 minutes on the cookie sheet, then remove to a rack or a plate to finish cooling.

Wednesday, March 28, 2012

Old-Fashioned Blackberry Orange Cake (with or without Ground Almonds)


Now that spring is here and the weather has been so divine, it was about time to post something lovely and inspiring. And that's just what I find this old-fashioned orange-blackberry cake to be.

Thought I'd post some shots I took so far that have made us welcome spring:


There's something about this weather that makes a person want to be outside. So take this cake outside with your loved ones after dinner and enjoy the feel of warmer breezes, the sound of birds chirping, and the smell of new grass growing. And yeah, don't forget to bring the allergy medicine.


I have made this cake several times over the last few months and love it. It's particularly good in the morning too with a hot cup of coffee if you can stare out your window in silence for a few moments before the day's activities overwhelm you. This cake makes me nostalgic. It is a simple recipe that, again, reminds me of the kind of dessert my mother or grandmother would make that highlights the season's best fruits.

If you prefer lemon extract instead of orange, you could easily substitute that. Or replace the blackberries with raspberries. Or you could skip the raw sugar topping and make a glaze of powdered sugar and fresh orange or lemon juice to drizzle on top of the cooled cake--there are several possibilities.


OLD-FASHIONED BLACKBERRY ORANGE CAKE (WITH OPTIONAL GROUND ALMONDS)


Serves 6-8

  • 1 cup sugar
  • 1/2 cup butter
  • 2 eggs
  • 1 tsp. fresh orange zest (zest of about 1 orange)
  • 1 cup flour
  • 1 tsp. baking powder
  • 1/4 cup ground almonds (optional-but oh so good!)
  • 1 cup fresh blackberries (or slightly more)
  • 2 Tbsp. raw sugar, for sprinkling on top


Preheat oven to 350°F.


Combine sugar and butter, then beat for 3 minutes on medium-high speed with paddle. Add in the flour, baking powder, eggs and zest. Scrape bottom of mixing bowl, then continue to mix for 2 minutes at medium speed.

 
Pour this batter into greased and floured tart pan with removable bottom or cake pan with removable sides. Drop berries over the top of the cake as evenly as possible. Then, sprinkle the raw sugar over the berries.
 
Bake cake until it tests done in center or until the cake pulls from the side of the pan, about 50 to 60 minutes depending on oven.
 
Let cake cool for about 10 minutes in the pan and then gently loosen edges of removable tart pan. When cooled, lift from the bottom on the tart pan or simply un-mold the cake pan sides.
 
Dust with powdered sugar or brush with a light glaze of your choice. (totally optional!)
 
This is a delicious cake served with vanilla or blackberry ice-cream. Enjoy!


Thursday, February 9, 2012

Salted Caramel Chocolate Chip Cookie Bars


We're moving in a few months and my husband has taken ghost-like characteristics due to board studying. Our to-do list is feeling a bit insurmountable right now, so my in-laws graciously came to visit and help us start with the 'purge, organize & donate' project. It was wonderful. The problem is, we need about 10 more of those visits! I knew that all I had to say to my mother in-law was 'salted caramel and chocolate' and I knew she'd be on board. So while the guys were cleaning out the garage, we made our new favorite cookie bar!

Not sure how to start discussing these bars because all I can say is: They. Are. Amazing. I absolutely HATE how good they are. I sort of wish I'd never even made this recipe....because I simply could not stop eating them. Oh Salted Caramel Chocolate Chip Cookie Bars, you have stripped me of all self-control. And it is downright embarrassing. The least I could do is share along the recipe from Maria & Josh.

Try these delicious, unpretentious bars--they're a step up from the traditional chocolate chip cookie. And if you are worried about your own self-control, make them to serve for others! They will love you for it :) The only thing different we did was to use the WHOLE caramel package of these. Don't skimp or skip the salted layer--here's what it looked like during that step:


The coarse sea salt is wonderful on top of the sweet, gooey caramel. The chocolate takes it over the top. Keep in mind that the caramel hardens after a while, making the bars easier to cut.

(SWOON!)


CHOCOLATE CHIP SALTED CARAMEL BARS

Adapted from www.twopeasandtheirpod.com

  • 2 1/8 cups all-purpose flour
  • 1/2 tsp. salt
  • 1/2 tsp. baking soda
  • 12 Tbsp. butter, melted and cooled to room temperature (1 ½ sticks)
  • 1 cup light brown sugar
  • 1/2 cup granulated sugar
  • 1 large egg
  • 1 large egg yolk
  • 2 tsp. vanilla extract
  • 2 cups chocolate chips (we used closer to 3 cups)
  • 10 ounces caramel candy squares, unwrapped (we used the whole 14 oz. package)
  • 3 Tbsp. heavy cream
  • Coarse Sea salt, for sprinkling over caramel and bars (don't skimp!)

Preheat oven to 325 degrees F. Spray a 2-quart baking pan (which is an 11 X 7 pan-I used a glass Pyrex dish) with nonstick cooking spray and set aside.
In a medium bowl, whisk together flour, salt, and baking soda. Set aside.
In the bowl of a stand mixer, mix the melted butter and sugars together until combined. Add the egg, egg yolk, and vanilla extract and mix until smooth. Slowly add the dry ingredients and mix on low, just until combined. Stir in the chocolate chips.
In a large microwave safe bowl, combine the caramels and heavy cream. Microwave caramels on High until caramels are melted, stirring every 20 seconds. This will take about 2 minutes, depending on your microwave.
Divide the cookie dough in half. Press half of the cookie dough into the prepared pan, smoothing the top with the spatula. Pour hot caramel over the cookie dough. Sprinkle caramel with sea salt. Drop spoonfuls of cookie dough over the caramel and spread dough with a spatula until the caramel is covered. Sprinkle the bars with additional sea salt.
Bake cookie bars for 30 minutes or until the top of the bars are light golden brown and the edges start to pull away from the pan. Cool bars on a wire rack to room temperature. Cut bars into squares and serve.


Saturday, January 28, 2012

Non-Dairy Chocolate Sauce to Die For


Last night, we had a great dinner with friends. And I got to bring dessert--which paled compared to the meal, but every once in a while, I let myself get spoiled. Seriously, isn't it the most wonderful thing in the world when someone feeds you a home-cooked meal?! It was my first time making a chocolate sauce to go with an amaretto cheesecake. And we really liked this chocolate sauce. Of course, it comes from famed pastry chef, David Lebovitz. Apparently, he's been making it for 20 years. Yeah, it's pretty darn good!

Since Valentine's Day is coming up, I figured maybe some of you might be looking for a fast and easy chocolate sauce to drizzle over your desserts. You might have to resist eating it out of a jar. Keep it in the fridge and warm it up before serving. I made some small changes in parentheses. I used agave nectar instead of corn syrup--I have a feeling that corn syrup would give you a bit thicker and shinier texture. 

  • One thing I did do that did end up tasting pretty delicious, was do 1/2 cup coffee (strong, unsweetened) + 1/2 cup water. However, keep in mind that coffee is acidic--and that helped me understand why my sauce did end up crystallizing a tiny bit--the acid affected the integrity of the sauce--not enough to bother us, but enough to notice it visually. I think it would be better to add a tablespoon or two of coffee liqueur instead if you want a little mocha flavor.

By the way, we weren't the only ones having fun--check out our children having their first date--this cracks me up as they were even provided 'candlelight'...the only thing missing is a shared pasta noodle between those busy mouths. 


Love may be in the air.....I think it would be great to add a little peppermint extract to this chocolate sauce and serve it over ice-cream at Christmas...or Valentine's Day. Which we are DEFINITELY preparing for at this house. All I hear about is hearts...heart songs, prayers, books, crafts,


..we even watched a little open heart surgery on youtube ('that was cool, mom!'). Hope everyone can use a little chocolate in preparation :)

THE BEST CHOCOLATE SAUCE
Adapted from www.davidlebovitz.com
About 2 1/2 cups
  • 1 cup (250 ml) water
  • 1/2 cup (100 g) sugar
  • 1/2 cup (160 g) light corn syrup, agave nectar, or glucose (I used agave nectar)
  • 3/4 cup (75 g) unsweetened cocoa powder (preferably Dutch-processed)
  • 2 ounces (55 g) bittersweet or semisweet chocolate, finely chopped--(I used 3 ounces of good quality semi-sweet chocolate chips)
  • 1/2 tsp. sea salt (my addition)

In a medium saucepan, whisk together the water, sugar, corn syrup (or agave or glucose), and cocoa powder.
Bring to a boil over medium heat. Once the mixture has just begun to simmer and boil, remove from heat and stir in the chopped chocolate until melted.
Serving: You should let the Chocolate Sauce stand for a few hours before serving, which will give it time to thicken a bit.
Storage: Store the chocolate sauce in a covered container in the refrigerator for up to 10 days. Rewarm before serving.
ENJOY! This sauce is delicious over cheesecake and when added to hot milk to make hot chocolate. Serve it over strawberries and ice-cream or dip bananas in it for a delicious treat. 

Sunday, January 22, 2012

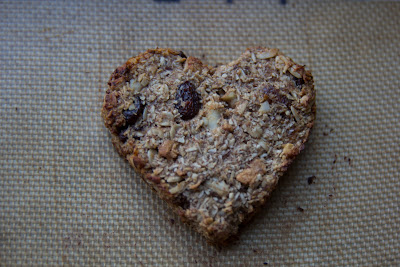
Soft Granola Cookie Hearts


These little treats are vegan. I hesitate to say that as many people are still coming around to not being scared by the word 'vegan.' I was one of those people that would instantly shut down at the idea of veganism due to less than tasty vegan food I had previous eaten (and if anyone has good—I mean, edible, vegan cheese--I'd love to know about it because I have yet to find that). But now that the world is coming around more to the idea of vegan eating (obviously from my chicken & dairy recipes, I'm not fully convinced I want to be totally vegan), the public is finally getting exposed to eating BETTER vegan food/recipes. You know, things that don't taste like cardboard. And recipes that aren't just composed of raw vegetables (not that there is anything with raw vegetables!).

Well, my child has been sick quite a bit this winter already--mainly due to exposure to other kids with illnesses—playdates and Mother's Day Out/Preschool. Because of this, I tried to give her less dairy. And because of the reward system instituted last spring, she thinks she deserves treats for good behavior (thank you potty training). So, what's a mom to do? Make vegan treats.

I love this little recipe—I hope you will too! It's one of those that you won't feel guilty eating or giving to your children. It's a sugar-free treat, has plenty of fiber from the whole grains and dried fruit and protein from the nuts. You could use any dried fruit you like, I just happen to like dried pineapple in things lately. I would also like to replace the bananas with prunes or pumpkin in this recipe sometime. These come together really fast (despite that at first glance it seems to have a lot of ingredients).

I tried to make this particular one more appealing to my daughter by shaping the cookies into little hearts (use a cookie cutter). And in doing so, realized that this would be a great little Valentine's 'cookie' to make with your kids. However, I'm sure any cookie cutter would do or you could just drop the 'dough' onto the sheet and shape with your hands if you are a minimalist.


SOFT GRANOLA COOKIE HEARTS
Makes 22-24

For Liquid Mixture:

  • 1 cup mashed bananas (about 3 medium)
  • 3 Tbsp. almond or soy milk
  • 1 tsp. pure vanilla extract
  • ¼ cup safflower oil (canola or another flavorless oil can be replaced)
  • zest of one orange (you could skip—but I like it in conjunction with the cloves)
Dried Fruit to add to liquid mixture—can replace with your favorites for 1 cup total of dried fruit:

  • ¼ cup chopped dried pineapple
  • ¼ cup chopped dried apple
  • ½ cup raisins (golden raisins fine too)
For dry mixture:

  • 1 ½ cups old fashioned oats (not instant)
  • ¾ cup shredded, unsweetened, coconut
  • 1 Tbsp. cinnamon
  • ¼ tsp. cloves 
  • ½ tsp. salt
  • 1/8 tsp. baking powder (I like aluminum-free)
  • ¼ cup almonds (processed in food processor to make 'almond meal')
Nuts to add to dry mixture--can replace with nuts of your choice for a total of ½ cup chopped nuts:

  • ¼ cup chopped Brazil nuts
  • ¼ cup walnuts

Preheat oven to 350 degrees. Set aside cookie sheets with Silpats or covered with parchment paper.

In a small bowl, mix your liquids. Add the dried fruit and mix well. If need be, use a whisk and push down on any clumps of fruit to separate and stir again. Set aside to let the fruit soften while you work on the dry ingredients.

In a larger bowl, stir your dry ingredients together and add in the nuts.

Now, add your liquid mixture to your dry mixture and stir well.

Place a cookie cutter (or different shaped ones—use medium-big sized cutters) on the cookie sheet and fill with granola mixture until it reaches about halfway into the height of the cookie cutter. Pat down with a spoon and spread evenly into the cookie cutter. Lift up your cookie cutter leaving the shape behind. Repeat until you get your sheet(s) filled. The 'cookies' don't rise much so you won't need to worry that they'll spread out into each other.

Bake for about 15-20 minutes—keep your eye on them so they don't burn (try to swap cookie sheets halfway--the bottom one can go on top and the top one can go on bottom).

Let cool before eating. (I store these treats in a covered tupperware container in the refrigerator & freeze half) 


Oh yeah, they're also really good for breakfast with a glass of soymilk and some coffee.


Wednesday, January 4, 2012

Quick Cranberry Cake (with our without Lemon Curd)


Time for some cake! Even though Christmas has come and gone, a treat here and there should still be allowed, right? Plus, the New Year is here! Welcome 2012! Let's continue to celebrate. Cranberries should still be in season at your grocery store...

I love the change in seasons--all seasons have something so wonderful to contribute to our lives--I can even stomach the shorter days of winter knowing that I can come home, cuddle with my loved ones, have candles burning, or be forced to read--but I just can't take the illnesses from winter anymore! And we've been sick some more. Baking cheers me up, so I wanted to post on this super easy cranberry cake I tried in between rocking my daughter for comfort, doing laundry, and trying to pack for a trip that no longer happened (thank you viruses)--then again, this may also have saved me from another speeding ticket...

Hope everyone had wonderful holidays! Here is what I've enjoyed so far in this winter season:


I had my husband take some of this lovely cranberry cake over to the neighbors on Christmas for good cheer and made a second one for us just to use up the frozen cranberries in my freezer. The first batch I made with the addition of lemon curd and the second, just plain. I loved them both. However, here is what I learned:

  1.  I preferred to use the 9X13 pan better than the 10-inch round pan. The 10-inch round pan will give you more of a gooey center--which is alright--almost pudding-like. But, I think I preferred a more sponge-like cake and settled on the longer, thinner pan. But, either way is wonderful. 
  2. For the second cake, I sprinkled a little Turbinado sugar on top before baking. I love the crunch! 
  3. I'm sure the cake would also benefit with the addition of lemon or orange zest--but it's also nice to not have all cranberry recipes taste the same and this one really pulls out the freshness of the berry when it stands alone.
  4. I used half light butter and half regular fat butter for the first recipe and all light butter for the second recipe and preferred the first version better due to the moistness (so, it's fine to use a little light butter--probably not for the whole cake, though if you do, you will still like it a lot).
  5. You could also replace the cranberries with blueberries if you prefer--but I love the tartness of the seasonal cranberry! YUM!
  6. *Like my first cake, you could add 2-3 tablespoons of lemon curd (add 1 extra Tbsp. of flour if you add lemon curd)

This is a wonderfully rustic dessert with vanilla ice-cream or with a hot drink like cocoa. Or eat it on its own. Though not terribly healthy, it is tart and sweet, and seems to fill the need for comfort. Enjoy!


QUICK CRANBERRY CAKE

  • 3 eggs
  • 2 cups sugar
  • 3/4 cup butter, slightly softened and cut into chunks (I used salted, but original recipe calls for unsalted)
  • 1 tsp. vanilla
  • 1 Tbsp. kirsch (optional)--I skipped this even though I had it
  • 1 tsp. of salt
  • 2 Tbsp. of milk
  • 2 cups all-purpose flour
  • 2 1/2 cups cranberries (1 bag)
  • *2-3 Tbsp. lemon curd (OPTIONAL--see Point #6 above)

Preheat oven to 350°F. Lightly grease a 9x13 pan or a 10" springform pan.

Beat eggs and sugar together for 5-7 minutes; the eggs will increase in volume quite a bit, streaming into ribbons when you lift the beaters. They will also turn pale yellow.

Add butter and extracts (and lemon curd, if using). Beat for 2 minutes. Add the milk and salt and mix for another 30 seconds.

Stir in flour and fold in cranberries. Pour into greased pan.

Bake 45-50 minutes for a 9x13, or a little over an hour for the springform. You may need to tent the cake with foil in the last 15 minutes or so to keep the top from browning. Cool completely on a wire rack before serving.

Hello my little bright spot in a dreary day.


Thursday, October 27, 2011

A Quick Taste of Sweet Fall: Creamy Pumpkin Dip


We spent the evening carving pumpkins last night. Don't you just LOVE pumpkins??

Here is my group hard at work (with a power tool for 'stars'):


And our end results:


While working on carving these pumpkins, I remembered to post this creamy pumpkin dip recipe that had my Bible study girls intrigued earlier this week when I hosted. This dip may not look like much, but it is SUPER good! The recipe was requested by several girls, so thought I'd share. Someone said it tasted like a creamy pumpkin pie. I guess pumpkin pie must be a theme to my baking lately...hmmmm...a bit obsessed? Possibly. Yet, this little dip is worth trying--and no, I'm not calling it healthy, but doesn't Halloween count as the beginning of holiday eating?

I made this sweet dip with a basic pumpkin butter I had made last week in an attempt to make the perfect flat-crispy-chewy chocolate chip pumpkin cookie (BIG FAT FAILURE, by the way--ended up 'cake-like' anyway), but I've made it with canned pumpkin and it works equally well..I imagine this dip would also do well with the addition of chopped pecans...just a thought. And if anyone is wondering about how to make a pumpkin butter similar to Williams-Sonoma's, here's my post on spicy pecan pumpkin butter. Hope to make a new batch by the end of the week--I crave it as soon as the weather turns cooler.

The dip is very simple to make, requires only a handful of ingredients, comes together in a snap, and pleases the masses. Make this as a dessert to enjoy with friends or on girls' night in...your kids will love dipping their graham crackers into it too!


CREAMY PUMPKIN DIP

Makes enough to serve 8 people (at least)

  • 6 ounces reduced fat cream cheese (this is 3/4 of an 8 oz. block), thawed to about room temperature
  • 1/3 cup powdered sugar
  • 1/2-3/4 cup canned pumpkin or pumpkin butter
  • 1/2 tsp. cinnamon
  • 1/4 tsp. nutmeg
  • 1/8 tsp. cloves
  • 1 (8 oz.) container reduced fat Cool Whip


In the bowl of a stand mixer (or any mixer), beat cream cheese and powdered sugar. Add the canned pumpkin or pumpkin butter and spices. Fold in the Cool Whip container.

Serve dip with gingersnaps and/or graham crackers. It's seriously delicious!


Sunday, October 23, 2011

Sweet Potato Cheesecake Bites


Sometime this spring, I froze some sweet potato puree I made. Over the weekend, I decided to clean out some of the freezer and made sweet potato popovers with some of the sweet potato puree (delicious!). Today I was wanting to make a dessert with the rest of the puree. Since it is fall, the time for flavorful and comforting desserts is upon us. And desserts that are slightly richer....but since I'm a fan of 'everything in moderation,' I decided to cut my desserts in smaller portions. Now, I just need someone to take them away so I don't eat more than I should 'because they're so small!' Guests can have as many 'bites' or as little as they want when these sweet potato bars are cut smaller. I really love how some restaurants (P.F. Chang's for instance) are allowing patrons to order smaller portions of their desserts. It makes it fun to try more things this way!

I ran across this recipe at East Village Kitchen blog and changed it up a bit to suit my liking. Also, I accidentally left out the baking powder from the original recipe (1/2 tsp.) in the base, but didn't miss it--actually preferred the creamier texture. And it still held up to being cut in smaller bites. My husband said it tasted like pumpkin pie--but I think it tastes better. No one can understand why I don't like pumpkin pie because I love pumpkin pie spices, but if I'm going to have my calories, I want it to be on something I love. Well, I really love these bites! Probably because they are creamy (I love pumpkin cheesecake!). You can skip the pumpkin pie spice for a purer flavor. And, I'm guessing you can substitute pumpkin for the sweet potato.

By the way, does anyone else find surprises in their kitchen? This is what I found when I began my baking. I was told that Minnie also wanted to cook. Apparently, Minnie also ate a few....that's the story I'm sticking with anyway...


These sweet potato cheesecake bites would be a fun dessert to serve during the holidays or even for cocktail-type parties where only appetizers and/or desserts are served. 


SWEET POTATO CHEESECAKE BITES

Should make about ~32 mini squares

For the base:
  • 8 Tbsp. butter (1 stick)--I used salted butter--a part 'light' butter and a part real butter
  • 1 1/2 cups sweet potato puree (canned or cooked & pureed by you)*
  • 3/4 cup light or dark brown sugar (raw sugar preferred)
  • 1 cup flour (I used all purpose, but plan on trying whole wheat pastry flour next time)
  • 1 egg + 1 egg white (reserve yolk for topping)
  • 2 tsp. vanilla extract (this may seem like a lot, but I think vanilla goes really well with the sweet potatoes)
  • 1/2 tsp. salt
  • 1 tsp. pumpkin pie spice (optional)

For topping:
  • 1 (8 oz.) package reduced-fat cream cheese
  • 1/2 tsp. vanilla extract
  • 1 egg yolk
  • 5 Tbsp. brown sugar (or raw)


Preheat oven to 350 degrees.

Grease a 8 inch square pan with 2 inch high walls with butter. Trim two pieces of baker’s parchment so they can sit flat on the bottom the the pan and so they are long enough to hang over the sides by a few inches. Butter the paper. (Now, I skipped the buttering before applying the parchment but think it was an essential step—since I had rough edges and ended up eating them all. Or, I'm not sure what it would be like to skip the parchment paper step altogether....?)

Microwave your sweet potatoes. Then, microwave the butter to melt it completely (about 30-45 seconds), and whisk the butter into the mashed sweet potatoes until the mixture is smooth with very few bumps.
Using a mixer with a paddle attachment, a hand mixer or a whisk, add sugar to the sweet potato mixture and beat until smooth. Add egg, egg white, and vanilla and beat until they are fully integrated. Add flour and salt and mix just until the liquids have absorbed them. Transfer the batter to the prepared pan, spreading it evenly.

In a separate bowl, using a whisk or hand mixer, combine cream cheese, egg yolk, sugar, and vanilla and beat until smooth and uniform.

Place 6-8 large dollops of the mixture on top of the batter in the pan. Use a knife to swirl the cream cheese mixture into the batter. Rap the pan flat against the counter a few times to level, then place in the preheated oven, on the middle rack. 

Bake until the cheesecake swirls are starting to turn golden, and a toothpick inserted into the batter part comes out clean, about 40 minutes.

Remove the pan from the oven and allow to cool completely on a wire rack. Use the parchment to pull the cake from the pan and transfer it to a cutting board and cut into squares. (You can place them in mini-muffin liners like I did for an easy-to-eat way to serve. No utensils are needed if you are standing :))

Store sweet potato cheesecake bites in an airtight container in the fridge.


*If you are using leftover baked sweet potatoes, remove them from foil, cut them in half and microwave them for 30 seconds to a minute, depending on thickness. If you are starting with raw sweet potatoes, poke holes in the skin with a fork and microwave on high for 4 to six minutes, or until they are soft and easily mashed. Discard skins and mash and whisk with a fork until they are smooth.