Showing posts with label peanut butter. Show all posts

Monday, July 23, 2012

Like Healthier Hostess Cupcakes: Flourless Double Chocolate, Peanut Butter, & Banana Mini Muffins


I have, again, been remiss in posting as our family has been living out of suitcases for a month or so and then moved across a few states. Life is chaotic most days, but I recently found myself craving the need to bake in a new home surrounded by boxes. Therefore, I am doing the second best option and posting something decadent and healthy for those that are willing to brave the summer heat by turning on the oven....if you're not willing to turn your oven on yet, bookmark this recipe, because they are truly worth trying! Even the kids love them!

I cannot get over how these delicious mini-muffins don't taste like they have healthy ingredients!--Ok, except for the chocolate chips on top. The best part is, the blender/food processor does all the work for you. Here is the original recipe from Dashing Dish that also shows nutritional information. Thank you for such an awesome recipe, Katie! I have adapted the recipe to use DARK chocolate cocoa, semi-sweet mini chocolate chips, (these latter two ingredients make it 'double dark') and added flaxmeal (this affects fat content a bit). Feel free to try it with peanut butter chips instead if you prefer more of a peanut butter flavor. Or skip the chips and frost for healthier cupcakes. Either way, the banana and peanut flavors make for terrific pairing with the chocolate. My daughter thinks she's getting cake when these come out.

Oh guys.....I am in awe of how delicious these muffins are--we are calling them chocolate 'treats' in our house. They have the softness and texture of a cupcake. I have made them several times now...you will think you are cheating on your diet when eating these...we even took them on a picnic in the mountains last month. Here are some pictures of that glorious day where the mini-muffins were just part of the delights:


And here are the mini-muffins (or cupcakes) thawing out from our cooler:


Flourless Double Chocolate, Peanut Butter, and Banana Mini-Muffins


Adapted from www.dashingdish.com

Yield: 12 regular sized muffins or 24 mini-muffins


  • 1 ¾ cups old fashioned oats
  • 3 egg whites
  • ¾ cup cocoa powder (I use Hershey’s Special Dark Chocolate Cocoa)
  • 1 ½ bananas (this makes ½ cup mashed banana)
  • ½ cup plain, fat-free Greek yogurt
  • ½ tsp. vinegar (or ½ tsp. cream of tartar)
  • 1 ½ tsp. baking powder
  • 1 ½ tsp. baking soda
  • ¼ tsp. salt
  • 1 cup hot water
  • ½ cup baking stevia OR 1 cup sweetener of choice that measures like sugar (I like raw sugar)
  • 1 Tbsp. ground flaxseeds (also called ‘flaxmeal’)
  • ½ cup creamy peanut butter, ‘natural’ preferred
  • 1 cup semi-sweet mini-morsels (or more)

Preheat oven to 350 degrees.

Line a 24 cup mini muffin pans with silicone mini muffin liners, or spray muffin tin with non-stick cooking spray. OR, you can use one 12 cup regular muffin tin pan. Set aside. 

Place the peanut butter in a mug or microwave safe bowl, and microwave for 30-45 seconds, or until melted.

In a blender, (or food processor), mix all of the ingredients together. Blend until oats are ground and mixture is smooth. (The batter will be sort of liquid-y, but that’s ok!)

Divide batter between muffin tins. Sprinkle each muffin top with mini-chocolate chips, dividing them evenly.

Place muffin tin(s) in the oven and bake for 12-15 minutes, or until a toothpick comes out clean. 

Cool muffins before removing from pan. ENJOY!!!

Wednesday, August 31, 2011

Back to School Peanut Butter & Jelly Bars


My daughter has started her Mother's Day Out/Preschool program. Ten whole hours a week. When it's not snowing, a school holiday, or she's not sick. Nope, no make up days either. I cling to these precious hours as they give me the opportunity to run errands (in record time), go to appointments, squeeze in a run, talk on the phone, or just start dinner preparations in quiet.

These are things that take ten times as long with a toddler in tow. It's just more fun than aplogizing to the woman who looks to be in her early 40's behind us at Target that my daughter called 'grandma'. ('No, I promise, you don't really look like a grandmother. Wow! Two kids under 5? No you don't need your stylist to do darker highlights next time.) And, it's pretty terrifying to wait 10 minutes in line at the post office, only to be finally called and have your daughter pull on your leg and say, 'Mommy I  have to go potty NOW.' Not at home 25 minutes ago, not 12 minutes ago on the portable potty in the car. No, NOW. (There are like 15 people behind you, so dare you risk it even if you forgot the 'backup outfit?')

Anyway, we both win this way. My daughter comes back from 'school' singing new songs, having done fun crafts, and talking excitedly about her 'friends.' Not even 2 1/2 and happy to have friends--can't we all relate just a little? Well worth the price to combat the worry that someone will call DCFS when I step 20 feet away from my car (with my child strapped in my view) to pick up my dry-cleaning.

So the challenge now becomes: what do I pack for lunch? (all of two days a week--that's the thing about motherhood--each stage prepares you for the next otherwise we might all be in straight jackets if someone just gave us a kid for the first time without experiencing the previous stages). The obvious answer to what's for lunch on day one is PB&J. You got it.

Then I got the itch to make it into a dessert. Every recipe I researched seem to call for 2 sticks of butter. Total bummer. So, I stumbled upon this wonderful blog called, Sweet & Natural. It's awesome. Ashley's recipe apealed to me because I am constantly looking for ways to incorporate more whole grains and natural sugars, use less fat, but still get a good result in my baking. These bars are delicious! I hope you will try them for when you get that sweet and salty craving. Or when you or your kids have to go back to school :)


PEANUT BUTTER & JELLY BARS
Adapted from www.sweetandnatural.wordpress.com

  • 1/2 cup non-hydrogenated shortening (Spectrum brand is good, I use Earth Balance vegan sticks)
  • 3/4 cup turbinado sugar (I prefer raw sugar--if you like more 'crunch' use turbinado)
  • 1/2 tsp. pure vanilla extract
  • 1 egg
  • 1 cup natural peanut butter
  • 1 1/2 cups whole wheat pastry flour
  • 1/2 tsp. baking powder
  • 1/2 tsp. salt
  • 3/4 cup 100% fruit strawberry jam (I used strawberry-rhubarb but suspect any flavor is fine)

Preheat the oven to 350 degrees F. Spray an 8 x 8-inch pan with cooking spray and set aside.
 
In a large bowl, cream shortening and sugar for about 2 minutes. Add vanilla extract, egg, and peanut butter. Blend until well-combined.

In a separate bowl, mix together whole wheat pastry flour, baking powder and salt. Add dry ingredients to wet ingredients and blend until just combined.

Spread 2/3 of dough into prepared pan. Top with jam (a mini spatula works great for this). Drop globs of remaining dough evenly over jam.

Bake for about 45 minutes.
 
Makes 12-16 bars.

Yes, I did overbake them a little, but they were still delicious. Ashley's picture HERE shows them being much more moist. Still playing with the 'convection' feature in my house....we'll get it!

Wednesday, August 3, 2011

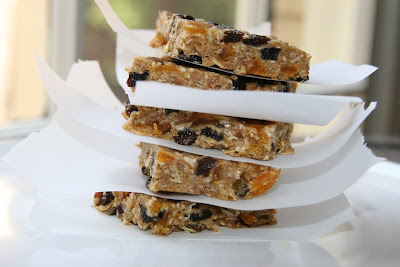
Octane Energy Bars

I've been dragging lately...my energy level is down because of this ridiculous heat. So, I blame the heat for my unproductivity--unfortunately, it's one of the busiest times of the year for me. I could either do this:


Or...try something healthier. After having my mother in law visit recently to help us out (my husband had his 4th weekend home since 2011 started this weekend), I was inspired by her energy and pulled out an energy bar recipe I've been meaning to try since college (yes, since COLLEGE). It was featured in the local paper outside of Chattanooga, TN. I didn't name them 'Octane Energy Bars'--so I realize the term 'octane' doesn't scientifically apply. It's been a while since chemistry has been on my radar, but according to Wikipedia (no, it's not my only source!), 'By the mid-nineties, the phrase [octane] was commonly being used as an intensifier and has apparently found a place in modern English vernacular.'  Now, let's hope these bars act like rocket fuel. I've adapted the recipe to suit my needs and make it somewhat easier to follow directions after some trial and error.


Am I ever glad that I made these!!! These energy bars are absolutely phenomenal. WAY better than your grocery store granola bars. Decently healthy recipe, in fact. The only other time I used brown rice syrup was for the crunchy brown rice crispy espresso nut bars from Heidi Swanson (she calls them 'Big Sur' power bars). I really like cooking with it now! It's not cheap though...you can find it Whole Foods or online--Heidi Swanson says that it doesn't give you that jolt of sweetness that other sweeteners do and has a more rounded flavor. The bars are chewy, sweet, nutty, and sort of creamy.

Reasons to make these:
  1. Your kids will love them.
  2. They taste like a treat. You're forced to eat healthier.
  3. It's a great snack when in a hurry.
  4. They have a ton of fiber. At least the fat is a 'good fat.'
 Cons: You have to go to the health food store to buy the ingredients. If you saw how annoying it was to shop at my small Whole Foods,  you'd understand. But, it was worth it. Enjoy!


OCTANE ENERGY BARS


 Makes ~18-24 bars
  • 1 cup rolled oats
  • 1 cup crunchy grain cereal (I used crispy brown rice cereal, but you can use 'Rice Krispies'--just not 'puffed' rice cereal)
  • 1/4 cup sesame seeds
  • 1 1/2 cups dried apricots, chopped (I used 1 cup dried apricots + 1/2 cup dried cherries)
  • 1 cup raisins
  • 1/2 cup wheat germ
  • 1/2 cup protein powder (I used vanilla-flavored soy protein powder)
  • 1 tsp. butter or olive oil (I used Smart Balance spread)
  • 3/4 cup brown rice syrup
  • 1/2 cup natural peanut butter
  • 1 tsp. cinnamon

 TIP: Get all your ingredients together and read through the entire directions because you need to move sort of quickly--it really helps.

Preheat oven to 350 degrees. Grease a 9X13 inch pan and set aside.
Toast the first 3 ingredients (oats, cereal, sesame seeds) for about 10 minutes (I used a shallow edge-rimmed cookie sheet), stirring once, about halfway. Do NOT let the mixture brown. (You can turn your oven off at this point as you will no longer need it.)

Meanwhile, in a separate smaller bowl, mix the wheat germ with the protein powder and set aside.

In a large mixing bowl, spoon in the toasted oat-cereal-sesame seed mixture. Mix in the dried fruits, trying to separate the pieces. Then, add the wheat germ-protein powder mixture to this and stir until incorporated as best you can.

In a saucepan over medium heat, melt butter or heat oil, and add rice syrup until bubbly. Mix in the peanut butter and cinnamon (I just put all of these in a pan and heated them until they were incorporated, melted, and more liquid like).

Pour the liquid mixture over the dry ingredients and QUICKLY mix together and transfer to the 9X13 inch pan (Come clean moment: I had to use my hands to fully incorporate everything and it was much easier because it's not like mixing sticky rice crispy treats). Pat mixture with your hands to spread it out evenly.

Refrigerate the bars for at least 4 hours. Cut into about 24 bars and wrap each bar in wax paper.


Store in refrigerator.

Wednesday, January 19, 2011

NEW & IMPROVED Healthier Rice Crispies Bars: How to Make Them Bind Better & Still Rock Your World


Ok, so if you have made these bars from my original post, you might have had binding issues. I'm sorry. I am removing the previous post....Turns out Robin McGraw must apparently have some magic, because every time my mother in law and I make these rice crispy bars, we have trouble with them sticking together. But they taste so good that we keep making them!!! But we figured out how to fix the 'sticking together' issue.

I had to repost this recipe with the improved version because the bars are really JUST THAT GOOD and now they are perfect!!!!

So after some trial and error (thanks Carol!)--here's some tricks we've learned:
  • You will most likely need to add 2-3 Tbsp. butter if you are making them with regular rice cereal or brown rice cereal. I tried 'light' butter--and it works. Just add it in with the marshmallows and peanut butter (which we prefer to almond butter).
  • Due to density issues, we have discovered that if you use regular Rice Crispies cereal, you will need 1.5 packages of marmallows (that is 1 and 1/2 packages). If you use the brown rice crispies, you may need only another 1/4-1/2 a package. But let's get real here folks....you need the extra marshmallows for binding. We've tried every which way.
Here is the BEFORE picture without the butter and extra marshmallows-which left a pan of crumbs:


And HERE is the AFTER binding picture--nicely bound :)


See the difference????

Other things that have improved the bars' nutrition & taste for us have been:
  • 2 scoops of vanilla soy protein powder
  • 2-3 Tbsp. wheat germ
  • Any combination of nuts or dried fruit (try the Sunsweet Berry Blend-so good!)
SO....here is the revised recipe--the 'Sommerville' version that we make now-it's really awesome & it works:

BROWN RICE BERRY NUT BARS 2.0 (aka HEALTHY RICE CRISPIES)

Non-stick cooking spray or melted butter, as needed for pan
~15 oz. mini marshmallows (which ends up being about 1 1/2 (10 oz) packages)
3/4-1 cup nut butter, such as cashew, almond, peanut or hazelnut (peanut butter is our favorite)
2-3 Tbsp. butter or light butter (not included in original recipe, but will give you trouble without it)
1 10 to 12-ounce box brown rice cereal (not 'puffed' rice cereal)
1/2-1 cup dried cranberries, and/or blueberries, cherries or mixed berry blend
*1 1/2 cups nuts, chopped (pecans + cashews or almonds, walnuts, etc.)
2 scoops of vanilla soy protein powder
2-3 Tbsp. wheat germ

Lightly coat the bottom and sides of a medium baking sheet with the nonstick cooking spray or melted butter. You can either use a 9X13 inch pan for a thicker bar or a half-sheet baking pan for a thinner bar. (FYI-the thicker bars stay together better.)

In a microwave-safe bowl, zap the marshmallows, butter and nut butter, stirring after 1 minute, until melted, about 2 minutes--sometimes a little longer.

Working quickly, add the brown rice cereal, cranberries, pecans and cashews (and IF USING, the wheat germ and protein powder) to the melted marshmallow mixture and stir gently to combine – try not to crush up the bits of cereal too much--but it's ok if you do. The mixture hardens quickly.

Either wet your hands or spray them lightly with the nonstick cooking spray and turn the cereal marshmallow mixture out onto the greased baking sheet/pan. Press the mixture into the pan using your slick hands so that it's evenly distributed. Set the pan aside and let the bars set up, about 30 minutes.

Once set, cut them into squares and serve. You can serve them at room temperature or refrigerate them. They do well stored in waxed paper or parchment paper in tupperware.

Yields: About 12-14 bars--we get more like 18-22 depending on cut size.

*You can use any nuts--not necessarily those listed below. We often use almonds & pecans.

Thanks for your patience! Hope you love them! We are absolutely ADDICTED!

Thursday, April 8, 2010

Healthier Chocolate Oat Nut Butter Protein Bars


These delicious protein bars are courtesy of my mother in law, Carol. I think she was inspired by her local health club & I'm lucky because she shared the recipe with me. To be honest, most of my best recipes come from her (thanks Carol!).
These taste like a decadent treat & can keep you going for hours.

HOMEMADE CHOCOLATE OAT NUT BUTTER PROTEIN BARS

Ingredients :

Non-stick cooking spray
1 cup powdered soy protein
1/2 cup unbleached all purpose flour (I use whole wheat pastry flour)
2 cups rolled oats
1/2 cup wheat germ
1/2 tsp. cinnamon
3/4 tsp. salt
1/2 cup packed brown sugar (I use Turbinado)1 cup semi-sweet chocolate chips (up to 2 cups)
1-1/2 cups vanilla yogurt (3-6oz. containers—I used fat free & plain Greek yogurt)
1/2 cup almond or peanut butter (I used more—can use any nut butter)
2 tsp. vanilla extract


Directions:

1. Preheat the oven to 350 degrees F.
2. Lightly spray a 9 by 13 inch baking pan and a cookie sheet with nonstick spray.
3. Mix together the protein powder, flour, oats, wheat germ, cinnamon, and salt in a large bowl.
4. Crumble in the brown sugar, rubbing it with your fingers to break up any clumps.
5. Stir in the chocolate chips.
6. Measure the yogurt, almond butter (thin it by melting a few seconds in the microwave and stirring) and vanilla into a second bowl, stirring until well combined.
7. Add the wet mixture into the dry and mix patiently until thoroughly blended.
8. Transfer to the prepared baking pan, patting it into place with your hands.
9. Bake for 15 minutes, then remove from the oven and cut into bars.
10. Place the bars on the prepared cookie sheet and bake for another 15 minutes, or until golden around the edges.
11. Remove the bars from the oven and cool.
12. Eat within a few hours, or store in heavy plastic bags in the freezer.
13. Reheat briefly in a toaster oven before serving.


Adapted from Bount Memorial Weight Management Ctr.


Banana Monkey Breakfast Shake


There are few thing more delicious, decadent, and healthier than this shake. This is truly an embodiment of "good food". Our recipe was inspired by an Oprah show I read about that featured the cast of "LOST", one of our favorite shows. Matthew Fox (the actor who plays "Jack") said this is a favorite of his (called "Kailua Monkey" in Hawaii). And now it's my husband's favorite shake.


In our house, it's called the "Banana Monkey" and it tastes like a milkshake. Ever since we've introduced this to my uncle Gabriel, he's had this shake every day.


BANANA MONKEY

Makes 2-3 servings

Approx. 4 oz. soy milk (we use light, Silk brand soymilk)
2 heaping Tbsp. scoop organic peanut butter (not Jif brand)
1-2 big scoops vanilla soy protein powder
2 ripe bananas (frozen bananas preferred)
1 huge glass of ice
1 tsp. honey or agave nectar (optional—can usually skip if bananas are ripe)
1 Tbsp. wheat germ (optional)

In blender (the Vitamix is awesome for this!), blend all ingredients until smooth, adding more soymilk to thin out the consistency if necessary.

Enjoy, enjoy, enjoy! We sure do.