Showing posts with label bell peppers. Show all posts

Thursday, October 20, 2011

Roasted Red Pepper Hummus


Sorry this is another hummus post--but, I just love hummus. I have expressed it before, but seriously, I REALLY really love hummus. My mom and I made roasted red peppers last time she visited me and we froze them. While going through my freezer, I decided to make a roasted red pepper hummus because those pita chips looked awfully lonely. It turned out excellent.

Moments after this picture was taken, my child tried to inch closer to the hummus and in trying to help her, I pushed the container over the edge and precious dip spilled all over the kitchen floor. My toddler burst into tears. 'What's wrong? Did that scare you?', I asked. 'All my hummus is gone!', she wailed. Well, luckily for her, this made a double batch--I'm freezing some (Yes, the recipe below makes a double batch of any of my other hummus recipes--but you can halve it. We just eat a lot.). 

It's just on the slight side of spicy, but you can use less crushed red pepper.

ROASTED RED PEPPER HUMMUS

Serves a big crowd as an appetizer

  • 1/2 cup roasted red peppers
  • 2 (15 oz.) cans garbanzo beans (chickpeas), drained (reserve 1/2 cup of liquid)
  • 1/2 cup freshly squeezed lemon juice
  • 4 Tbsp. tahini (sesame seed paste)
  • 3 Tbsp. extra virgin olive oil
  • 3 medium garlic cloves
  • 1 tsp. dried parsley
  • 1 1/2 tsp. salt (sea salt preferred)
  • 1 tsp. crushed red pepper flakes
  • 1/4 tsp. smoked paprika
  • 1/4-1/2 tsp. ground cumin

Strain the beans, reserving portion of liquid.

Using a food processor or blender, combine all ingredients and mix until smooth, stirring to ensure even mixing consistency if necessary.

Spoon into covered container and refrigerate overnight before serving, if possible. Store in refrigerator. Hummus will keep for about 2 weeks. 

Hummus can be served alone or with pita chips and/or veggies.

(Having trouble with blogger so if part of my font seems 'off'--sorry! I've been working on it, but can't seem to find a solution yet.)

Thursday, July 7, 2011

Super Succotash


My child and I have a love for lima beans. And now succotash. I recently learned that this dish came about during the Great Depression because of widely available and inexpensive ingredients. This is my version below. It makes for an awesome summer lunch. Flavorful, fresh, and resplendent with grilled meats and potatoes. Another example of how a vegetarian dish can be full of flavor. Also, it makes a great meal to pack for work.

Keep in mind that the version below is a bit fresher than traditional succotashes which saute the onions and bell pepper--feel free to do so and toss with the corn and beans if you prefer. Also, if you really want to 'kick it up a notch' (as our friend, Emeril, says)--add about 3-4 pieces of crumbled cooked bacon (we use turkey bacon). Feel free to add more butter--it really makes for a better taste with the creaminess of the lima beans and sweetness of the corn. We love this--hope you do too!


SUPER SUCCOTASH

Serves 4-6

  • 1 (10 oz) package frozen lima beans
  • 1 big red bell pepper, diced
  • 3-4 green onions, chopped--white and green parts
  • 3-4 ears of cooked corn--kernels cut off OR 2 cups of corn from either cans (drained) or cooked from frozen
  • 2 Tbsp. of sesame seeds (heaping)
  • 1/4-1/2 tsp. garlic powder
  • 1 Tbsp. light butter (melted) or extra virgin olive oil (can use Earth Balance spread for vegans)
  • Juice of half a lemon or lime (optional)
  • Salt & pepper to taste (a bit heavier on the pepper)
Cook lima beans according to package directions (either on the stovetop or in the microwave). While still warm, toss the onions and bell peppers with the lima beans--this softens the 'bite' of the onion. Add the corn and sesame seeds and garlic powder. Pour the melted butter (or oil), citrus juice (if using) over the ingredients and gently mix it all together. Season with salt and pepper--taste and adjust seasonings as necessary.

Monday, May 9, 2011

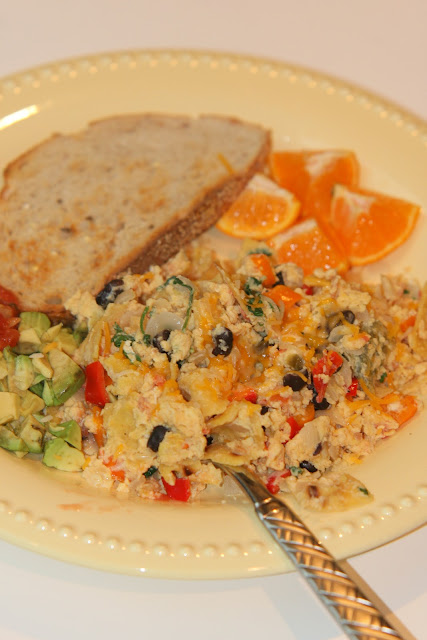
Eggs on Spring Break: PW's Migas


Hey all! I was hoping to post this on Cinco de Mayo (5th of May), but I ran out of time since we've been out of town yet again. Anyway, my friend, Holly, inspired me to make this when she posted a picture on Facebook. Holly, I'm hooked! I love big breakfasts on the weekend--especially holiday weekends. These migas remind me of the chilaquiles my husband and I love to eat on our Mexican vacations.

Pioneer Woman's blog has a MUCH better post on this. She's absolutely amazing and her blog is phenomenal. I used to wonder how she was able to do so much and later found out she has a lot of hired help--good for her!!! I aplaud women who are honest about their lives because they help dismantle this notion that perfection is attainable. I love Ms. Drummond's approach to life and her recipes. I think she may just be the younger generation's Martha Stewart....but, now I'm wondering which generation I'd be categorized into....hmmm....either way, both inspiring women! Wish I could spend time with each of them.

This is a wonderful recipe and I urge you to try it--I found it to be incredibly flexible--add more spices, use less peppers, replace eggs with some egg whites....either way, it will be good! I made 1/3 of the recipe and it still turned out great.

PIONEER WOMAN (REE DRUMMOND)'s MIGAS (aka EGGS ON SPRING BREAK)

Yield: 6 servings (I say more like 8)
  • 4 whole corn tortillas
  • 1 whole jalapeno, seeds and membranes removed, finely diced
  • 4 whole plum tomatoes, roughly chopped
  • 1 whole green pepper, roughly chopped
  • 1 whole red bell pepper, roughly chopped
  • 1 whole medium onion, chopped
  • 12 whole large eggs (I used 1/3 egg whites and the rest whole eggs)
  • ¼ liters Cotija cheese, grated--may use Cheddar, Monterey Jack, etc. (liters?! ridiculous. I translated this to a heaping cup of cheese)
  • ⅓ cups cilantro, chopped
  • 1 Tbsp. butter
  • 1 Tbsp. olive oil
  • ¼ cups half-and-half (I used fat-free half & half--but would have easily used milk)
  • *1 cup black beans (my addition-totally optional-read the last sentence of instructions)
  • OPTIONAL: for serving--diced avocados, salsa, sour cream

In a bowl, whisk together eggs and half & half (or milk)--I added half the cilantro at this point (not sure why). Salt and pepper eggs, then set aside.

In a small skillet over medium heat, heat oil and fry each corn tortilla just until crisp. Remove to a paper towel-lined plate to drain. Chop tortillas and set aside.


In a large skillet over medium-high heat, melt the olive oil with the butter (you can use a little less if you can get away with it). Add onions and bell peppers and cook until starting to turn brown/black, about 3 to 4 minutes. Add in diced jalapenos (and beans, if using) and stir to combine.


Add tomatoes to the skillet and stir around, then add tortilla pieces, stirring gently to combine. Reduce heat to low. When the heat has decreased, pour egg mixture into skillet. Stir gently to cook with the peppers, folding mixture very gently as it cooks.


Add in grated cheese and chopped cilantro, and stir to combine.


*PW's note: Serve with black beans and iced coffee. But since I didn't feel like making the beans separately, I just added a cup of drained, rinsed black beans in with the onions and peppers. Totally optional, of course. I like the migas with some fresh cut oranges, toast (this is beyond optional), and hot coffee. SUCH a good breakfast!!!!


And since we're talking about Spring Break, here's a couple pictures from our Mexican vacation last month...I can't wait to go back! Enjoy your breakfast!


Sunday, March 27, 2011

Salsa Sloppy Joes


Ok, so despite the not-so-appetizing picture, this dinner will please your family. I don't know how to make sloppy joes look good. But this is another recipe that is simple, healthy, fast.

I prefer to buy organic ground turkey breast (at Whole Foods)--as snobby as that sounds, it really seems to make a difference in the taste of some recipes. Since I only cook meat 2-3 times a month, the organic meat cost can be somewhat justified.

Normally, I make Martha Stewart's sloppy joe recipe, but this time I wanted to try something different--a deviation from the overwhelming ketcup flavor of typical sloppy joes. We really enjoyed it and it feels fantastic to get dinner out on the table within 30 minutes.

SALSA SLOPPY JOE'S

Serves 6-8 (depending on how meaty you like them) 
  • 1-1 1/4 lb. extra lean ground turkey, organic preferred
  • 2 cups salsa (~16 oz. jar)--we prefer the Herdez brand
  • 2 Tbsp. Worcestershire sauce
  • 1 garlic clove, crushed or minced finely
  • 1/2 green bell pepper, chopped 
  • Salt (or Lawry's seasoned salt) & pepper, to taste
  • A dash of oregano and a dash of chili powder
For serving:
  • 6-8 hamburger buns-split, preferably whole grain
  • 6-8 slices of Cheddar cheese or Colby Jack cheese

In a large skillet (sprayed with Pam or other non-stick cooking spray), cook turkey over medium heat 6 to 8 minutes or until turkey is no longer pink--breaking it up with a spoon/spatula. If turkey starts to stick to the skillet, add some salsa and continue to stir.

When turkey has cooked through, stir in the rest of the salsa, Worcestershire sauce, garlic, and green pepper. Add seasonings. Cook until thoroughly heated, stirring occasionally. Taste and adjust seasonings, if necessary.

Add a piece of cheese to each bun (sometimes we add a piece to each side!) and fill or spoon the sloppy joe mixture on top of the buns. Serve warm. With a stack of napkins.

Friday, March 18, 2011

Super Duper Stromboli


What's for dinner? Well, if you're pizza lovers like ourselves, you will LOVE this easy stromboli recipe. A stromboli is a usually a baked turnover filled with vegetables or meat. It's also a small island (Strombuli) in the Tyrrhenian Sea, off the north coast of Sicily, containing one of the three active volcanoes in Italy.

I will admit that stromboli recipes call for pizza dough--but I read that bread dough can work too. However, you can buy pizza dough! This is such an adaptable recipe, you can add or replace any of the filling ingredients with your favorite pizza toppings. It's a lot less greasy than pizza and makes a great dinner when served with marinara sauce for dipping and with a salad.

Also, I imagine that you could prepare it the day or night before (up to the step of brushing it with egg) and wrap it in plastic wrap. When you come home, you can just pop it in the oven. I'm even thinking about trying to freeze one of these for an easy dinner on a crazy weeknight.

SUPER DUPER STROMBOLI
  • 1 (13.8 oz) can of pizza dough (Pillsbury is a good brand) OR 1 pizza dough recipe
  • 1/2 lb. ground turkey or beef OR 8 oz. of Morningstar meal starters grillers crumbles OR 4-5 crumbled veggie sausage links
  • 1/4 cup of pizza sauce or tomato sauce
  • 1/4 onion, chopped
  • 1 garlic clove, minced (optional)
  • 8 oz. mushrooms, sliced
  • 1/4-1/2 green bell pepper, sliced
  • 1/4 cup chopped olives (green or black)
  • 4 oz. (1 cup) shredded mozzarella cheese
  • 1/4 tsp. Italian seasoning
  • 1 egg, whisked
  • 1/4 cup Parmesan cheese
  • Marinara Sauce (for dipping/serving)
Other optional ingredients/options:
  • A diced tomato or two (you can skip the pizza sauce if using tomato)
  • Turkey pepperoni or veggie pepperoni
Heat oven to 400°F. Spray cookie sheet with nonstick cooking spray. Brown ground beef in medium skillet over medium-high heat until thoroughly cooked, stirring frequently. Drain. Set aside. If using veggie meat, NO need to brown!!!!
 
Saute onions and mushrooms together until cooked through. Add bell pepper at the last minute, if preferred.
 
Unroll dough; place on sprayed cookie sheet. Starting at center, press out dough with hands to form 12x8-inch rectangle. Spread sauce over dough to within 2 inches of long sides and 1/2 inch of short sides. Place beef or veggie meat lengthwise down center, forming an approximate 3-inch-wide strip and to within 1/2 inch of short sides. Top with cheese, vegetables, olives, and Italian seasoning.


Fold long sides of dough over filling; press edges to seal. Then flip over (use another pan underneath & turn over). Brush the stromboli with egg and sprinkle the Parmesan cheese on top.


Bake at 400°F. for 15 to 20 minutes or until crust is golden brown.


Slice and serve with warmed marinara sauce for dipping.

Serves about 4-6 people. It's absolutely delicious! (Sorry for the bad pictures--it was night again!)

Thursday, February 3, 2011

Roasted Vegetable Salad


When we lived downtown, we had some fun neighbors that we became friends with and ate dinners with.... Kelly Daniel made this amazing grilled vegetable salad and I have thought of it often. Thanks for the inspiration, Kelly! Being that it's cold outside, I improvised by roasting the vegetables. I think Kelly uses eggplant, but I didn't have it on-hand--but feel free to add some to the roasted vegetables if you have eggplant. I also didn't have zucchini/squash, but the salad ended up being amazingly delicious with just red bell pepper, asparagus, and mushrooms. I'm sure that even adding potato would be delicious! If you don't have feta, you can probably use goat cheese or blue cheese.

I think you'll really love this salad. Enjoy!

Roasted Vegetable Salad

Serves 6-8

To Roast:
1 red bell pepper, cut into big pieces
1 small bundle of asparagus, washed, with tough stems removed (probably about 1/3 of the asparagus)
1 package whole mushrooms, rinsed and cut in half
1 zucchini or squash, chopped
2 red potatoes, scrubbed and cubed small (optional)

For rest of salad:
1 head of red leaf lettuce, rinsed and dried with paper towels, then torn or roughly chopped
4 oz. reduced-fat feta, crumbled
4 green onions, chopped (optional)

Dressing:
1-2 cloves garlic, minced (preferably crushed)
2-3 Tbsp. olive oil
1-2 Tbsp. red wine vinegar
1-2 Tbsp. lemon juice
Salt & pepper, to taste

Preheat the oven to 375 degrees F.
Place whatever vegetables you are using in a large mixing bowl and drizzle with some olive oil, salt, and pepper--just enough to coat them evenly.

Spread the vegetables in one layer in a large roasting pan, and roast in the preheated oven for about 20 minutes--or until the vegetables are tender (I like them to still stay a bit crisp-tender so I don't cook them very long. But you can leave them in longer-just make sure to check on them). Halfway through the roasting process, stir once if you can remember to do it.

Remove the roasting pan from the oven and allow the vegetables to cool completely. This may take about 15 minutes. (You can roast the vegetables a day in advance and just store them in the fridge until you are ready to use them.)

Meanwhile, in a capped container (like a jelly jar or small tupperware), shake your dressing ingredients.

In a large bowl, toss your vegetables with your lettuce greens, the feta, green onions (if using) and your dressing.

Serve immediately.


By the way, you can leave the garlic out of the salad, but man does it make it good!

What garlic is to salad, insanity is to art. --Augustus Saint-Gaudens

Tuesday, October 26, 2010

EASY Vegetarian Chili: 2 Methods-Fast & Slow


Here's another easy, healthy recipe for cold weather days--my favorite recipe for use in the slowcooker (crock pot).

This recipe comes to me by way Janet Kurzynske--the mom of a my great friend, Heather. Dr. Kurzynske is a nutrionist, and a really good cook. I love this chili almost as much as I love Heather--we used to sit indian style on the floor of her kitchen with big bowls of this chili in our lap, talking about all our college drama. Maybe it will comfort you the way it comforted us.

Without the cheese, this chili is fat-free, vegan, and amazingly delicious.

We often serve this chili as a vegetarian option alongside our turkey chili in the winter when we want to do easy entertaining. Just set up a "toppings" bar with green onions, cheese, sour cream, corn, fresh tomatoes, cilantro, olives, tortilla chips, etc., and serve with cornbread. Everyone can serves themselves and go back for more.

This recipe makes a big pot and I often freeze half the recipe. You can use it later as a topping for baked potatoes, or in tamale pie, or as a dip with sour cream, cheese, and layered onions, etc. (Google "skyline chili".) For other great ideas-check out this site.


EASY VEGETARIAN CHILI


  • 1 large onion, diced
  • 1-2 cloves garlic, chopped (optional)
  • 2 large green bell peppers, diced
  • 1 bag frozen vegetarian crumbled burger (I use the Morningstar brand)
  • 2 cans diced tomatoes
  • *2 small cans plain tomato sauce or 1 bigger can (small cans are about 8 oz-bigger cans are about 14 oz.)
  • 1 can black beans, drained
  • 1 can kidney beans, drained
  • 1 can navy beans, drained
  • 1 bay leaf
  • 1 tsp. chili powder (I add some 'taco' seasoning as well)
  • Salt and pepper
  • Cooked small pasta or a can of drained corn (both optional)
  • Shredded cheese (Mexican blend or Cheddar works best)
*NOTE: If you do not like this much 'tomato-ness' in your chili, feel free to skip the tomato sauce and use some chicken/beef broth and/or beer. We often use beer for half the tomato sauce


Toppings of your choice (green onions, chopped raw onions, olives, shredded cheese, fresh cilantro, corn, olives, etc.)

METHOD 1: CROCK POT

Mix all ingredients in a crock pot. Simmer for at least 4 hours.

METHOD 2: STOVE TOP

Over medium heat, saute onion in a large pot until translucent. Add the bell peppers and sauté until tender. Add the vegeburger, tomatoes and sauce (also the bay leaf). Mix and heat through.

Gently stir in the beans and chili powder. Season with salt and pepper.

Lower heat and simmer for 30 minutes, gently stirring occasionally to ensure there isn’t any sticking to the bottom of the pan. Mix in corn and pasta (if using) and heat through.

Serve with shredded cheese (cheddar or a Mexican blend) and any toppings desired. Remove bay leaf (not to be eaten).

Serves about 8-10.

Leftovers freeze beautifully.

Tuesday, August 17, 2010

Cami's Roasted Salmon with Peppers


My aunt is a really good cook. I mean, really good cook. She taught me to make salmon this way and it has become my favorite way to prepare salmon--especially since you can use the wild-caught, individually frozen, portions from Costco. It's so easy this way!

And remember that bit about salmon being one of the world's healthiest foods? Well, it is! The American Heart Association recommends eating 2 servings of heart-healthy fish a week. There are cardiovascular benefits associated with the Omega-3s that can be found in fish oil. I have read that apparently, fresh, wild-caught salmon has been known to have greater amounts of protein. Wild-caught salmon (like sockeye or chinook) have less calories and fat--but the farm-raised salmon has a milder flavor. This is a great article from WebMd on 'good' fats.
The lemon, garlic, wine, bay leaves, and olive oil combine to a delicious and flavorful sauce to complement the baked fish.

CAMI’S ROASTED CITRUS SALMON WITH PEPPERS

6 pieces of wild-caught salmon (I prefer smaller pieces if possible)
1 small lemon, sliced in thin wedges
2 medium red bell peppers, cut up in chunks
1 large onion, cut up in chunks
2-4 garlic cloves, finely minced (crushed would be best)
4-5 pieces of bay leaves
½ cup white wine (approximately)
¼ cup olive oil (approximately)
salt & pepper

Preheat oven to about 425 degrees.

Arrange cut up peppers, onions, and bay leaves on a large baking sheet. Put salmon on top of all these. If your garlic is very finely minced, mix it in with your wine. If not, sprinkle the garlic on top of the fish. Pour the wine on top of all the ingredients and then drizzle all the fish, onions, peppers, etc. with olive oil. Lastly, sprinkle liberally with salt and pepper.

Bake for about 15 minutes—or until your fish is baked through and opaque. (Test with fork and make sure fish “flakes”.)

REMOVE the lemon before serving. The lemon is added to give flavor to the fish but is not meant to be eaten.


**It’s easier to bake it if you are serving 6 people. But, if you scale back the recipe for just 2-4 people, all ingredients can be placed in a very large skillet on the stovetop. Cook over medium heat. Don’t flip the fish over for a few minutes until the side on the heat sears evenly. Then flip and let the other side sear as well. This method seems to produce a crispier texture than baking.

Serves 6 people--and if your fish pieces are bigger, 8 people.

This entree is delicious with green beans and couscous or baked potatoes.


Thursday, May 27, 2010

Don't Look Sideways at These Sides-Vegetable Adventures

It's often difficult to find supporting actors (your side dishes) to the leads (your meats & proteins) that don't include cheese. Not that I have an issue with cheese--in fact, this household happens to believe that cheese deserves its own food group. However, we have just gotten back from a vacation and we need a break from rich food. I'm always looking for new ways to cook vegetables.

Here are three side dishes that don't make you feel like you are eating vegetables just to meet your daily quota.


ROASTED CAULIFLOWER WITH KALAMATA OLIVES


1 head of cauliflower, rinsed well and broken up into bite-sized pieces
2 cloves garlic, minced
2 Tbsp. truffle-infused olive oil
1 Tbsp. freshly squeezed lemon juice
1/2 tsp. salt
1/8 tsp. black pepper
1/3 cup pitted Kalamata olives, quartered
1/4 chopped parsley (optional)

Preheat oven to 375 degrees. On a large baking sheet, toss the cauliflower with the garlic, olive oil, lemon juice, salt and black pepper. Spread florets evenly on the baking sheet and roast for approximately 30 minutes or until the cauliflower begins to brown, stirring halfway through.

Add olives and continue to roast for 10 more minutes, or until the cauliflower is golden and the olives begin to shrivel.

Remove from oven, sprinkle with chopped parsley (if using) and serve immediately.

Makes approximately 4 side servings.

Note: This was very good! I suspect that some chopped hazelnuts or pine nuts thrown in with the olives at the last 10 minutes of roasting would elevate this dish to even greater heights.


SPICY SQUASH RIBBONS WITH ONIONS & PEPPERS

1/3 cup diced onion (approximately)
2 medium sized yellow summer squash
1/2 red bell pepper, thinly sliced
salt, to taste
1/2 tsp. crushed red pepper


Spray a medium sized frying pan with olive oil spray. Over medium heat, saute the onion until it becomes clearer--aproximately 3-5 minutes (being careful to watch that it doesn't brown).


Using a juliene peeler (click here to see what one looks like--this is the very one I have), carefully julienne the squash--taking care not to cut yourself. You may need to discard a lot of the middle portion of the seeded part of the squash.

Add the squash and red pepper to the sauteed onions and toss gently. Add the salt and crushed red pepper. Saute for a few minutes until the red pepper has softened and the onions start to turn a bit brown. At this point, take the squash off the heat as you want it to still have a bit of give to it when bitten into.

Serve while dish is warm. Makes approximately 4 side servings.

Note: This dish turned out wonderfully sweet & spicy--very spicy. Adjust pepper to your taste if you do not care for a lot of heat in your food.


GREEK-STYLE LIMA BEANS (adapted from Gourmet Magazine)


1 (10-ounce) package frozen baby lima beans
1 cup water
2 tablespoons extra-virgin olive oil
2 tablespoons chopped fresh flat-leaf parsley
1 tablespoon minced garlic
1/2 teaspoon salt
Crushed black pepper, to taste


Cook lima beans, water, 1 tablespoons oil, 1 tablespoon parsley, garlic, and salt in a 2-quart heavy saucepan, tightly covered, over moderate heat, stirring occasionally, until beans are tender, 17 to 20 minutes.

Season with salt and pepper and transfer to a bowl.

Serve sprinkled with remaining tablespoon parsley and drizzled with remaining tablespoon oil.

(Note: I skipped the extra olive oil drizzle in the picture above. These are absolutely delicious!)


All in all, we decided to make a meal out of these three with a veggie meat roast. These side dishes are another reason I don't believe you have to eat boring as a vegetarian. Hope you all enjoy them too.