Showing posts with label chocolate. Show all posts

Monday, July 23, 2012

Like Healthier Hostess Cupcakes: Flourless Double Chocolate, Peanut Butter, & Banana Mini Muffins


I have, again, been remiss in posting as our family has been living out of suitcases for a month or so and then moved across a few states. Life is chaotic most days, but I recently found myself craving the need to bake in a new home surrounded by boxes. Therefore, I am doing the second best option and posting something decadent and healthy for those that are willing to brave the summer heat by turning on the oven....if you're not willing to turn your oven on yet, bookmark this recipe, because they are truly worth trying! Even the kids love them!

I cannot get over how these delicious mini-muffins don't taste like they have healthy ingredients!--Ok, except for the chocolate chips on top. The best part is, the blender/food processor does all the work for you. Here is the original recipe from Dashing Dish that also shows nutritional information. Thank you for such an awesome recipe, Katie! I have adapted the recipe to use DARK chocolate cocoa, semi-sweet mini chocolate chips, (these latter two ingredients make it 'double dark') and added flaxmeal (this affects fat content a bit). Feel free to try it with peanut butter chips instead if you prefer more of a peanut butter flavor. Or skip the chips and frost for healthier cupcakes. Either way, the banana and peanut flavors make for terrific pairing with the chocolate. My daughter thinks she's getting cake when these come out.

Oh guys.....I am in awe of how delicious these muffins are--we are calling them chocolate 'treats' in our house. They have the softness and texture of a cupcake. I have made them several times now...you will think you are cheating on your diet when eating these...we even took them on a picnic in the mountains last month. Here are some pictures of that glorious day where the mini-muffins were just part of the delights:


And here are the mini-muffins (or cupcakes) thawing out from our cooler:


Flourless Double Chocolate, Peanut Butter, and Banana Mini-Muffins


Adapted from www.dashingdish.com

Yield: 12 regular sized muffins or 24 mini-muffins


  • 1 ¾ cups old fashioned oats
  • 3 egg whites
  • ¾ cup cocoa powder (I use Hershey’s Special Dark Chocolate Cocoa)
  • 1 ½ bananas (this makes ½ cup mashed banana)
  • ½ cup plain, fat-free Greek yogurt
  • ½ tsp. vinegar (or ½ tsp. cream of tartar)
  • 1 ½ tsp. baking powder
  • 1 ½ tsp. baking soda
  • ¼ tsp. salt
  • 1 cup hot water
  • ½ cup baking stevia OR 1 cup sweetener of choice that measures like sugar (I like raw sugar)
  • 1 Tbsp. ground flaxseeds (also called ‘flaxmeal’)
  • ½ cup creamy peanut butter, ‘natural’ preferred
  • 1 cup semi-sweet mini-morsels (or more)

Preheat oven to 350 degrees.

Line a 24 cup mini muffin pans with silicone mini muffin liners, or spray muffin tin with non-stick cooking spray. OR, you can use one 12 cup regular muffin tin pan. Set aside. 

Place the peanut butter in a mug or microwave safe bowl, and microwave for 30-45 seconds, or until melted.

In a blender, (or food processor), mix all of the ingredients together. Blend until oats are ground and mixture is smooth. (The batter will be sort of liquid-y, but that’s ok!)

Divide batter between muffin tins. Sprinkle each muffin top with mini-chocolate chips, dividing them evenly.

Place muffin tin(s) in the oven and bake for 12-15 minutes, or until a toothpick comes out clean. 

Cool muffins before removing from pan. ENJOY!!!

Monday, April 16, 2012

Banana, Chocolate Chip, and Granola Cookies


So, with two months left until we leave our house and downsize to less than half of what we have now....I've got a myriad of foods and odds and ends ingredients that need to be used up. Powdered sugar, lentils, Swiss cheese, dried papaya, dehydrated mushrooms, corn flakes, etc. In fact, I got really creative this weekend and made waffles from random pantry items: coconut oil, quinoa flakes, eggs leftover from Easter, leftover buttermilk, sorghum, cornstarch, etc. My family ate them and ate them again. While I watched silently. And enjoyed the smell of coconut in my house. And then decided to tackle more ingredients...like granola.

What's a person to do with leftover granola when they're burned out on parfaits? Well, I saw these cookies online and had to try them. They are VERY good. Moist...flavorful...quite the treat. Glad I stumbled upon the recipe so that I can have another use for bananas and granola. 

The recipe below is my adapted version: I used less sugar (and brown, not white), a not-so ripe banana (so the pieces didn't get smushed), a different granola, and totally upped the amount of chocolate chips--and felt I could have even used more! Delicious.


BANANA, CHOCOLATE-CHIP, AND GRANOLA COOKIES
Adapted from www.biggirlssmallkitchen.com

Makes 3-4 dozen
  • 1/2 cup light brown sugar, packed
  • 1/2 cup dark brown sugar, packed
  • 1 cup butter (2 sticks), softened
  • 1 egg
  • 2 ¼ cups all-purpose flour
  • 1 tsp. baking soda
  • ½ tsp. salt
  • 1 1/2 cups semi-sweet chocolate chunks (or chips)
  • 3/4 cup Cascadian Farms Maple-Brown Sugar Granola (I used Nature's Path Pumpkin Flax Plus)
  • 1 medium banana, cut into chunks

Preheat oven to 375°F.
Mix sugars and butter in a large bowl. With a mixer, hand-held beater, or very strong arm, beat until creamy. Then beat in the egg until the batter is fluffy and light.
Stir in flour, baking soda, and salt and mix until basically combined. Using a rubber spatula, fold in the chocolate chips and granola. Now fold in the banana, being careful not to smush the pieces too much.
Drop dough by rounded tablespoonfuls about 2 inches apart onto ungreased cookie sheet (yes, I did add some more chips on top!). Bake 6-8 minutes or until just barely set.
Cool for 5-10 minutes on the cookie sheet, then remove to a rack or a plate to finish cooling.

Tuesday, February 21, 2012

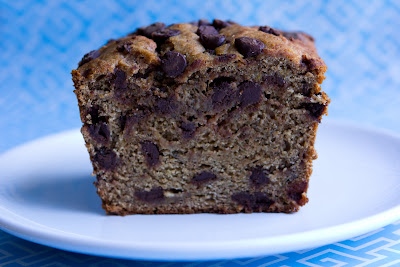
Blew-My-Mind-Delicious-Treat: Vegan (REALLY?) Banana Chocolate Chip Bread


Yup. Another vegan recipe. And it's amazing. My friends recently asked me what my obsession with trying vegan recipes was...I really don't know. Maybe it's because it seems like the 'hip' thing to do these days...? Or maybe it's because I'd like to believe that there are delicious vegan foods to discover. Or maybe because I'd like to know I'm not as completely dependent on cheese as I think I am (HA! A life without cheese? Say it isn't so!!!!). I haven't read 'The China Study' or 'Eat To Live'...no time and parenting/bible study material sort of take priority at this point in my life. Maybe I'll get to them later this year...however, I like the idea of 'cleaner' eating. Though we like to live with moderation, trying vegan recipes is my way of staying 'open-minded.' And when I stumble upon recipes like this, I don't miss the dairy or eggs.

I saw this banana bread recipe on www.chocolatecoveredkatie.com and was excited about a way to use up the spelt flour sitting in my fridge (yes, I keep my whole grain flours in the fridge). What a surprise it was to find such a low-fat treat. There is no additional fat in this bread (if you don't use oil) besides the chocolate chips! And yes, I added extra chocolate chips. Also, I realize that I have posted several banana bread recipes--all very good. But this is the only one that didn't require butter, refined sugar, or eggs. So, I will definitely be making it again!

I hope you will try this and that you enjoy it as much as I did.


POLKA-DOT BANANA BREAD (CHOCOLATE CHIP BANANA BREAD)
(Makes 10-12 slices)
  • 2 cups spelt flour (or white, or Arrowhead Mills gluten free, etc.)
  • 1 tsp. baking soda
  • 1/2 tsp. cinnamon
  • 3/4 tsp. baking powder
  • 3/4 tsp. salt
  • 1/3 cup milk of choice (or oil)--(I used almond milk)
  • 1 and 1/2 tsp. pure vanilla extract
  • 1/2 cup agave or maple syrup (I used maple syrup)
  • 1 and 1/2 Tbsp. lemon juice
  • 1 stevia packet (or 1 Tbsp. more agave or other sweetener)--(I used agave nectar)
  • 2 cups tightly-packed, mashed banana (measured after mashing)-(I had a little less than 2 cups)
  • 1/3 to 2/3 cups chocolate chips (I used 1 cup and sprinkled more on top)

Preheat oven to 350 F. Combine dry ingredients, and mix well. In a separate bowl, combine wet ingredients and mix into dry. (Mix by hand, and don’t overmix.)

Pour batter into a greased loaf pan and cook for around 50 minutes. (Tip: If the top is cooked but the inside is still gooey, put tin foil over the top and continue to cook.)

After removing from the oven, let cool for ten minutes before slicing. After the first day, this bread is best stored in the fridge. Or cut it into slices and freeze for later. 


Thursday, February 9, 2012

Salted Caramel Chocolate Chip Cookie Bars


We're moving in a few months and my husband has taken ghost-like characteristics due to board studying. Our to-do list is feeling a bit insurmountable right now, so my in-laws graciously came to visit and help us start with the 'purge, organize & donate' project. It was wonderful. The problem is, we need about 10 more of those visits! I knew that all I had to say to my mother in-law was 'salted caramel and chocolate' and I knew she'd be on board. So while the guys were cleaning out the garage, we made our new favorite cookie bar!

Not sure how to start discussing these bars because all I can say is: They. Are. Amazing. I absolutely HATE how good they are. I sort of wish I'd never even made this recipe....because I simply could not stop eating them. Oh Salted Caramel Chocolate Chip Cookie Bars, you have stripped me of all self-control. And it is downright embarrassing. The least I could do is share along the recipe from Maria & Josh.

Try these delicious, unpretentious bars--they're a step up from the traditional chocolate chip cookie. And if you are worried about your own self-control, make them to serve for others! They will love you for it :) The only thing different we did was to use the WHOLE caramel package of these. Don't skimp or skip the salted layer--here's what it looked like during that step:


The coarse sea salt is wonderful on top of the sweet, gooey caramel. The chocolate takes it over the top. Keep in mind that the caramel hardens after a while, making the bars easier to cut.

(SWOON!)


CHOCOLATE CHIP SALTED CARAMEL BARS

Adapted from www.twopeasandtheirpod.com

  • 2 1/8 cups all-purpose flour
  • 1/2 tsp. salt
  • 1/2 tsp. baking soda
  • 12 Tbsp. butter, melted and cooled to room temperature (1 ½ sticks)
  • 1 cup light brown sugar
  • 1/2 cup granulated sugar
  • 1 large egg
  • 1 large egg yolk
  • 2 tsp. vanilla extract
  • 2 cups chocolate chips (we used closer to 3 cups)
  • 10 ounces caramel candy squares, unwrapped (we used the whole 14 oz. package)
  • 3 Tbsp. heavy cream
  • Coarse Sea salt, for sprinkling over caramel and bars (don't skimp!)

Preheat oven to 325 degrees F. Spray a 2-quart baking pan (which is an 11 X 7 pan-I used a glass Pyrex dish) with nonstick cooking spray and set aside.
In a medium bowl, whisk together flour, salt, and baking soda. Set aside.
In the bowl of a stand mixer, mix the melted butter and sugars together until combined. Add the egg, egg yolk, and vanilla extract and mix until smooth. Slowly add the dry ingredients and mix on low, just until combined. Stir in the chocolate chips.
In a large microwave safe bowl, combine the caramels and heavy cream. Microwave caramels on High until caramels are melted, stirring every 20 seconds. This will take about 2 minutes, depending on your microwave.
Divide the cookie dough in half. Press half of the cookie dough into the prepared pan, smoothing the top with the spatula. Pour hot caramel over the cookie dough. Sprinkle caramel with sea salt. Drop spoonfuls of cookie dough over the caramel and spread dough with a spatula until the caramel is covered. Sprinkle the bars with additional sea salt.
Bake cookie bars for 30 minutes or until the top of the bars are light golden brown and the edges start to pull away from the pan. Cool bars on a wire rack to room temperature. Cut bars into squares and serve.


Saturday, January 28, 2012

Non-Dairy Chocolate Sauce to Die For


Last night, we had a great dinner with friends. And I got to bring dessert--which paled compared to the meal, but every once in a while, I let myself get spoiled. Seriously, isn't it the most wonderful thing in the world when someone feeds you a home-cooked meal?! It was my first time making a chocolate sauce to go with an amaretto cheesecake. And we really liked this chocolate sauce. Of course, it comes from famed pastry chef, David Lebovitz. Apparently, he's been making it for 20 years. Yeah, it's pretty darn good!

Since Valentine's Day is coming up, I figured maybe some of you might be looking for a fast and easy chocolate sauce to drizzle over your desserts. You might have to resist eating it out of a jar. Keep it in the fridge and warm it up before serving. I made some small changes in parentheses. I used agave nectar instead of corn syrup--I have a feeling that corn syrup would give you a bit thicker and shinier texture. 

  • One thing I did do that did end up tasting pretty delicious, was do 1/2 cup coffee (strong, unsweetened) + 1/2 cup water. However, keep in mind that coffee is acidic--and that helped me understand why my sauce did end up crystallizing a tiny bit--the acid affected the integrity of the sauce--not enough to bother us, but enough to notice it visually. I think it would be better to add a tablespoon or two of coffee liqueur instead if you want a little mocha flavor.

By the way, we weren't the only ones having fun--check out our children having their first date--this cracks me up as they were even provided 'candlelight'...the only thing missing is a shared pasta noodle between those busy mouths. 


Love may be in the air.....I think it would be great to add a little peppermint extract to this chocolate sauce and serve it over ice-cream at Christmas...or Valentine's Day. Which we are DEFINITELY preparing for at this house. All I hear about is hearts...heart songs, prayers, books, crafts,


..we even watched a little open heart surgery on youtube ('that was cool, mom!'). Hope everyone can use a little chocolate in preparation :)

THE BEST CHOCOLATE SAUCE
Adapted from www.davidlebovitz.com
About 2 1/2 cups
  • 1 cup (250 ml) water
  • 1/2 cup (100 g) sugar
  • 1/2 cup (160 g) light corn syrup, agave nectar, or glucose (I used agave nectar)
  • 3/4 cup (75 g) unsweetened cocoa powder (preferably Dutch-processed)
  • 2 ounces (55 g) bittersweet or semisweet chocolate, finely chopped--(I used 3 ounces of good quality semi-sweet chocolate chips)
  • 1/2 tsp. sea salt (my addition)

In a medium saucepan, whisk together the water, sugar, corn syrup (or agave or glucose), and cocoa powder.
Bring to a boil over medium heat. Once the mixture has just begun to simmer and boil, remove from heat and stir in the chopped chocolate until melted.
Serving: You should let the Chocolate Sauce stand for a few hours before serving, which will give it time to thicken a bit.
Storage: Store the chocolate sauce in a covered container in the refrigerator for up to 10 days. Rewarm before serving.
ENJOY! This sauce is delicious over cheesecake and when added to hot milk to make hot chocolate. Serve it over strawberries and ice-cream or dip bananas in it for a delicious treat. 

Wednesday, January 11, 2012

Dark Chocolate Lavender Truffles....LOVE at First Bite


WOW. I have been dreaming of lavender recipes lately....and finally, I tried something with my dried lavender (courtesy of the bulk spice department in Whole Foods). Chocolate & lavender are an amazing team. If you like the smell of this herb, then you will like the taste of this treat. If you don't...then maybe you should still try it--but make 1/2 a recipe. Lavender is native to the Mediterranean region. I've heard a lot of people say that they can't imagine lavender in food--that it just reminds the of soap. I suppose it is clean & relaxing. And the word does come from the latin, lavare, which means 'to wash'...It's one of those herbs like cilantro or tarragon--you either love it or hate it. I happen to love it. My aunt and I dream of visiting lavender fields across the globe!

Here's one in Tasmania (photo from Wikipedia):


and one in Provence (photo from Lizzie Shepherd: Photography):


There is something incredibly decadent about combining these two flavors--the peaceful, calming nature of lavender--with the explosive, luxurious, and deep flavor of chocolate. It's like having a vacation in a bite! Truffles are an easy, but heavenly, treat to make.

When making these heady treats--read my recipe all the way to the end first--I wrote a note on whether to include or eliminate the lavender flowers.

I made a double recipe of these awesome truffles (so I'd have something to give out at the tail end of the Christmas holiday) and tried hard to remember the yield....I think 25-35 for a double recipe. But of course, it also depends on how big you make your truffles....now, I can't wait to try other flavor possibilities--these chocolates are otherwise expensive at the store! Somehow, they tasted expensive at home too.....


DARK CHOCOLATE LAVENDER TRUFFLES
Adapted from www.voilawithemily.com

  • 8 oz. dark chocolate (53% cocoa or above), chopped--the better the quality, the better the truffle
  • 1/2 cup heavy whipping cream
  • 2 tsp. dried lavender buds
  • 1 tsp. pure vanilla extract
  • 1/4 cup unsweetened cocoa powder or 1/4 cup blanched almond crumbs (I needed more like 1/3 cup)


Chop chocolate into small chunks (I actually didn't even bother to chop them!), place in medium size bowl and set aside. Simmer cream in small sauce pan. Once simmering, pour in lavender buds and vanilla, whisk together. 
Now, this is just my suggestion-- let sit a few minutes to let the lavender flavor fully set and then strain the lavender pieces out through a sieve (RESERVING HOT CREAM!) Some people don't like their chocolate to have anything in it--like herb leaves/buds. I prefer my chocolate smooth so I can be undistracted during my afternoon moment of bliss as I tune out the cats that are in heat on my porch, the crashing of some dish off the countertop my toddler has pulled on, or the sound of the garbage truck dragging my recycling across the street. But, that's just me and my untethered moment (bliss).
Add cream/lavender mixture to the chopped chocolate. Let sit for a few minutes before stirring until smooth. (I just stirred immediately until it was all combined.)
After the mixture is smooth, place in fridge for 3 hours or more.
Remove bowl and with a teaspoon or melon baller, roll out balls of the chocolate, placing on a cookie sheet lined with parchment paper. Place the cookie sheets back in the fridge for another 30 minutes. When truffles are firm, roll in your (clean) hands quickly to form small spheres (the temporary heat of your hands helps the cocoa/almonds to adhere to them better). Roll these round spheres in cocoa powder or the chopped almonds, and either serve or return to the fridge for safe keeping. 
Store in refrigerator. They save for at least several weeks!!
Really: BLISS BITES!

Wednesday, August 10, 2011

Nordy Bars


Years ago, I used to work at a shi shi outdoor mall in Oak Brook, IL. It was very pretty. And during my lunch breaks, I would walk around window shopping at Mark Shale, Pottery Barn, or Restoration Hardware. Often, I'd stroll into Nordstrom--an even more luxurious department store than the one I worked at....Nordstrom was shiny and bright. There was classical music playing and all the salespeople were dressed beautifully with impeccable hair and manners. In order to enter this amazing store, you had to pass through their cafe. Oh, the smells this cafe offered! The air was filled with espresso, butter, and vanilla. Sigh. This place felt like what one often thinks a home should feel like (ha!). Until you glanced at the price tags of the Manolo Blahniks past the coffee shop. Then reality came crashing in and you settled in for a caramel macchiato and braced yourself to walk amongst the glittering beauty and temporarily feel part of a different world.

As the years have passed, I've been able to 'visit' several Nordstroms around the country and I must say that their wares do not tempt me as much as they used to....possibly because I am more practical, possibly because God answered my prayers. Their food....however.....is a different story. (Check out my favorite tomato basil soup recipe from their cafe here.) I have been yearning to try this decadent bar recipe Nordstrom used to sell in their cafe years ago (they no longer do). I am not sure of the Nordy bar's recipe's origin--most likely, it's a copycat and can be found on several sites on the internet. But I am featuring it here, because it is simply wonderful. These bars are ooey-gooey (albeit, a tiny bit too sweet--making them excellent with dark coffee)....and worth the extra miles you have to run to make up for their taste. They went fast in our house!

 
I suggest you make them when you have people to share them with.....you will not be able to resist the marshmellow, butterscotch, vanilla, and chocolate combination in this recipe....

NORDY BARS
Makes ~16

  • 1/2 cup butter (1 stick)
  • 1 (11 oz) pkg. butterscotch chips
  • 1/2 cup  brown sugar
  • 2 eggs
  •  1 1/2 cups flour
  •  2 tsp. baking powder
  • 1/2 tsp. salt
  • 2 tsp. vanilla
  • 1 (12 oz) pkg. semisweet chocolate chips
  • 2 cups miniature marshmallows
In medium sauce pan melt butter, add butterscotch chips and brown sugar.  Stir until melted (this may look a little strange, but it will be ok).
Remove from heat, add eggs, flour, baking powder, and salt.  Add vanilla and set aside and cool (I stuck the batter in the refrigerator for about 15 minutes).
Meanwhile, preheat oven to 350 degrees.
When the butterscotch batter has cooled (it doesn't have to be cold--just not warm!), stir in chocolate chips, marshmallows.  Spread in an ungreased  9 x 13 pan.  Bake for 25 minutes. 

Remove and cool – they will be soft and gooey when you take them out – they will set up as they cool.  Enjoy!

Wednesday, March 23, 2011

White Chocolate-Apricot-Oatmeal Cookies

Spring is definitely here. And, mmmmm.....my house smelled like fresh baked cookies yesterday.....With the weather getting warmer, a new Bible study starting, my sweet friend having a baby....it's clearly a 'clean slate' kind of season. Here are some signs that spring is present around our house:


And also time to try out some new recipes. This particular cookie is milder from the white chocolate, a bit tart from the apricots, and chewy due to the oatmeal. I added the espresso powder for more flavor and enjoyed it, but you certainly don't have. Give these a go if you're tired of the same old classic oatmeal cookie and want to try a new twist.

Took these sweet treats to the girls. And since it was a new recipe, I was urged to share it by my wonderfully kind pest control guy who graciously accepted the 'taste tester' position. Thanks Kyle. And my sweet babysitter, Rachel, for taking them home :)


WHITE CHOCOLATE-APRICOT-OATMEAL COOKIES
Adapted & changed from Martha Stewart
  • 1 1/2 cups all-purpose flour
  • 1 1/2 cups old-fashioned oatmeal
  • 1/2 tsp. baking soda
  • 8 ounces (2 sticks) salted butter, softened
  • 1 1/4 cup packed light-brown sugar
  • 1 tsp. salt
  • 1 tsp. pure vanilla extract
  • 2 large eggs
  • 8 ounces white chocolate, chopped
  • 7 ounces dried apricots, chopped (~1 1/2 cups)--I used a 6 oz. package
  • 2 Tbsp. espresso powder, or chocolate-covered espresso beans (ground up)--OPTIONAL, but good addition since white chocolate has a milder flavor
Preheat oven to 350 degrees.
Mix flour, oatmeal, and baking soda in a medium bowl.

In another bowl, cream butter and sugars with a mixer until light and fluffy. Reduce speed to low. Add salt, vanilla, and eggs, and beat until well combined, about 1 minute.

Add flour mixture gradually, beating until just combined. Stir in chocolate and apricots. Cover, and refrigerate until cold, about 30 minutes.

Drop heaping tablespoons of dough onto parchment-lined baking sheets (or silpats), spacing 2 inches apart.

Bake until cookies are golden brown around the edges but still soft in the center, 14 to 16 minutes. (Mine took less time so watch your oven!)

Let cookies cool on baking sheets for 2 minutes. Transfer cookies to a wire rack; let cool.

Cookies will keep, covered, for up to 1 week. Makes about 3-4 dozen cookies.

Wednesday, March 9, 2011

Mocha Cupcakes with Truffle Cream Cheese Frosting


How wonderful--another excuse to bake came my way--I was asked to bring dessert for two events this week. Don't recall where I got this recipe, but I've adapted it from a bundt cake to cupcakes and it worked well (surprisingly). By the end of my time in the kitchen, I was absolutely covered in chocolate. And in desperate need of a gym.

The frosting recipe is from http://www.allrecipes.com/, but I've adapted it somewhat as well. You can use a buttercream or ganache topping for the cupcakes if you like; but I prefer the tanginess from the cream cheese mixed with the sophistication of dark chocolate.

This is a more 'adult' cupcake recipe; however, cupcakes seem to bring out the kid in all of us!

 Please enjoy!!!

MOCHA CUPCAKES WITH TRUFFLE CREAM CHEESE FROSTING
  • 1 box devil's food cake mix (pudding recipe preferred but not necessary)
  • 1/2 cup sugar
  • 1/3 cup vegetable or canola oil
  • 3 large eggs
  • 3/4 cup water (I prefer to use milk)
  • 3/4 cup strong, black coffee
  • 1/4 cup bourbon
  • 1/2 cup Kahlua or coffee liqueur
  • 2 tsp. unsweetened cocoa
Preheat oven to 350 degrees.

Mix all ingredients and beat for 4 minutes. Batter will be runny. Don't panic. Trust me, it will be fine.

Pour batter into liners inserted into a muffin pan. Bake for approximately 19-20 minutes or until toothpick inserted comes out clean (a few crumbs sticking to toothpick is ok--just no liquid/stickiness).

Frost cupcakes and decorate however you would like. (I used candy flowers purchased at a baking supply store.)

YIELD: Makes about 2 dozen cupcakes (if you don't overfill them with batter like I did--huge mistake I always make!)

TRUFFLE CREAM CHEESE FROSTING
 Makes approximately 5 cups of frosting--just right to frost 2 dozen cupcakes. 
  • 1 1/2 pkgs (12 oz) cream cheese (I use reduced fat cream cheese with no problems)
  • 1/2 cup confectioners' sugar
  • 1/2 cup heavy whipping cream (or half & half or whole milk)
  • 1 1/2 cup semisweet or bittersweet chocolate chips
In double boiler melt chips and add heavy cream, mix until smooth. Turn off the heat. OR, alternatively, melt the chocolate chips with the cream in the microwave for 20-30 seconds at a time--stopping to mix in order to prevent burning. (Some people find this method trickier, but I prefer it since it uses a few less dishes--lazy cook that I am....)

In mixing bowl cream together sugar and cream cheese until smooth, slowly add chocolate mixture. Mixture will thicken up as the chocolate cools. (You can also place frosting in the refrigerator for a few minutes before frosting your cupcakes if the frosting is too soft).

You should have 24 cupcakes.

Wednesday, February 23, 2011

Frozen Chocolate (Kahlua) Pie with Pecan Crust


Celebration time! Dinner with friends, birthdays coming up, and time to make something fun that I can share. And if we don't have celebrations, we make them--life is SHORT. Right? I found this recipe in one of the cookbooks I was given as a wedding present. This pie came together surprisingly fast! I will warn you that you may have several bowls leftover to clean, but it really isn't that difficult of a recipe. And it's AMAZINGLY good! Like a frozen, creamy mousse with a crunchy crust and then a creamy topping. SO good! If you like chocolate, you will love this!

Not sure about you guys, but the concept of a double boiler is intimidating to me. However, I was able to conquer my fear of cooking eggs over boiling water without turning them into scrambled eggs (that did indeed happen to my husband and myself while attempting to make ice-cream years ago--it was disgusting! Not this time though...). I love that this crust has no flour in it...just sugared nuts--it's a fun change from working with dough! If you don't have, or want to use Kahlua, I'm sure using strong coffee would do just as well.


FROZEN CHOCOLATE PIE WITH PECAN CRUST
Adapted from: Southern Living, 30 Years of Our Best Recipes

Pecan Crust:
2 cups finely chopped pecans
1/3 cup firmly packed brown sugar
¼ cup butter or margarine, melted
2 tsp. Kahlua
Cooking spray

Pie Filling:
6 (1-ounce) squares semisweet chocolate
½ tsp. instant coffee granules
2 large eggs, beaten
3 Tbsp. Kahlua or other coffee-flavored liqueur
¼ cup powdered sugar
¾ cup whipping cream
1 tsp. vanilla extract

For serving:
¾ cup whipping cream
1 Tbsp. Kahlua
1 Tbsp. confectioner's sugar (optional)
Grated chocolate (optional)

To make crust: Combine first 4 ingredients, mixing well. Firmly, press mixture into bottom and up sides of a 9-inch pie plate coated with cooking spray. Bake at 350 degrees for 12 to 14 minutes or until pecans are toasted. Press sides of crust with back of a spoon. Cool completely.

To make filling: Place chocolate squares and coffee granules in top of a double boiler; bring water to a boil. Reduce heat to low; stir until chocolate melts. This is what my 'double boiler' looked like--a glass bowl over a regular pot of water:


Gradually stir about one fourth of a melted chocolate mixture into eggs, mixing well; add to remaining chocolate mixture in double boiler. Gradually stir in Kahlua and powdered sugar. Cook, stirring constantly (until mixture reaches 160 degrees—check with a meat or candy thermometer). Remove from heat. Cool to room temperature.

Beat ¾ cup whipping cream with the vanilla (and the 1 Tbsp. powdered sugar, if using) until soft peaks form; fold into chocolate mixture. This is what mine looked like:


Spoon the whole chocolate-whipping cream mixture into the pecan crust. Cover and freeze.

Transfer pie from freezer ONE HOUR before serving.

Before serving: Beat ¾ cup whipping cream until foamy. Gradually add 1 Tbsp. of Kahlua, beating until soft peaks form. Pipe or dollop (meaning drop with a spoon) the whipped cream around the edge of the pie. Sprinkle with grated chocolate, if desired.


YIELD: 1 (9-inch) pie

Saturday, February 12, 2011

RAW Fudge-y Coffee Brownie Truffles


With Valentine's Day approaching, we're all thinking chocolate....here is an alternative chocolate dessert. Ok, so they're not super pretty to look at, but these little guilt-free treats are REALLY good!

I'm really apprehensive when it comes to 'raw' recipes....most 'raw' things I've had have been pretty scary. But I want to learn more about it so that I can find things that actually taste good. I'm sure a lot of people feel that way when going from a meat-eating diet to vegetarianism. Anyway, there are a lot of vegan recipes that actually taste pretty good and I'm always interested in tried & true....

While perusing some food blogs, I found this recipe on a food blog I am now in love with (http://www.bakingwithbasil.com/) and am absolutely DELIGHTED at how delicious these are! Check out Brooke's great blog. Many of us need our chocolate fix, but need to find less fattening ways to sustain our love affair...give these a try. I hope you like them. I have 3 more raw truffle-like recipes waiting to be tried out...since the first experiment went well. You can find pitted dates next to the raisins and other dried fruit at your grocery store. And most of them shouldn't have sugar--unfortunately mine did, but that also allowed for super dark cocoa to be used. Yum......

RAW FUDGE-Y COFFEE BROWNIE TRUFFLES
Adapted from Baking With Basil

Makes approximately 16 'truffles'

1/2 cup unsalted cashews
1 1/4 cup pitted dates (I used an 8 oz. package of diced, pitted dates)
4-5 Tbsp. cocoa powder (I used dark cocoa since my dates had sugar listed in the ingredients)
1 tsp. vanilla extract
1/2-1 tsp. instant coffee

In a food processor, chop/blend all ingredients. (Or you can chop the nuts finely and set aside. Then you can place the dates in a mini food processor and chop/grind for about 2-3 minutes until they are in small pieces. Add cashews, vanilla, chocolate, and instant coffee. Mix until all ingredients are combined.) The mixture will be somewhat sticky.

Roll into bite size balls. Store in fridge (my experience has been that they hold up better when cool). I got about 15-16 truffles and I think I will double the recipe next time.

Mine turned out slightly darker because I processed the nuts finer, but as mentioned above, you can chop them and retain the polka dot look as can be seen in the original post.

Sunday, January 23, 2011

Sinfully Delicious Orange Flourless (Dark) Chocolate Cake


This is definitely one of the 'champagne' recipes....I know, not exactly healthy. But, it's FAST preparation and EASY to make. Extremely decadent. Worthy of those moments in life where you want to punctuate sentences such as, 'I love you for working like a dog so I can stay home', or 'sorry I ran up the Discover prior to Christmas', or 'can I change your mind about taking that vacation?' or 'happy birthday to a hardworking immigrant mom that I never get to see on her birthday.'  Ha! You get my point...

Being that my mom is visiting on her birthday weekend and she is European, making a traditional cake with buttermilk frosting was completely out of the question. Therefore, this was the perfect opportunity to pull out another 'can't wait to try this when I have people over' recipe that combined her favorite things: dark chocolate and orange flavor. No, this cake is NOT attractive. But that's ok. One bite, and you are lost in love....

This delightfully moist and rich flourless chocolate cake was made for the Reagan family by the French pastry chef Roland Mesnier, during President Ronald Reagan's administration. The recipe is excerpted from the book Chef Mesnier wrote describing the desserts he made during 25 years he served as the White House pastry chef.

This recipe appeared on http://www.epicurious.com/ and had amazingly good reviews. I modified the recipe using salted butter and leaving out the extra 2 Tbsp. of sugar which made it turn out particularly excellent, but the original recipe is below.

ORANGE FLOURLESS (DARK) CHOCOLATE CAKE
Adapted from All the Presidents' Pastries: Twenty-Five Years in the White House, A Memoir

1 1/2 sticks (170 g) unsalted butter, plus extra for greasing
flour, only for dusting
6 ounces (170 g) bittersweet chocolate
1 cup plus 2 tablespoons (220 g) sugar
zest of one large orange
4 eggs, plus 2 egg yolks
1/2 cup (55 g) unsweetened cocoa powder

To serve:
Confectioner's sugar, for dustingcandied orange peel and vanilla ice cream, optional--but, apparently worth it

Preheat the oven to 375°F (190°C). Butter and flour a 10-inch (25-cm) round cake pan. Line the bottom of the pan with parchment paper, then butter and flour the parchment paper.

Gently melt the chocolate over a double boiler. Stir the butter into the chocolate to melt, and stir until smooth.

Remove from the double boiler and whisk the sugar and orange zest into the chocolate mixture. Add the eggs and egg yolks and whisk well. Sift the cocoa powder over the chocolate mixture and whisk the batter until totally smooth. (Below is some of the chocolate I used--a little of each)


Pour the batter into the pan and bake for approximately 35 to 40 minutes, or until the top has formed a good crust. The cake will puff up some, but it will not be as heavy as other flourless chocolate cakes.


Cool the cake in the pan on a rack for 10 minutes. Invert the cake onto a serving platter. Dust with confectioners' sugar and if you like, serve with candied orange peel and/or vanilla (bean) ice cream.

 
Makes about 10 servings.