Sunday, May 22, 2011

Spicy, Cheesy, Roasted or Grilled Mahi-Mahi (ADAPTABLE)


We really like the texture of mahi-mahi fish and being that fish is healthy (in moderation), I'm always looking for a new way to prepare it. Today ended up being rainy, so though the original intention of this recipe is for it to be grilled, I roasted the mahi mahi in the oven. The result was impressive. The recipe makes a delicious sauce that is best mopped up with crusty bread, but would do equally well on a bed of rice.

I don't know about you guys, but I like to use recipes that fit with how we live--sometimes this means adapting to the weather and sometimes this means working with changes based on what is in the fridge or pantry. This is an easy recipe, and one that is also very adaptable--meaning the following changes would make for just as delicious of a dish. I wasn't thrilled with elements of the original one (here it is), so I changed it up a bit. Seemed very forgiving--so feel free to experiment!

  • if you don't have wine, use chicken broth
  • if you don't want to make it spicy, use a mild version of tomatoes and chilies and/or substitute another cheese for the pepper jack (like regular Monterey Jack)
  • if you don't have fish, try it with chicken--that will be my next attempt
  • if you'd rather use olive oil over the butter, it would work just as well
  • add more or less garlic, depending on how much you like
  • if you want it spicier, add another can of spicy tomatoes and chilies and skip the wine/chicken broth
  • double or quadruple the recipe to your liking
  • if you like less sauce, add less wine and use half the can of tomatoes and chilies or drain the can
  • original recipe calls for bottled garlic so if you don't have fresh, that should work
  • if you want an Italian flavor, skip the tomatoes with chilies and just use a 14 oz. can of Italian style chopped tomatoes (with basil) and use Mozzarella instead of the Pepper Jack cheese

SPICY, CHEESY, ROASTED or GRILLED MAHI MAHI
Adapted (and changed) from www.allrecipes.com

Serves 4
  • 2 Tbsp. butter (or light butter or a butter spread like Smart Balance)
  • 4 boneless filets of mahi mahi
  • 4 cloves garlic, minced
  • 1 onion, sliced thinly
  • 1.5-2 (10 oz) cans diced tomatoes and chile peppers--undrained (like Rotel brand)
  • 1 lemon, juiced
  • 1/4 cup white wine
  • Salt & pepper, to taste
  • 4 ounces shredded Pepper Jack cheese 
If GRILLING:
Preheat grill for high heat.          

Place mahi mahi in an aluminum foil pan, and toss with the garlic to coat.

Distribute butter evenly throughout pan. Spread onions over fish. Pour the lemon juice, wine, and diced tomatoes with green chile peppers over the fish. Season with salt and pepper. Tightly cover pan with aluminum foil.               

Place pan on the grill grate, and cook fish 35 minutes, or until easily flaked with a fork. Sprinkle with cheese before serving.

If ROASTING:

Preheat oven to 450 degrees.

Place mahi mahi in a baking pan or dutch oven, and toss with the garlic to coat.

Distribute butter evenly throughout pan. Spread onions over fish. Pour the lemon juice, wine, and diced tomatoes with green chile peppers over the fish. Season with salt and pepper. Tightly cover pan with aluminum foil or use a lid (I left mine completely open--without lid--to allow for greater roasting texture and to let more of the liquid evaporate because I felt it was too much liquid--but you can always DRAIN the tomatoes and chilies or skip the wine).               

Bake fish for about 20-25 minutes, or until easily flaked with a fork--if you leave uncovered, check to make sure fish isn't burning! Sprinkle the fish with cheese before serving.

Serve with rice or crusty bread and a salad or vegetable.


This should go in your 'What's for dinner?' file for a quick and delicious family meal.

Saturday, May 21, 2011

Salt-Kissed Buttermilk Cake


Oh my goodness. This cake is SO good! It's actually pretty healthy as far as 'cakes' go--but that's because it's a more rustic, homey cake. The kind you want to eat with coffee in the morning. The kind you linger over after dinner while looking over at a view....the kind you wat to try with different kinds of fruit, the kind you give to your kids because you figure it won't kill them....a cake that instantly becomes a family favorite and you feel has always been something you've made.

When I first saw this cake on Heidi's blog (http://www.101cookbooks.com/), the raspberries she used in the batter drew me in....and then I began a love affair with desserts that were made with fleur de sel at restaurants. Brownies, truffles, ice-cream..you name it...seems like everything is better with salt--you don't get that sick, cloying sweet taste that sticks in your throat. So the coarse salt and raw, shiny sugar crystals really will seem like they are kissing the cake!

This cake has a wonderful crispness in the crust and would adapt well with many fruits or flavor combinations. The buttermilk gives it incredible flavor...mellow, tart....like you can't put your finger on what it is but you keep wanting to come back for more. And the lemon zest works well with the saltiness. The whole wheat pastry flour gives the cake a wondeful crumb texture that still manages to stay together instead of fall apart and yet the cake is still moist with only 1/2 of stick of butter. I like it as much as I like my Romanian tart cherry cake and for different reasons. Thank you Heidi for such a delicious, comfort treat....I may even make another one this weekend with different fruit!

Please try this recipe. I dare say it will make you happy.


SALT-KISSED BUTTERMILK CAKE

  • 2 1/2 cups whole wheat pastry flour (Heidi says not to try with white whole wheat flour-texture not as good)
  • 1 Tbsp. baking powder
  • 1/2 cup fine-grain natural cane sugar (or brown sugar)
  • 1/2 tsp. salt
  • 2 eggs
  • 1 cup buttermilk (I used low fat with no problems)
  • *1/4 cup butter, melted and cooled a bit (If you melt this in the microwave-watch, as it can explode)
  • zest of 2 lemons
 For Topping:
  • 1 cup of raspberries (more if you like)--I used blackberries, but any berry could work
  • 3 Tbsp. large grain raw sugar (like a Turbinado sugar or Demerera sugar)
  • 1 tsp. large grain salt (I used a smoked champagne sea salt I never know what to do with)

Preheat oven to 400F degrees, racks in the middle. Grease and flour (or line bottom with parchment paper) one 11-inch tart/quiche pan. Alternately, Heidi has done this cake in a 9x13-inch rectangular baking dish - just keep a close eye on it after it has been baking for 20 minutes.

Combine the flour, baking powder, and sugar and salt in a large bowl. In a separate smaller bowl whisk together the eggs and the buttermilk, whisk in the melted butter, and the lemon zest. Pour the buttermilk mixture over the flour mixture and stir until just combined - try not to over mix.

Spoon the batter into the prepared pan, pushing out toward the edges (Yes, not like a typical batter than you drop in and it is more liquid-like and easily goes to the sides--this one you gently coax to the edges with a spatula). Now drop the berries across top. Heidi says she likes to smush them a bit between her fingers before letting them fall to the cake - no so perfect looking and the juices meld with the sugar (and that's what I did too).

Sprinkle the cake with the large grain sugar and then the salt. This is what it looks like going in the oven (SO PRETTY! YUM!)


Bake for about 20-25 minutes or until cake is set (or a toothpick in the center comes out clean), and a touch golden on top.

Serves about 12 (super funny--Heidi, let's talk about this, shall we? Between my husband, myself, and a 2 year old, we devoured half of it in one evening.)

*Heidi's note: I melt the butter for this cake, so sometimes while I'm at it I just keep going and brown it - this adds an entirely different deep buttery flavor. If you go this route, strain out any solids and let the butter cool a bit before stirring it into the egg-buttermilk mixture. As I mentioned up above - feel free to experiment with other types of seasonal berries and fruit. The coup de grace is a floppy dollop of sweet, freshly whipped cream on the side.

Thursday, May 19, 2011

Strawberry Cheesecake Ice-Cream


Summer is almost here and if you've been (or planning to go) strawberry picking, you may be wondering what else you can do with strawberries besides making jam. Well if you like cheesecake, then you will find this ice-cream to your liking. This ice-cream is creamy, fresh-tasting, not too sweet, and makes the most of summer's very best fruit. It tastes just like strawberry cheesecake! I like to add a handful of coarsely crushed graham crackers and a handful of chopped strawberries 15 minutes before turning off the ice cream machine.

Best part? No eggs to mess with! And this dessert will taste better than your store bought ice-cream.


STRAWBERRY CHEESECAKE ICE CREAM

Serves 4-6

• 6 ounces reduced-fat cream cheese
• 1/2 cup sugar 
• 1 Tbsp. freshly squeezed lemon juice
• 1/2 tsp. vanilla extract
• 3/4 cup fresh pureed strawberries (if using sugar or syrup packed frozen berries, omit the sugar in the recipe)
• 1 cup half-and-half

Add ins:
  • ~1/2 cup chopped strawberries
  • 1 handful of coarsely broken graham cracker crumbs (optional—but defintely good for cheesecake crust factor)

Either in food processor or blender, blend all ingredients until smooth. Chill mixture for about 1 hour, or until cold.

Turn on ice cream machine and set it to chill the freezing/mixing bowl for 5 minutes.

Spoon the cooled mixture into the freezing/mixing bowl of machine. Set the freezing timer to the 30 minute maximum setting. Push start button. If adding the chopped strawberries and graham crackers (I highly recommend!), drop them into the ice cream maker about 15-20 minutes into the freezing and let the machine incorporate the ingredients.

When timer rings, spoon ice cream into dishes and enjoy. (Sometimes, you may need to stick the ice-cream in the freezer for 10-15 minutes if the texture is not hard enough once the machine has finished its cycle--depends on the machine and how hard you like your ice-cream.)

YUM!!


**Can also make this ice-cream with cherries OR you can fill a pie shell with the ice-cream and make an ice-cream pie.

Sunday, May 15, 2011

Easy, Healthy, Fast Multi-Grain Waffles With Mixed Berries


A few years ago, my mom had cancer--Burkitt's Lymphoma to be exact. Pretty rare and pretty awful. Through the grace of God, today she is in remission. Anyway, since then, mom started subscribing to the AICR Health e-recipes and forwarding recipes to me like the one below. To see a list of AICR's publications and sign up, here's a link.

We have been loving them for several years now--they're not that much harder to make than using store bought mix ones. Enjoy them with the amazing berries that are about to be in season.

This was the first time I ever prepared the batter the night before and made them the next morning. Worked amazingly well--so I would recommend doing that if you have overnight guests and want to simplify your breakfast routine. If I'm really ambitious, I premix the dry ingredients and store them in a ziplock bag until I need to them. I often double the recipe and wrap each waffle in plastic wrap and freeze. Some mornings, we just pop them in the toaster right from the freezer to re-crisp.


MULTI-GRAIN WAFFLES WITH MIXED BERRIES

Serves 4
  • 1/2 cup all-purpose flour
  • 1/2 cup whole-wheat flour
  • 1 1/4 cups fat-free buttermilk
  • 1/4 cup rolled oats
  • 2 Tbsp. toasted wheat germ
  • 1 Tbsp. sugar (raw sugar is preferred)
  • 1 Tbsp. canola oil
  • 1 tsp. baking soda
  • 1 large egg, lightly beaten
  • Pinch of salt
  • Cooking spray
  • 2 cups assorted fresh or frozen thawed berries, such as strawberries, raspberries, blueberries and blackberries
  • Maple syrup or low-fat vanilla yogurt, if desired
**Feel free to add 1 tsp. vanilla extract or ground cinnamon or even  2 Tbsp. chopped nuts to the batter (I sometimes do)

In a medium bowl, whisk together the first 10 ingredients. Let the mixture stand several minutes to thicken. (Add additional buttermilk to thin the batter if needed.) Coat a waffle iron with non-stick cooking spray and preheat.

When the waffle iron is ready, ladle the batter into the center of bottom grid until it spreads to within one inch of the edges. Close the cover and cook until golden, about 5 minutes.

Place the waffles on a plate; cover loosely with foil to keep warm. Repeat with more batter. Place the waffles on serving plates. Spoon the berries over the top, drizzle with pure maple syrup (if desired) and serve immediately. Can be served with low-fat vanilla yogurt too!
Options: Serve these waffles as a dessert with low-fat frozen yogurt. Or double the recipe and freeze individually. Reheat in a toaster oven and serve with yogurt, nuts, or fresh fruit. Try other fruits such as bananas, mandarin oranges, and mangoes.
Makes 4 servings or 4 waffles.

My little girl was incredibly happy to have waffles for breakfast.

Saturday, May 14, 2011

New Wave Bruschetta

Yes, I made that name up. If you've never had raw zucchini, you're missing out--it has amazing texture and a very mild flavor that can be enhanced with whatever seasoning or oils you use. I love to toss it in salads.
This recipe came about on a whim when I ran out of time to bring a snack to Bible study. Now I want to make it again. It was a fun variation on the traditional bruschetta. And a great way to use up zucchini if you have a bumper crop. The bruschetta is crispy, creamy and has a fresh flavor--ideal for summer entertaining.


NEW WAVE BRUSCHETTA

Serves 6-8 as an appetizer
  • 1 large multigrain baguette, sliced into ~1/4 inch slices
  • Olive oil cooking spray (or some regular olive oil and a pastry brush)
  • 1 (8 oz.) pkg of reduced fat cream cheese, softened
  • 2 Tbsp. reduced fat sour cream or fat-free Greek yogurt
  • 1 medium garlic clove, minced
  • 1 small handful of basil, chopped
  • Salt & pepper, to taste
  • 1 medium zucchini, washed well, dried and diced small
  • 2 tomatoes, rinsed, dried and diced--drained in colander if possible (I like the vine ripened variety)
  • 1/3 cup Kalamata olives, sliced or chopped (yes, you may use Spanish ones if you don't like this variety)
  • 1/4-1/3 cup freshly grated Parmesan cheese
  • 1-2 Tbsp. lemon juice (I used half a lemon)
  • 1-2 Tbsp. extra virgin olive oil
Preheat oven to 450 degrees.

Place the bread slices on a cooking sheet. I sprayed each bread slice with a little bit of olive oil spray--if you don't have olive oil spray, coat each slice with olive oil with a pastry brush.  Toast the bread slices in the top rack in your oven--this may require you to do the little slices in a couple batches depending on the size of your oven.

Toast for approximately 5-6 minutes, until the bread just begins to turn golden brown. Let cool.

In the bowl of a small food processor, mix the sour cream or yogurt with the cream cheese, minced garlic, and basil. Season with salt and pepper and process until smooth. If you don't have a food processor or are in a hurry, go ahead and mix it by hand (I just wanted the basil fully incorporated). Set cream cheese mixture aside.

In a medium bowl, mix the zucchini, tomatoes, olives, Parmesan cheese, olive oil, and lemon juice. Season with salt and pepper and taste--adjust seasonings if necesssary. Stir gently.

JUST prior to serving, spread a little bit of the cream cheese mixture on each bread slice. Scoop some of the tomato-zucchini-olive mixture on top of the cream cheese. Serve the toasts immediately.

Friday, May 13, 2011

Greek Lemon Chicken with New Potatoes


I've made this several times and each time I love it even more. How is this possible? Maybe it has to do with the tart and salty taste combination--an absolute favorite of mine--or maybe because it takes care of carbs and protein all in one dish..not sure, either way, the credit goes to my friend Nancy. She featured it on her blog www.casualcuisine.blogspot.com. Thank you Nancy for this recipe that has become my favorite way to eat chicken (I've only changed the proportions slightly).

The tangy sauce is so delicious! You can use frozen chicken for ease and the chicken will come out tender and the potatoes crispy. This is one of my absolute favorite recipes! LOVE IT, LOVE IT, LOVE IT! It goes right next to my Moroccan chicken recipe (to be featured at a later date). Please try Nancy's recipe if you like feta or lemons.

Greek lemon chicken with potatoes also makes great leftovers. It makes a delicious dinner served with green beans and fresh tomatoes. Hope you love it as much as I do.


GREEK LEMON CHICKEN WITH NEW POTATOES

Serves ~6
  • 5-6 chicken quarters (or chicken breasts)--I used 2 lbs. of lean chicken tenders 
  • 4 lbs. redskin  (or new) potatoes, quartered or cut in bigger chunks
  • 1/2-3/4 cup FRESHLY squeezed lemon juice
  • 1/3 cup olive oil
  • 1/2 Tbsp. salt
  • 1 tsp. freshly ground black pepper
  • 1 Tbsp. garlic, granulated (or about 4 small-medium cloves, minced)
  • 1 tsp. paprika (smoked preferably)
  • 2 Tbsp. oregano (I used fresh and LOVED the flavor)
  • ~1/3 cup crumbled feta cheese--you can add more or less

Place chicken in deep baking pan (I used a large shallow baking pan and it seemed to work well also). Surround with potatoes. In a separate bowl, combine lemon juice, oil, salt, pepper, paprika, garlic, and oregano. Stir to combine all ingredients and drizzle mixture over chicken and potatoes.
Sprinkle the crumbled feta cheese over the chicken and potatoes.

Cover with foil and bake at 425 degrees for 1 hour. Remove foil and bake for an additional 1/2 hour to achieve a crisp light brown texture*. Serve hot.


*NOTE: Nancy said that even though she used frozen chicken, she still cooked the chicken at the same temperature and amount of time, and it was fully cooked and tender. But if your frozen meat is really thick, check for doneness (or about 170 degrees). If you need to cook it longer, place the foil back on it so the chicken does not get burnt.

Monday, May 9, 2011

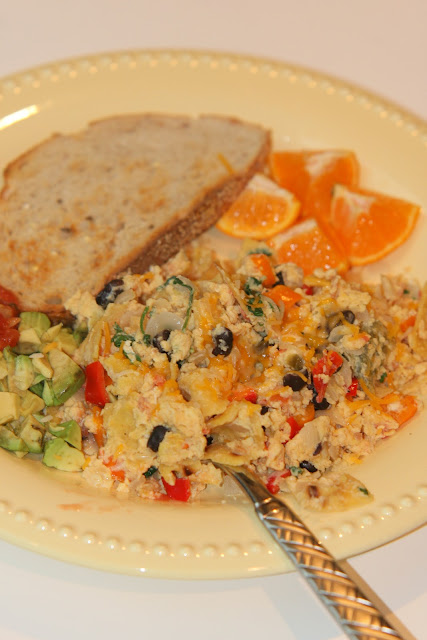
Eggs on Spring Break: PW's Migas


Hey all! I was hoping to post this on Cinco de Mayo (5th of May), but I ran out of time since we've been out of town yet again. Anyway, my friend, Holly, inspired me to make this when she posted a picture on Facebook. Holly, I'm hooked! I love big breakfasts on the weekend--especially holiday weekends. These migas remind me of the chilaquiles my husband and I love to eat on our Mexican vacations.

Pioneer Woman's blog has a MUCH better post on this. She's absolutely amazing and her blog is phenomenal. I used to wonder how she was able to do so much and later found out she has a lot of hired help--good for her!!! I aplaud women who are honest about their lives because they help dismantle this notion that perfection is attainable. I love Ms. Drummond's approach to life and her recipes. I think she may just be the younger generation's Martha Stewart....but, now I'm wondering which generation I'd be categorized into....hmmm....either way, both inspiring women! Wish I could spend time with each of them.

This is a wonderful recipe and I urge you to try it--I found it to be incredibly flexible--add more spices, use less peppers, replace eggs with some egg whites....either way, it will be good! I made 1/3 of the recipe and it still turned out great.

PIONEER WOMAN (REE DRUMMOND)'s MIGAS (aka EGGS ON SPRING BREAK)

Yield: 6 servings (I say more like 8)
  • 4 whole corn tortillas
  • 1 whole jalapeno, seeds and membranes removed, finely diced
  • 4 whole plum tomatoes, roughly chopped
  • 1 whole green pepper, roughly chopped
  • 1 whole red bell pepper, roughly chopped
  • 1 whole medium onion, chopped
  • 12 whole large eggs (I used 1/3 egg whites and the rest whole eggs)
  • ¼ liters Cotija cheese, grated--may use Cheddar, Monterey Jack, etc. (liters?! ridiculous. I translated this to a heaping cup of cheese)
  • ⅓ cups cilantro, chopped
  • 1 Tbsp. butter
  • 1 Tbsp. olive oil
  • ¼ cups half-and-half (I used fat-free half & half--but would have easily used milk)
  • *1 cup black beans (my addition-totally optional-read the last sentence of instructions)
  • OPTIONAL: for serving--diced avocados, salsa, sour cream

In a bowl, whisk together eggs and half & half (or milk)--I added half the cilantro at this point (not sure why). Salt and pepper eggs, then set aside.

In a small skillet over medium heat, heat oil and fry each corn tortilla just until crisp. Remove to a paper towel-lined plate to drain. Chop tortillas and set aside.


In a large skillet over medium-high heat, melt the olive oil with the butter (you can use a little less if you can get away with it). Add onions and bell peppers and cook until starting to turn brown/black, about 3 to 4 minutes. Add in diced jalapenos (and beans, if using) and stir to combine.


Add tomatoes to the skillet and stir around, then add tortilla pieces, stirring gently to combine. Reduce heat to low. When the heat has decreased, pour egg mixture into skillet. Stir gently to cook with the peppers, folding mixture very gently as it cooks.


Add in grated cheese and chopped cilantro, and stir to combine.


*PW's note: Serve with black beans and iced coffee. But since I didn't feel like making the beans separately, I just added a cup of drained, rinsed black beans in with the onions and peppers. Totally optional, of course. I like the migas with some fresh cut oranges, toast (this is beyond optional), and hot coffee. SUCH a good breakfast!!!!


And since we're talking about Spring Break, here's a couple pictures from our Mexican vacation last month...I can't wait to go back! Enjoy your breakfast!