Showing posts with label vegan. Show all posts

Saturday, September 8, 2012

Healthy Protein Lunch: Chickpea Sandwich Spread (Vegetarian/Vegan)


I have been sending my better half to work with sandwiches lately. He left the land of scrubs, a fully stocked doctor's lounge, and the comfort of driving a truck to the world of 'Midwestern Ivy' academia--wear crisp shirts and khakis, pay $1.79 for a bad cup of coffee, and take the bus to work. And though he insists he's totally happy with peanut butter and jelly, I'm not happy with that idea.

So....the trick has been finding protein-filled sandwiches that would be safe at room temperature for a few hours (since he hadn't found the department fridge yet). Which usually means, something vegetarian--and to be exact, something vegan for a while. Can't risk anything spoiling and then having him get sick at work.

I read the helpful reviews for this chickpea sandwich spread online and was motivated to try it. After a few adjustments to the recipe (based mainly on what I had), we absolutely love it! It's right up there with this tofu sandwich spread. Both these sandwich spreads are just delicious! And would make creative pita pocket fillings.

This chickpea sandwich spread is also another great replacement for tuna fish. One reviewer said that a member of their family didn't know they weren't eating a tuna fish sandwich while enjoying this sandwich--it was just that good. A couple people used it as dip or stuffed tomatoes with it. I made a double recipe of this sandwich spread and was very glad because it was good as a thick dip with crackers dipped into it (ha). Even my in-laws enjoyed these sandwiches after a long travel day.

Give this spread a try. It's really very, VERY good! Imagine the possibilities you could do with the base of chickpea, vegan mayo and lemon juice!


VEGETARIAN CHICKPEA SANDWICH SPREAD
Adapted from www.allrecipes.com


Below is almost a double recipe--it makes about 6-8 sandwiches.


  • 2 (15 oz.) cans chickpeas (also called garbanzo beans), drained and rinsed
  • 3 stalks celery, diced (mine were on the smaller side)
  • 4 green onions, chopped (you can use 1 small onion instead as the original recipe calls for)
  • 1/4 cup, or less, vegan mayonnaise (such as Vegenaise--grapeseed variety is the best)
  • Juice of about one lemon
  • 2 tsp. dried dill
  • 1/2 tsp. garlic powder
  • Salt and pepper, to taste


1) Put the rinsed and drained beans in the bowl of a food processor and process a few times until the texture of the beans is a chunky paste. Because there is very little liquid, the beans won't process to a paste. In fact, you can add a little lemon juice or water to help the processing go smoother. Place the mixture in a medium-large sized bowl.

OR, 

In a medium to large sized bowl, just mash the (garbanzo) beans with the back of a fork until you get the texture you wish--a chunky paste.

2) Then, mix in the celery, onions, mayonnaise, lemon juice, and spices. Add a little water if more liquid is needed.


Store the filling in refrigerator. DELICIOUS!!!! And almost better the next day.


If anyone has any other great vegan/vegetarian sandwich filling ideas, please let me know!

Wednesday, August 22, 2012

Almond and Herb Crusted Roasted Heirloom Tomatoes


Alright, this is another one of those non-recipe-recipes that I urge you try. I know everyone's super busy with the kids going back to school and the cramming of the last bits of errands and family vacations and activities before this season is out. The last thing you may want to do is try something complicated for dinner. This is not a complicated side dish. Bear with me. I mean, really. TRY IT. Throw a piece of fish, steak, tofu, or chicken on the grill. Then boil some potatoes, nuke some frozen green beans or saute some spinach, and MAKE THESE TOMATOES! Because, they turned out INCREDIBLY delicious!

We've had a bumper crop of heirloom tomatoes because my parents have decided to turn their tiny backyard into a tomato sanctuary. They somehow manage to make time for these beauties despite their long work hours. They baby them. They worry about whether they get enough water. They love to share them. It's truly precious. And because of their nurturing, I get to share in this amazing bounty. But there's only so many tomatoes a person can eat before getting creative. So, after spying my pantry ingredients...it was either pistachios or almonds. I went with the almonds because I thought of the beloved Romesco sauce...check out the nutty coating:


So this side dish, is summer boiled down. Garden tomatoes. Herbs. Nuts. It's low-carb....it's vegan...it's delicious. We served these little veggie wonders with some hot crash potatoes (thank you Pioneer Woman--those are a dinner staple in our house), edamame, a Costco veggie souffle, and some ciabatta bread. Our little family loved them. LOVED them.

Try them with a variety of heirloom tomatoes for the best presentation--I had yellow, green, and red tomatoes. The savory crunch really compliments the flavor of the roast tomato. They shrink down a bit when you roast them...in fact, I'm making a double recipe next time because they were that good. And then I'm going to put the leftovers in a sandwich. Maybe with Havarti cheese and some turkey or veggie bacon.

*In my 'recipe,' I used a mixture of both fresh and dried herbs. Remember that if you're using dry herbs, use a little less than fresh herbs--dry herbs tend to be much more potent in flavor. 

My three year old wanted to 'take my picture'---the result is below. Have to encourage creative outlets...


ALMOND and HERB CRUSTED ROASTED HEIRLOOM TOMATOES
Loosely adapted from www.familyfreshcooking.com

Serves 2-4

  • 4 heirloom tomatoes, sliced in ~1/4 inch slices (or just slightly bigger)
  • 3/4 cup almonds (roughly)
  • One handful fresh herbs--your choice, rinsed and patted dry--(I used fresh basil, mint, rosemary, and dill and added a small dash of DRY parsley and oregano)
  • Sea salt & freshly ground pepper
  • ~1/2 tsp. garlic powder 
  • ~1/2 tsp. smoked paprika
  • Olive oil spray

Preheat oven to 375 degrees.

Spray a baking sheet with olive oil spray and set aside.

Place the almonds and herbs in the bowl of a food processor. Pulse until combined and the nuts have been made to look similar to bread crumbs. 

Place crumbs in a shallow bowl and add the rest of the seasonings (salt and pepper, garlic powder, and paprika). 

Dip each tomato slice in the nut mixture and pat the mixture on if it starts to come off. Place the tomato slices onto the baking sheet and spray the tomatoes lightly with olive oil. 

Bake for 15 minutes and then gently flip each tomato piece--being careful not to scrape off the herb-nut coating. Continue to bake for another 15 minutes. They should be browned and crispy. 

Serve the tomatoes warm or at room temperature.

Serves about 3-4 as a side dish OR 2 people if they are more of the main entree.


I think these tomatoes would be amazing with a piece of good cheese (layer with some goat cheese for a pretty presentation), some fresh bread, and a lovely Chardonnay. But they'll probably taste best if you eat them on the porch during a cooler August evening. 

Sunday, April 15, 2012

BEST Tofu Sandwich Spread. Like A Fabulous Chicken Salad for Vegetarians.


I have been wanting to try this tofu sandwich spread recipe for years! Recently, my mother in law mentioned she had it at a relative's house and wanted to make it herself. That sealed it--she makes the best sandwich spreads.

We have been in an whirlwind of chaos with life lately and I haven't been in the kitchen as much as I'd like. This is part of the reason--been selling a house! And all the super not-fun stuff that goes with it....if another realtor never calls me again, it will be too soon.


In fact, after discussing this with my funny, honest girlfriends, I realized that the last thing I made for my family was veggie burgers (from a can!) and toppings for Costco frozen pizza--in addition to take out orders. Big fat FAIL in meal-planning. But hey, sometimes you just gotta survive (and let's be honest, I've never been a meal-planning kind of gal--that would require dirty discipline). But, finally this was something quick, easy, and do-able to make that could sort of make me feel like I'm providing for my family. Because I had to make up for the lemon split peas I made from this recipe that my daughter spit out and said, 'GROSS, MOM!' and for the last load of whites I turned pink. Check out the lint proof/shame--anyone else do this since college?


Anyway, we absolutely LOVED this spread! And I think even tofu haters would like eat this spread on a sandwich. It tastes a lot like chicken salad. I imagine it would be delicious served alone on a bed of lettuce for those who like to do low-carb diets, but I'm anxious to try it in a tortilla roll-up.  I think even your kids will eat it...mine was last seen happily munching this and watching Veggie Tales.

The recipe below has been modified based on reviews I read and personalized. What I found to be helpful:


  1. Plan ahead--because you will need to freeze the tofu overnight. Something amazing happens when tofu is frozen and thawed--the texture changes considerably--more crumbly. I love to use it in lasagnas after it's been frozen. 
  2. To make it vegan, use Grapeseed Vegenaise brand--you can find it at health food stores like Whole Foods. It's the best tasting mayonnaise I've ever had--you will not think 'vegan' when you have it in food. 
  3. I used low-sodium soy sauce, and ended up needing to use more than 2 Tbsp. So, keep this in mind if using low-sodium soy sauce. I have not used Bragg's Liquid Aminos, but it may be a good substitute for the soy sauce.
  4. This recipe is a great jumping off point for other add-ins. Feel free to add chopped fresh parsley or cilantro. Add curry powder if you prefer. I felt it absolutely necessary to use garlic powder. 
  5. I added a little extra lemon juice and some pepper. Taste for seasonings.


TOFU SANDWICH SPREAD
Adapted from allrecipes.com

Makes 4-6 sandwiches (depending on how much filling you use)

  • 1 lb. firm tofu (1 package)
  • 1 1/2 stalks celery, finely minced
  • 2-3 green onions, chopped (white and green parts)
  • 1/2 cup mayonnaise 
  • 2 Tbsp. soy sauce (maybe more if using low-sodium soy sauce)
  • 2 Tbsp. fresh lemon juice
  • 1/2 tsp. garlic powder
  • 1/4 tsp. cracked black pepper


Drain the block of tofu. Wrap it in saran wrap or put it in a ziplock bag and freeze the tofu overnight. Then thaw it out--it's best to leave it out wrapped in paper towels to absorb the excess moisture. Squeeze out any moisture by hand--you can cut it into quarters to make it easier to squeeze out each section.

When the tofu has been dried out as much as possible, crumble it into a medium-sized bowl.

Add celery and green onion to the tofu. Stir in the mayo, soy sauce, lemon juice, and other seasonings until well blended.

Store leftover sandwich spread in the refrigerator.

Enjoy!

Friday, March 9, 2012

North African Inspired Tomato, Chickpea & Spinach Stew (Vegan)


Inspired by pantry staples, I made this super basic, but healthy, vegetarian stew a few weeks ago. My intention was to serve it over rice or with pita bread, but instead I ate two bowls plain by myself. Really enjoyed the flavors and textures together. Thought I'd pass it along if you've got a hungry family and a few cans to use up.

If you're not a big spinach fan, cut the spinach amount in half!!! My picture, above, does not show the bright green vibrancy of the spinach because this particular portion was reheated as leftovers :)

I'm sure this stew would benefit from with some cayenne pepper for heat and topped with some Greek yogurt (if you weren't vegan) or fresh lemon/lime juice (if you are a vegan). The stew was also good over a wild rice mix with a little grated cheese on top (Kashkaval is particulary delicious). Enjoy.


NORTH-AFRICAN INSPIRED TOMATO, CHICKPEA, & SPINACH STEW


Serves ~6


  • 2-3 Tbsp. extra virgin olive oil
  • 1 medium-large onion, thinly sliced in half moon shapes (1/2 circles)
  • 4 garlic cloves, minced
  • 1 (28 oz.) can tomatoes, pureed (I used Muir Glen's fire-roasted tomatoes)
  • 2 cans chickpeas (also called garbanzo beans), drained & rinsed--(can save a little liquid)
  • 1 tsp. coriander 
  • 3/4 tsp. turmeric
  • Salt & pepper to taste (I used ~1/2 tsp. of each)
  • 1 (10 oz.) package frozen chopped spinach (thawed or defrost, if you prefer) OR 2 cups fresh spinach

In a medium-sized pot with lid (I used a dutch oven), heat olive oil over medium heat and add onion. Add a couple tablespoons of water (or any of the liquid from the chickpeas). Saute until onion is translucent--about 10 minutes--making sure onion doesn't burn.

Add garlic and tomatoes. Stir until combined and cover. Lower heat to medium-low. Mix in chickpeas and spices, including salt & pepper, and continue to cook for about 10 more minutes or until the chickpeas are tender.

Add the spinach (mine was a frozen block that thawed in the hot stew). Gently mix it in and try to break it up if yours is frozen like a block as well (I used a fork to separate it). You can turn off the heat once most of the spinach has thawed--or when the spinach has wilted, if you are using fresh spinach.

Tuesday, February 21, 2012

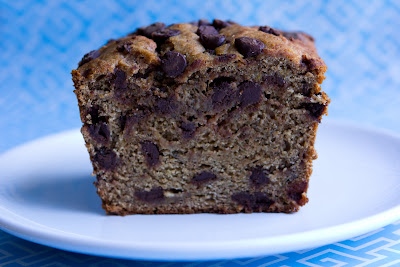
Blew-My-Mind-Delicious-Treat: Vegan (REALLY?) Banana Chocolate Chip Bread


Yup. Another vegan recipe. And it's amazing. My friends recently asked me what my obsession with trying vegan recipes was...I really don't know. Maybe it's because it seems like the 'hip' thing to do these days...? Or maybe it's because I'd like to believe that there are delicious vegan foods to discover. Or maybe because I'd like to know I'm not as completely dependent on cheese as I think I am (HA! A life without cheese? Say it isn't so!!!!). I haven't read 'The China Study' or 'Eat To Live'...no time and parenting/bible study material sort of take priority at this point in my life. Maybe I'll get to them later this year...however, I like the idea of 'cleaner' eating. Though we like to live with moderation, trying vegan recipes is my way of staying 'open-minded.' And when I stumble upon recipes like this, I don't miss the dairy or eggs.

I saw this banana bread recipe on www.chocolatecoveredkatie.com and was excited about a way to use up the spelt flour sitting in my fridge (yes, I keep my whole grain flours in the fridge). What a surprise it was to find such a low-fat treat. There is no additional fat in this bread (if you don't use oil) besides the chocolate chips! And yes, I added extra chocolate chips. Also, I realize that I have posted several banana bread recipes--all very good. But this is the only one that didn't require butter, refined sugar, or eggs. So, I will definitely be making it again!

I hope you will try this and that you enjoy it as much as I did.


POLKA-DOT BANANA BREAD (CHOCOLATE CHIP BANANA BREAD)
(Makes 10-12 slices)
  • 2 cups spelt flour (or white, or Arrowhead Mills gluten free, etc.)
  • 1 tsp. baking soda
  • 1/2 tsp. cinnamon
  • 3/4 tsp. baking powder
  • 3/4 tsp. salt
  • 1/3 cup milk of choice (or oil)--(I used almond milk)
  • 1 and 1/2 tsp. pure vanilla extract
  • 1/2 cup agave or maple syrup (I used maple syrup)
  • 1 and 1/2 Tbsp. lemon juice
  • 1 stevia packet (or 1 Tbsp. more agave or other sweetener)--(I used agave nectar)
  • 2 cups tightly-packed, mashed banana (measured after mashing)-(I had a little less than 2 cups)
  • 1/3 to 2/3 cups chocolate chips (I used 1 cup and sprinkled more on top)

Preheat oven to 350 F. Combine dry ingredients, and mix well. In a separate bowl, combine wet ingredients and mix into dry. (Mix by hand, and don’t overmix.)

Pour batter into a greased loaf pan and cook for around 50 minutes. (Tip: If the top is cooked but the inside is still gooey, put tin foil over the top and continue to cook.)

After removing from the oven, let cool for ten minutes before slicing. After the first day, this bread is best stored in the fridge. Or cut it into slices and freeze for later. 


Saturday, February 18, 2012

Garlicky Sunflower Seed Spread with Parsley


I got this intriguing sunflower seed recipe from my friend, Carla, after she posted a great picture of it on Facebook. She got it from Ligia Pop, a Romanian raw food chef. I was a bit unsure about trying it because I'm not familiar with raw recipes...however, this was SO delicious! This fabulous dip/spread only requires a  handful of ingredients and tastes nutty, fresh, creamy, salty, tart, and sweet (that almost covers it all, doesn't it??).

It was a delicious spread on the pumpkin, sunflower & flax seed bread I just posted on. Carla said it is terrific served on cucumber slices as an appetizer. But, I liked dipping my carrots in it and my daughter liked dipping her crackers in it--so yes, you can use it as a dip! I imagine this sunflower seed spread would be wonderful drizzled with olive oil, if you preferred, or sprinkled with some smoked paprika before serving. I can't wait to try it again with different kinds of herbs. I especially would like to try it this summer with fresh basil instead of the parsley, spread on crostini, and topped it with fresh sliced heirloom tomatoes--YUM!


GARLICKY SUNFLOWER SEED SPREAD WITH PARSLEY

Adapted from my friend, Carla, who got it from www.ligiapop.com

  • 1 cup raw sunflower seeds (I used 1/2 cup raw sunflower seeds & 1/2 cup roasted sunflower seeds)
  • 2 garlic cloves
  • 3 Tbsp. fresh lemon juice
  • 1/4 tsp. agave nectar
  • 1 small handful fresh parsley, rinsed & lightly patted dry
  • ~1/4-1/3 cup water
  • Salt & pepper, to taste (cracked sea salt is particularly good)

In a food processor or blender (I used my Vitamix), blend/process all ingredients. Add more water, if necessary, until the texture is to your liking.


All I can say--is YUM!

Tuesday, February 7, 2012

A Black-Eyed Pea Salad that Makes a Browned-Eyed Girl Happy


My husband used to sing 'Brown-Eyed Girl' to me when we were dating. It always made me love him more--how can you not love a man that celebrates a common trait in an average woman? Black eyed peas are the only legume with a human characteristic. Makes me think they're a little special among the more common beans and peas. Maybe that's why I always felt this kinship to black-eyed peas....they're a little misunderstood. It's unfortunate, because they're quite versatile and the more I make with them, but more please I am with them! Black-eyed peas are delicious. I recently used them in a salsa and was super impressed. Will post on that sometime--but, in the meantime, try this great little side that comes together quite quickly if you have the peas cooked ahead of time.

Some fun facts about black eyed peas:
  1. Eating black-eyed peas on New Year's Day is considered to bring good luck (mainly in the South)
  2. Black-eyed peas are heat-loving and do well during droughts. 
  3. They produce a lot of nectar and large crops can be used for honey.
  4. They were introduced in the United States in the 17th century in Virginia. 
  5. It is thought black-eyed peas originate from India and China but brought to West Africa by slaves.
  6. They are originally named 'cowpeas'.
  7. They are a key-ingredient to Hoppin' John--which is considered a staple in African-American soul food. 
(Photo courtesy of Wikipedia)


I came up with this simple, easy lunch salad one afternoon and we have loved it so much that we've made it three times so far. It's great alongside sandwiches on a Saturday or Sunday afternoon and terrific with a slice of homemade brown bread and a hunk of good cheese such as Manchego. It's even good with some feta sprinkled on top. Add more veggies, if you like! 

This deli-style salad stores well and would make a great summer side at a picnic. It would also make a great salad to eat on a weekday lunch at work. Try it! It's very healthy, very good. 

BLACK EYED PEA SALAD

Serves 4-6
  • 1 (16 oz.) package frozen black-eyed peas
  • 1 big bell pepper, diced (preferable red, yellow or orange)
  • 3 green onions, sliced (white & green parts)
  • 1 medium carrot, shredded or grated
  • 1 (10 or 12 oz) package grape tomatoes, rinsed and dried
  • 2 tsp. extra virgin olive oil (or more, to taste)
  • 1 lemon, juiced
  • Salt & pepper, to taste

Cook black-eyed peas according to package directions (should be 45 minutes or just a little over that). Cool the peas. (You can do this step a day or two in advance and store cooked peas in the fridge until you're ready to toss with the rest of the ingredients).

Gently toss the chilled peas with the vegetables and olive oil, lemon juice, and spices. Serve or return to the fridge until ready to serve. 

Store leftovers in the refrigerator--will keep for a day or two.


Monday, February 6, 2012

Black Bean and Lentil Soup with Smoked Paprika


First of all, this was fabulous. Second of all, this was healthy AND fabulous. Third of all, you should make it!!! Saw this soup on Cookin' Canuck and was surprised to see lentils and black beans together--we love both and would have not thought to put them together. What a great idea! I've adapted the recipe somewhat because of my love of all things smoked. It's awesome. Shared it with folks and was asked for the recipe. Definitely going in my permanent rotation. Filling, straight-forward and delicious.

As has been my recent method, I made a double recipe and froze half of the soup--it defrosted beautifully. The smoked paprika is what makes this soup--do not skip it or use regular paprika--the soup will not be the same.

This soup is perfect for a cold day. It's perfect to reheat at work. It's perfect to serve for a casual dinner with grilled cheese sandwiches and fresh fruit. Enjoy!


BLACK BEAN AND LENTIL SOUP WITH SMOKED PAPRIKA
Adapted from www.cookincanuck.com

  •   1 Tbsp. olive oil
  • 1/2 large onion, chopped
  • 2 large stalks celery, diced
  • 2 cloves garlic, minced (I used 3 cloves)
  • 2 tsp. smoked paprika
  • 2 bay leaves
  • 1 (14 oz.) can diced tomatoes (use 'fire-roasted' if you can find them)
  • 1 cup dried brown lentils
  • 4 3/4 cup low-sodium vegetable or chicken broth, divided
  • 3 cups water
  • 1 (14 oz.) black beans, drained and rinsed
  • 1/4 cup chopped fresh parsley
  • Salt and pepper to taste (I used a smoked salt—it was fantastic!)

Heat olive oil in a large sauce pan set over medium heat. Add onions and celery and cook, stirring occasionally, until the vegetables are beginning to soften, 6 to 7 minutes.

Add garlic, smoked paprika and bay leaves and saute for 30 seconds.

Stir in diced tomatoes with juices, lentils, 3 cups vegetable or chicken broth and 3 cups water. Increase heat to medium-high and bring the mixture to a boil. Reduce the heat slightly and cook, stirring occasionally, until lentils are tender, 25 to 35 minutes.

Remove from the heat and let cool for about 10 minutes. Remove and discard the bay leaves. 

*Transfer half of the lentil mixture, half of the black beans and 3/4 cup vegetable or chicken broth to the bowl of a blender or food processor. Pulse until combined, but not pureed. It should be a chunky texture. Pour the blender mixture back into the lentils in the saucepan, along with the remaining 1 cup of chicken broth and remaining black beans. 

Stir the soup and reheat over medium heat. Stir in parsley. Season with salt and pepper to taste--seriously, the smoked salt is wonderful in this! (Trader Joe sells smoked sea salt for $3)

Serve with freshly grated Parmesan cheese, if possible. Would probably also be great with fat-free Greek yogurt and sliced green onions. YUM!

*Note: I did NOT take the soup out of the pot—I inserted my stick blender into the soup pot for about 5 seconds or until just a bit of the soup was pureed to give it some creamy feel but still retained the chunky texture. Therefore, I added ALL of the broth into the soup all at once.


Saturday, January 28, 2012

Non-Dairy Chocolate Sauce to Die For


Last night, we had a great dinner with friends. And I got to bring dessert--which paled compared to the meal, but every once in a while, I let myself get spoiled. Seriously, isn't it the most wonderful thing in the world when someone feeds you a home-cooked meal?! It was my first time making a chocolate sauce to go with an amaretto cheesecake. And we really liked this chocolate sauce. Of course, it comes from famed pastry chef, David Lebovitz. Apparently, he's been making it for 20 years. Yeah, it's pretty darn good!

Since Valentine's Day is coming up, I figured maybe some of you might be looking for a fast and easy chocolate sauce to drizzle over your desserts. You might have to resist eating it out of a jar. Keep it in the fridge and warm it up before serving. I made some small changes in parentheses. I used agave nectar instead of corn syrup--I have a feeling that corn syrup would give you a bit thicker and shinier texture. 

  • One thing I did do that did end up tasting pretty delicious, was do 1/2 cup coffee (strong, unsweetened) + 1/2 cup water. However, keep in mind that coffee is acidic--and that helped me understand why my sauce did end up crystallizing a tiny bit--the acid affected the integrity of the sauce--not enough to bother us, but enough to notice it visually. I think it would be better to add a tablespoon or two of coffee liqueur instead if you want a little mocha flavor.

By the way, we weren't the only ones having fun--check out our children having their first date--this cracks me up as they were even provided 'candlelight'...the only thing missing is a shared pasta noodle between those busy mouths. 


Love may be in the air.....I think it would be great to add a little peppermint extract to this chocolate sauce and serve it over ice-cream at Christmas...or Valentine's Day. Which we are DEFINITELY preparing for at this house. All I hear about is hearts...heart songs, prayers, books, crafts,


..we even watched a little open heart surgery on youtube ('that was cool, mom!'). Hope everyone can use a little chocolate in preparation :)

THE BEST CHOCOLATE SAUCE
Adapted from www.davidlebovitz.com
About 2 1/2 cups
  • 1 cup (250 ml) water
  • 1/2 cup (100 g) sugar
  • 1/2 cup (160 g) light corn syrup, agave nectar, or glucose (I used agave nectar)
  • 3/4 cup (75 g) unsweetened cocoa powder (preferably Dutch-processed)
  • 2 ounces (55 g) bittersweet or semisweet chocolate, finely chopped--(I used 3 ounces of good quality semi-sweet chocolate chips)
  • 1/2 tsp. sea salt (my addition)

In a medium saucepan, whisk together the water, sugar, corn syrup (or agave or glucose), and cocoa powder.
Bring to a boil over medium heat. Once the mixture has just begun to simmer and boil, remove from heat and stir in the chopped chocolate until melted.
Serving: You should let the Chocolate Sauce stand for a few hours before serving, which will give it time to thicken a bit.
Storage: Store the chocolate sauce in a covered container in the refrigerator for up to 10 days. Rewarm before serving.
ENJOY! This sauce is delicious over cheesecake and when added to hot milk to make hot chocolate. Serve it over strawberries and ice-cream or dip bananas in it for a delicious treat. 

Sunday, January 22, 2012

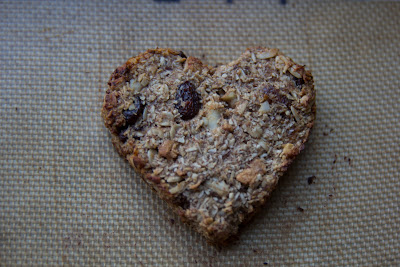
Soft Granola Cookie Hearts


These little treats are vegan. I hesitate to say that as many people are still coming around to not being scared by the word 'vegan.' I was one of those people that would instantly shut down at the idea of veganism due to less than tasty vegan food I had previous eaten (and if anyone has good—I mean, edible, vegan cheese--I'd love to know about it because I have yet to find that). But now that the world is coming around more to the idea of vegan eating (obviously from my chicken & dairy recipes, I'm not fully convinced I want to be totally vegan), the public is finally getting exposed to eating BETTER vegan food/recipes. You know, things that don't taste like cardboard. And recipes that aren't just composed of raw vegetables (not that there is anything with raw vegetables!).

Well, my child has been sick quite a bit this winter already--mainly due to exposure to other kids with illnesses—playdates and Mother's Day Out/Preschool. Because of this, I tried to give her less dairy. And because of the reward system instituted last spring, she thinks she deserves treats for good behavior (thank you potty training). So, what's a mom to do? Make vegan treats.

I love this little recipe—I hope you will too! It's one of those that you won't feel guilty eating or giving to your children. It's a sugar-free treat, has plenty of fiber from the whole grains and dried fruit and protein from the nuts. You could use any dried fruit you like, I just happen to like dried pineapple in things lately. I would also like to replace the bananas with prunes or pumpkin in this recipe sometime. These come together really fast (despite that at first glance it seems to have a lot of ingredients).

I tried to make this particular one more appealing to my daughter by shaping the cookies into little hearts (use a cookie cutter). And in doing so, realized that this would be a great little Valentine's 'cookie' to make with your kids. However, I'm sure any cookie cutter would do or you could just drop the 'dough' onto the sheet and shape with your hands if you are a minimalist.


SOFT GRANOLA COOKIE HEARTS
Makes 22-24

For Liquid Mixture:

  • 1 cup mashed bananas (about 3 medium)
  • 3 Tbsp. almond or soy milk
  • 1 tsp. pure vanilla extract
  • ¼ cup safflower oil (canola or another flavorless oil can be replaced)
  • zest of one orange (you could skip—but I like it in conjunction with the cloves)
Dried Fruit to add to liquid mixture—can replace with your favorites for 1 cup total of dried fruit:

  • ¼ cup chopped dried pineapple
  • ¼ cup chopped dried apple
  • ½ cup raisins (golden raisins fine too)
For dry mixture:

  • 1 ½ cups old fashioned oats (not instant)
  • ¾ cup shredded, unsweetened, coconut
  • 1 Tbsp. cinnamon
  • ¼ tsp. cloves 
  • ½ tsp. salt
  • 1/8 tsp. baking powder (I like aluminum-free)
  • ¼ cup almonds (processed in food processor to make 'almond meal')
Nuts to add to dry mixture--can replace with nuts of your choice for a total of ½ cup chopped nuts:

  • ¼ cup chopped Brazil nuts
  • ¼ cup walnuts

Preheat oven to 350 degrees. Set aside cookie sheets with Silpats or covered with parchment paper.

In a small bowl, mix your liquids. Add the dried fruit and mix well. If need be, use a whisk and push down on any clumps of fruit to separate and stir again. Set aside to let the fruit soften while you work on the dry ingredients.

In a larger bowl, stir your dry ingredients together and add in the nuts.

Now, add your liquid mixture to your dry mixture and stir well.

Place a cookie cutter (or different shaped ones—use medium-big sized cutters) on the cookie sheet and fill with granola mixture until it reaches about halfway into the height of the cookie cutter. Pat down with a spoon and spread evenly into the cookie cutter. Lift up your cookie cutter leaving the shape behind. Repeat until you get your sheet(s) filled. The 'cookies' don't rise much so you won't need to worry that they'll spread out into each other.

Bake for about 15-20 minutes—keep your eye on them so they don't burn (try to swap cookie sheets halfway--the bottom one can go on top and the top one can go on bottom).

Let cool before eating. (I store these treats in a covered tupperware container in the refrigerator & freeze half) 


Oh yeah, they're also really good for breakfast with a glass of soymilk and some coffee.


Thursday, December 15, 2011

Back in Business: Crusty Rosemary-Olive Peasant-Style Pot Bread


Alright, so I realize that I have slacked on posting...life has been chaotic for our family. Between doing a half marathon, my husband's crazy schedule, the holidays, flus & colds, extensive travel, house repairs, managing a toddler, and general busy-ness of everyday life, my little blog has suffered. Everyone is busy, I know! But after I made this bread, yesterday, I was motivated to post again. It was that good. Especially if you're into rustic food. This bread would be amazing with the hearty soups of this season, along stews, and as a sandwich bread. I'd even use it as the foundation of a broiled caprese toast (think pesto, fresh mozzarella, vine-ripe tomatoes).

If you have seen any of my other posts, you will see that I am insanely into this nice woman named Nancy Baggett and her fabulous bread cookbook, Kneadlessly Simple. By the way, the book has gone down in price on Amazon. And how can you not want to make something from someone that emails you back every time you email her with a question?! Anyway, I was so excited about this bread because it reminds me of the fantastic Italian bread served at Maggiano's Corner Bakery (in Chicago area). I usually get the tuna salad on this kind of olive bread and never imagined I could make something like it at home! And so easily!

The bread is very easy to make--you just have to patiently wait and go about living your life--which shouldn't be hard considering the holidays are around the corner...right? However, I will confess that while in a hurry, I misread the directions after the second rise, and let the bread rise on the counter instead of the fridge overnight. Imagine my surprise to see that the bread STILL turned out amazingly well--I'm not saying I recommend doing what I did, just that it was surprising to see that the dough continued to rise, air pockets were visible, the crust was intact, and it tasted wonderful with a piece of hard goat cheese and a crisp apple. YUM! Enjoy!

Make the basic white version if it's your first time making a bread, or add in the kalamata olives and fresh rosemary like I did (I brought in my outdoor plant and somehow it's surviving inside!)--you will be very surprised that you can make a bread with the same quality of that at your local European bakery.

NOTE: The crust softens if you store the bread in plastic wrap or plastic bags.


From the author, Nancy Baggett:

Pot boules — round, peasant-style breads that are simply popped into a sturdy, lidded pot and baked — are about the easiest loaves possible, but among the most gratifying. They puff up well, brown beautifully and always come out crusty, due to the moisture trapped inside the pot during the first few minutes in the oven. (In fact, the pot actually serves as a minioven.) As a bonus, the loaves need no hand shaping because the dough just conforms to the container shape as it expands.

Like the basic black dress, this basic white loaf is always appropriate and in favor. The interplay of light mild crumb, crunchy golden crust and deep, sweet yeast taste and aroma (coaxed out by long, slow rising) is downright amazing. In fact, eating this bread is a far more complex and exciting sensory experience than one might expect from the simple ingredients.

Should you ever want a change of pace from the basic loaf, it's an easy matter to add a few accents for a rather different effect. See the rosemary-black olive variation at the end of the recipe.


CRUSTY WHITE PEASANT-STYLE POT BREAD-with Rosemary-Olive Variation 

Makes 1 large loaf, 12 to 14 slices.

  • 4 cups (20 ounces) unbleached all-purpose white flour or white bread flour, plus more as needed (I used 3 cups white flour + 1 cup whole wheat flour + ~1 Tbsp. Vital wheat gluten)
  • 1 teaspoon granulated sugar
  • 2 teaspoons table salt
  • 3/4 teaspoon instant, fast-rising or bread-machine yeast
  • 2 cups ice water, plus more if needed
  • Corn oil, canola oil or other flavorless vegetable oil or oil spray for coating dough (I used olive oil for the Rosemary-Olive version I made)

First Rise: In a large bowl, thoroughly stir together the flour, sugar, salt and yeast. Vigorously stir the water into the bowl, scraping down the sides and mixing until the ingredients are thoroughly blended. If the mixture is too dry to incorporate all the flour, stir in more water, a bit at a time, just enough to blend the ingredients. 

Don't over-moisten; the dough should be very stiff. If necessary, stir in enough more flour to yield a hard-to-stir dough. Brush or spray the top with oil. Cover the bowl with plastic wrap. If desired, for best flavor or for convenience, you can refrigerate the dough for three to 10 hours. Then let rise at cool room temperature for 18 to 24 hours. If convenient, vigorously stir the dough once about halfway through the rise.

Second Rise: Using an oiled rubber spatula, gently lift and fold the dough in toward the center, all the way around, until mostly deflated; don't stir. Brush or spray the surface with oil. Re-cover the bowl with plastic wrap that has been coated with nonstick spray. Let rise using any of these methods: for a 1 1/2- to 2 1/2-hour regular rise, let stand at warm room temperature; for a 1- to 2-hour accelerated rise, let stand in a turned-off microwave along with 1 cup of boiling-hot water; or for an extended rise, refrigerate, covered, for 4 to 24 hours, then set out at room temperature. Continue the rise until the dough doubles from the deflated size; remove the plastic if the dough nears it.

Baking Preliminaries: 20 minutes before baking time, put a rack in the lower third of the oven; preheat to 450 degrees. Heat a 3 1/2- to 4-quart (or larger) heavy metal pot or Dutch oven in the oven until sizzling hot (test with a few drops of water), then remove it, using heavy mitts. Taking care not to deflate the dough (or burn yourself), loosen it from the bowl sides with an oiled rubber spatula and gently invert it into the pot. Don't worry if it's lopsided and ragged-looking; it will even out during baking. Generously spritz or brush the top with water. Immediately top with the lid. Shake the pot back and forth to center the dough.

Baking: Bake on the lower rack for 55 minutes. Remove the lid. Reduce the heat to 425 degrees. Bake for 15 to 20 minutes longer, or until the top is well browned and a skewer inserted in the thickest part comes out with just a few crumbs on the tip (or until center registers 209 to 212 degrees on an instant-read thermometer). When it seems done, bake 5 minutes longer to ensure the center is baked through. Cool in the pan on a wire rack for 10 to 15 minutes. Remove the loaf to the rack and cool thoroughly.

VARIATION: Crusty Rosemary And Olive Pot Bread — Stir 1 cup pitted, coarsely chopped kalamata olives (well drained) and 3 tablespoons finely chopped fresh (not dried) rosemary needles (discard the stems) into the dough along with the water. Proceed exactly as directed in the original recipe.


Serving And Storing: Cut or tear the loaf into portions; it tastes good warm but will cut much better when cool. Cool completely before storing. To maintain the crisp crust, store draped with a clean tea towel or in a heavy paper bag. Or store airtight in a plastic bag or wrapped in foil: The crust will soften, but can be crisped by heating the loaf, uncovered, in a 400 degree oven for a few minutes. The bread will keep at room temperature for three days, and may be frozen, airtight, for up to two months.