Showing posts with label breakfast. Show all posts

Monday, July 23, 2012

Like Healthier Hostess Cupcakes: Flourless Double Chocolate, Peanut Butter, & Banana Mini Muffins


I have, again, been remiss in posting as our family has been living out of suitcases for a month or so and then moved across a few states. Life is chaotic most days, but I recently found myself craving the need to bake in a new home surrounded by boxes. Therefore, I am doing the second best option and posting something decadent and healthy for those that are willing to brave the summer heat by turning on the oven....if you're not willing to turn your oven on yet, bookmark this recipe, because they are truly worth trying! Even the kids love them!

I cannot get over how these delicious mini-muffins don't taste like they have healthy ingredients!--Ok, except for the chocolate chips on top. The best part is, the blender/food processor does all the work for you. Here is the original recipe from Dashing Dish that also shows nutritional information. Thank you for such an awesome recipe, Katie! I have adapted the recipe to use DARK chocolate cocoa, semi-sweet mini chocolate chips, (these latter two ingredients make it 'double dark') and added flaxmeal (this affects fat content a bit). Feel free to try it with peanut butter chips instead if you prefer more of a peanut butter flavor. Or skip the chips and frost for healthier cupcakes. Either way, the banana and peanut flavors make for terrific pairing with the chocolate. My daughter thinks she's getting cake when these come out.

Oh guys.....I am in awe of how delicious these muffins are--we are calling them chocolate 'treats' in our house. They have the softness and texture of a cupcake. I have made them several times now...you will think you are cheating on your diet when eating these...we even took them on a picnic in the mountains last month. Here are some pictures of that glorious day where the mini-muffins were just part of the delights:


And here are the mini-muffins (or cupcakes) thawing out from our cooler:


Flourless Double Chocolate, Peanut Butter, and Banana Mini-Muffins


Adapted from www.dashingdish.com

Yield: 12 regular sized muffins or 24 mini-muffins


  • 1 ¾ cups old fashioned oats
  • 3 egg whites
  • ¾ cup cocoa powder (I use Hershey’s Special Dark Chocolate Cocoa)
  • 1 ½ bananas (this makes ½ cup mashed banana)
  • ½ cup plain, fat-free Greek yogurt
  • ½ tsp. vinegar (or ½ tsp. cream of tartar)
  • 1 ½ tsp. baking powder
  • 1 ½ tsp. baking soda
  • ¼ tsp. salt
  • 1 cup hot water
  • ½ cup baking stevia OR 1 cup sweetener of choice that measures like sugar (I like raw sugar)
  • 1 Tbsp. ground flaxseeds (also called ‘flaxmeal’)
  • ½ cup creamy peanut butter, ‘natural’ preferred
  • 1 cup semi-sweet mini-morsels (or more)

Preheat oven to 350 degrees.

Line a 24 cup mini muffin pans with silicone mini muffin liners, or spray muffin tin with non-stick cooking spray. OR, you can use one 12 cup regular muffin tin pan. Set aside. 

Place the peanut butter in a mug or microwave safe bowl, and microwave for 30-45 seconds, or until melted.

In a blender, (or food processor), mix all of the ingredients together. Blend until oats are ground and mixture is smooth. (The batter will be sort of liquid-y, but that’s ok!)

Divide batter between muffin tins. Sprinkle each muffin top with mini-chocolate chips, dividing them evenly.

Place muffin tin(s) in the oven and bake for 12-15 minutes, or until a toothpick comes out clean. 

Cool muffins before removing from pan. ENJOY!!!

Thursday, May 17, 2012

Individual Breakfasts: Baked Eggs In Tomato Sauce


I first saw this idea years ago in a Self Magazine. What a neat concept--individual baked eggs with sauce! We love them because they are easy, delicious, and 'recipe' is so versatile. It's not much of an 'exact' recipe, so your imagination is key. This breakfast requires only a few ingredients and they're usually things you have on hand: cheese, tomato sauce, and eggs. Then you can dress them up with whatever seasonings you want. These eggs are one of those perfect breakfasts to make when having guests over because ALL the eggs come out at once and you don't have to make them to order--yet, they are still customizable.

I have only made them with an 'Italian' flavor (as described below), but have yet to try them with salsa, cumin/chili powder, and a Mexican cheese blend instead. I can't imagine that wouldn't be good!

You will love these--play around with different cheeses--for a sophisticated breakfast, I bet Talegio, vodka sauce & rosemary would be a good combo with some crusty ciabatta :) While your eggs are baking, you can brew coffee, make hash browns, and cut up fruit. Breakfast can be ready in 30 minutes from start to finish.

By the way, I HAVE noticed that the type of egg you use, does make a difference as I have made these with both organic and non-organic eggs. The organic eggs tend to taste a bit better--too bad the price isn't better also!


INDIVIDUAL BAKED EGGS 

Yield: Servings vary-see below.

Preheat oven to 375 degrees.

Grease as many ramekins (4 oz or 6 oz) as you plan to have portions.

For each serving--layer in this order:

  • 3 tsp. pasta sauce (any flavor)
  • ~2 Tbsp. Mozzarella cheese or 2 tsp. Parmesan cheese, or a little of each (preferable)
  • 1/8-1/4 tsp. dried basil or Italian herbs
  • Salt & pepper, to taste

Bake them for less time (15-18 minutes) if you like your centers running--bake them longer (22-24 minutes) if you prefer your yolks hardened like us.

Serve with buttered toast :)

NOTE: It's easier to place all the ramekins on a baking sheet and take the baking sheet in and out, than take each ramekin out one by one.

Enjoy!

Friday, March 2, 2012

Spelt and Sunflower Seed Pancakes


A very rare thing occurred: My husband was home on a weekday morning. Granted, he was using a vacation day to study (boards are coming up) and he was working on taxes (for the umpteenth time)--but he was home! And that made us girls very happy. We needed something special to eat to distract from the paperwork and the painting (I'm tackling the trim on the bathroom--my workmanship is disastrous). Solution? PANCAKES!

I have a new love for spelt flour. I have now tried spelt flour in muffins and banana bread with excellent results. So, it was time to move on to using it in pancakes. Spelt flour just called for something nutty to be added with it--and of course, I paired it with sunflower seeds (been a bit obsessed with sunflower seeds as you have seen from my previous sunflower seed spread and the rustic sunflower seed bread).

(A note about SPELT: it's a member of the same grain family as wheat but is not as heavy as whole wheat flour--you get a more tender result by using spelt flour in baking.) 

And because we're mentioning sunflower seeds, here are a couple pictures from our local trip out to the sunflower field (from this last August)....


Back to pancakes: Well, I'm happy to say, my experimental recipe turned out great! LOVE these pancakes and will be making them again. Serve them with some veggie sausage on the side for some extra protein to take you through until lunchtime.


SPELT AND SUNFLOWER SEED PANCAKES

Makes 10-12 pancakes (depending on size)--should serve at least 4 people for breakfast

Dry Ingredients:
  • 2 cups spelt flour
  • 2 tsp. baking powder
  • 1 tsp. baking soda
  • 3/4 tsp. salt
  • 1/2 tsp. cinnamon
  • ~1/3 cup raw sunflower seeds 

Wet Ingredients:
  • 2 eggs
  • 1 1/3 cup low-fat buttermilk
  • 2 Tbsp. + 1 tsp. safflower oil (or canola) + more for greasing pan/griddle
  • 1 Tbsp. honey

In a small-medium bowl, mix all dry ingredients (including the sunflower seeds) and set aside. In a larger bowl, beat eggs. Whisk in the buttermilk and oil. Add honey and whisk again until all the ingredients are incorporated.

(TIP: if you use your tablespoon to measure out the oil, the honey will slide out easily when you use the same tablespoon to measure out the honey).

Add dry ingredients to wet ingredients and mix until just incorporated. Feel free to add a little more buttermilk if the mixture seems too dry.

Heat pan, skillet or griddle over medium heat and lightly coat with some oil (of your choice--I used safflower again as it is good with high temperatures). 

Pour approximately 1/4 cup of pancake batter for each pancake. (I only got about 3 pancakes in a really large skillet)


Cook pancakes 2-3 minutes on each side, until they are golden brown--you will know they are ready to be flipped  when you start to see little bubbles form around the edges.

Serve the pancakes warm with maple syrup and fruit of your choice.


Go out there and make some pancakes for your loved ones this weekend--they're DELICIOUS!

Tuesday, February 21, 2012

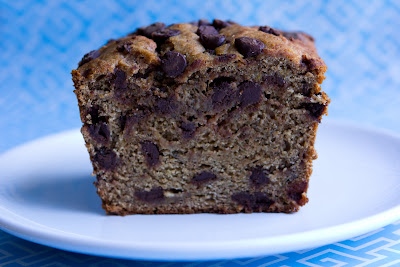
Blew-My-Mind-Delicious-Treat: Vegan (REALLY?) Banana Chocolate Chip Bread


Yup. Another vegan recipe. And it's amazing. My friends recently asked me what my obsession with trying vegan recipes was...I really don't know. Maybe it's because it seems like the 'hip' thing to do these days...? Or maybe it's because I'd like to believe that there are delicious vegan foods to discover. Or maybe because I'd like to know I'm not as completely dependent on cheese as I think I am (HA! A life without cheese? Say it isn't so!!!!). I haven't read 'The China Study' or 'Eat To Live'...no time and parenting/bible study material sort of take priority at this point in my life. Maybe I'll get to them later this year...however, I like the idea of 'cleaner' eating. Though we like to live with moderation, trying vegan recipes is my way of staying 'open-minded.' And when I stumble upon recipes like this, I don't miss the dairy or eggs.

I saw this banana bread recipe on www.chocolatecoveredkatie.com and was excited about a way to use up the spelt flour sitting in my fridge (yes, I keep my whole grain flours in the fridge). What a surprise it was to find such a low-fat treat. There is no additional fat in this bread (if you don't use oil) besides the chocolate chips! And yes, I added extra chocolate chips. Also, I realize that I have posted several banana bread recipes--all very good. But this is the only one that didn't require butter, refined sugar, or eggs. So, I will definitely be making it again!

I hope you will try this and that you enjoy it as much as I did.


POLKA-DOT BANANA BREAD (CHOCOLATE CHIP BANANA BREAD)
(Makes 10-12 slices)
  • 2 cups spelt flour (or white, or Arrowhead Mills gluten free, etc.)
  • 1 tsp. baking soda
  • 1/2 tsp. cinnamon
  • 3/4 tsp. baking powder
  • 3/4 tsp. salt
  • 1/3 cup milk of choice (or oil)--(I used almond milk)
  • 1 and 1/2 tsp. pure vanilla extract
  • 1/2 cup agave or maple syrup (I used maple syrup)
  • 1 and 1/2 Tbsp. lemon juice
  • 1 stevia packet (or 1 Tbsp. more agave or other sweetener)--(I used agave nectar)
  • 2 cups tightly-packed, mashed banana (measured after mashing)-(I had a little less than 2 cups)
  • 1/3 to 2/3 cups chocolate chips (I used 1 cup and sprinkled more on top)

Preheat oven to 350 F. Combine dry ingredients, and mix well. In a separate bowl, combine wet ingredients and mix into dry. (Mix by hand, and don’t overmix.)

Pour batter into a greased loaf pan and cook for around 50 minutes. (Tip: If the top is cooked but the inside is still gooey, put tin foil over the top and continue to cook.)

After removing from the oven, let cool for ten minutes before slicing. After the first day, this bread is best stored in the fridge. Or cut it into slices and freeze for later. 


Sunday, January 22, 2012

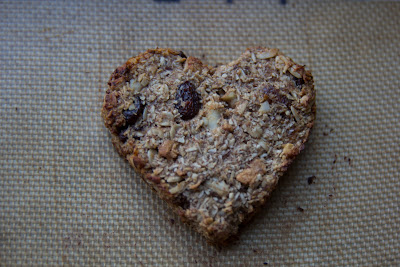
Soft Granola Cookie Hearts


These little treats are vegan. I hesitate to say that as many people are still coming around to not being scared by the word 'vegan.' I was one of those people that would instantly shut down at the idea of veganism due to less than tasty vegan food I had previous eaten (and if anyone has good—I mean, edible, vegan cheese--I'd love to know about it because I have yet to find that). But now that the world is coming around more to the idea of vegan eating (obviously from my chicken & dairy recipes, I'm not fully convinced I want to be totally vegan), the public is finally getting exposed to eating BETTER vegan food/recipes. You know, things that don't taste like cardboard. And recipes that aren't just composed of raw vegetables (not that there is anything with raw vegetables!).

Well, my child has been sick quite a bit this winter already--mainly due to exposure to other kids with illnesses—playdates and Mother's Day Out/Preschool. Because of this, I tried to give her less dairy. And because of the reward system instituted last spring, she thinks she deserves treats for good behavior (thank you potty training). So, what's a mom to do? Make vegan treats.

I love this little recipe—I hope you will too! It's one of those that you won't feel guilty eating or giving to your children. It's a sugar-free treat, has plenty of fiber from the whole grains and dried fruit and protein from the nuts. You could use any dried fruit you like, I just happen to like dried pineapple in things lately. I would also like to replace the bananas with prunes or pumpkin in this recipe sometime. These come together really fast (despite that at first glance it seems to have a lot of ingredients).

I tried to make this particular one more appealing to my daughter by shaping the cookies into little hearts (use a cookie cutter). And in doing so, realized that this would be a great little Valentine's 'cookie' to make with your kids. However, I'm sure any cookie cutter would do or you could just drop the 'dough' onto the sheet and shape with your hands if you are a minimalist.


SOFT GRANOLA COOKIE HEARTS
Makes 22-24

For Liquid Mixture:

  • 1 cup mashed bananas (about 3 medium)
  • 3 Tbsp. almond or soy milk
  • 1 tsp. pure vanilla extract
  • ¼ cup safflower oil (canola or another flavorless oil can be replaced)
  • zest of one orange (you could skip—but I like it in conjunction with the cloves)
Dried Fruit to add to liquid mixture—can replace with your favorites for 1 cup total of dried fruit:

  • ¼ cup chopped dried pineapple
  • ¼ cup chopped dried apple
  • ½ cup raisins (golden raisins fine too)
For dry mixture:

  • 1 ½ cups old fashioned oats (not instant)
  • ¾ cup shredded, unsweetened, coconut
  • 1 Tbsp. cinnamon
  • ¼ tsp. cloves 
  • ½ tsp. salt
  • 1/8 tsp. baking powder (I like aluminum-free)
  • ¼ cup almonds (processed in food processor to make 'almond meal')
Nuts to add to dry mixture--can replace with nuts of your choice for a total of ½ cup chopped nuts:

  • ¼ cup chopped Brazil nuts
  • ¼ cup walnuts

Preheat oven to 350 degrees. Set aside cookie sheets with Silpats or covered with parchment paper.

In a small bowl, mix your liquids. Add the dried fruit and mix well. If need be, use a whisk and push down on any clumps of fruit to separate and stir again. Set aside to let the fruit soften while you work on the dry ingredients.

In a larger bowl, stir your dry ingredients together and add in the nuts.

Now, add your liquid mixture to your dry mixture and stir well.

Place a cookie cutter (or different shaped ones—use medium-big sized cutters) on the cookie sheet and fill with granola mixture until it reaches about halfway into the height of the cookie cutter. Pat down with a spoon and spread evenly into the cookie cutter. Lift up your cookie cutter leaving the shape behind. Repeat until you get your sheet(s) filled. The 'cookies' don't rise much so you won't need to worry that they'll spread out into each other.

Bake for about 15-20 minutes—keep your eye on them so they don't burn (try to swap cookie sheets halfway--the bottom one can go on top and the top one can go on bottom).

Let cool before eating. (I store these treats in a covered tupperware container in the refrigerator & freeze half) 


Oh yeah, they're also really good for breakfast with a glass of soymilk and some coffee.


Saturday, October 8, 2011

Maple Apple Pecan Bread


My friend (and neighbor), Lindsay, and I went apple picking for the first time this season. We took our girls and enjoyed seeing them take delight from picking fruit off the tree and putting the apples in their own baskets.


It was a gorgeous, sunny day!


Lindsay made apple pie with the apples and I made applesauce and Maple Apple Pecan Bread. It's my new favorite quickbread that I stumbled upon at www.cookingforseven.com. This blog is so beautiful! (I have adapted the recipe a bit, but wanted to give credit to the Erica--she's an incredibly talented 21 year old!) I'm glad I made extra to share with our other neighbor, Chelsea. I can't wait to make this again. It's delicious in the morning with a cup of coffee or as a snack in the afternoon with a piece of cheese and a cup of tea.


Reasons why I absolutely LOVE this Maple Apple Pecan bread and think you will too:

  1. It is tender and moist.
  2. It has a crumbly-crunchy topping.
  3. It is made with whole grains and is sweetened with maple syrup instead of sugar.
  4. It makes the whole house smell like fall.
  5. It has complex layers of flavor--the vanilla, the maple, the cinnamon, the nuttiness--simply delicious.


MAPLE APPLE PECAN BREAD
inspired by www.cookingforseven.com

INGREDIENTS:
  • 1 cup white whole wheat flour (I love King Arthur brand)
  • 3/4 cup all-purpose flour
  • 3 Tbsp. old fashioned oats 
  • 1 Tbsp. ground flax seeds (flaxmeal)
  • 2 tsp. baking powder
  • 1 tsp. baking soda
  • 1/2 tsp. salt
  • 1 heaping tsp. ground cinnamon
  • 1/8 (or less) tsp. ground nutmeg
  • 2 eggs
  • 2/3 cup low-fat buttermilk or fat-free plain Greek yogurt (or a combination of the two)
  • 5 1/2 Tbsp. melted butter (I did a combination of light and regular butters)
  • 3/4 cup pure maple syrup
  • 1 tsp. pure vanilla extract
  • 1 1/2 cups chopped apples (relatively finely chopped)
  • 1/2 cup chopped pecans
Topping:

  • Ground cinnamon & brown sugar (Turbindo or raw sugar preferred)
  • 1/4-1/3 cup chopped pecans

DIRECTIONS:

Preheat oven to 350 degrees.

Butter and flour a 9X5X3 inch loaf pan. I use the spray below instead--makes it so much easier!


In a medium bowl, whisk together flours, oats, flaxmeal, baking powder, baking soda, salt, cinnamon and nutmeg. Add the apples and pecans. (I like to add them at this point so that they are covered with the dry ingredients first and think it makes a little bit of a difference so they don't sink as far into the bread when baking.)

In a smaller bowl, whisk together the eggs, buttermilk/yogurt, melted butter, maple syrup, and vanilla extract. Then, mix the wet ingredients into the dry ingredients with apples and pecans. Gently fold to incorporate the ingredients thoroughly.

Scoop the batter into the prepared loaf pan and top with cinnamon and sugar and the pecans reserved for topping. Bake for 40 to 50 minutes or until a skewer inserted in the center of the loaf comes out clean.

Let bread cool in the pan for 15 minutes then invert onto a cooling rack to cool before wrapping & storing.  Serve slightly toasted with butter.


Makes one large loaf that welcomes fall! Enjoy.


Monday, September 5, 2011

Whole Grain Cottage Cheese Blender Waffles with Peach Melba Conserve Topping


I love waffles. So much. Baked goods for breakfast are another weakness. However, we always seem to need additional protein with such breakfasts because we get hungry again within a couple hours of eating waffles or pancakes. So, I wondered about trying cottage cheese in my waffles and tried researching online to see if anyone had tried making waffles with cottage cheese. I stumbled upon this great blog: www.gethealthywithheather.com  and also read about trying the batter in the blender. This was my first attempt at making the batter in the blender--now I'm hooked. It's easier to pour them into the waffle maker this way.

You absolutely cannot even tell these are whole grain either (well, I couldn't). And, you will not be able to 'taste' the cottage cheese; so if anyone in your family is averse to it, you can still try it. The waffle recipe below is Heather's recipe with my changes in the italics.

In addition, I love fresh fruit on top of my waffles but the peaches I picked at the orchard a few weeks ago seemed a little spotted. My mom always makes conserves or compote with excess fruit--but I wanted to try making something similar but with maple syrup instead of processed sugar. I LOOOOVED the result of these conserves. If you liked my Quick Blackberry Jam with Agave Nectar, you will probably like this too. Now, I wish I would have made double the peach melba topping, because it was that good!

WHOLE GRAIN COTTAGE CHEESE BLENDER WAFFLES
Adapted from www.gethealthywithheather.com

These waffles are a bit more cake-like, but they crisp up pretty good in the toaster when reheated.

Serves ~4-5
  • 1 1/4 cups whole wheat PASTRY flour (purchase at Whole Foods or other natural food store)
  • 1/4 tsp. salt
  • 1 Tbsp. ground cinnamon
  • 1 tsp. baking powder
  • 1 tsp. flax meal, ground (optional--my addition)
  • 2 Tbsp. wheat germ (optional--my addition)
  • 1 cup reduced fat cottage cheese
  • 4 eggs (I used 3 eggs + 1 egg white)
  • 1 cup milk (I used low-fat buttermilk)
  • 1 tsp. vanilla (I skipped this because I was out of extract)
  • 1 Tbsp. maple syrup (optional)

Turn your waffle iron on and begin to heat it up while you make the batter.

Whisk together the flour, salt, cinnamon, and baking powder in large bowl (add flax meal and wheat germ, if using).

In a blender combine the cottage cheese, eggs, milk, and vanilla (plus optional maple syrup). Blend until smooth. Gently add the dry ingredients to the wet ingredients into the blender. Process JUST until well combined.
Once the waffle iron is ready, coat it generously with olive oil spray. Pour the batter (from the blender) into the hot waffle iron (about 1 cup batter) and cook until your waffle iron lights up as done (or screeches as mine tends to do). Repeat with remaining batter until batter is all used up.

Serve the waffles warm. (Heather suggests almond butter and applesauce and I can't wait to try that next time!)

PEACH MELBA CONSERVES

Makes ~2 jars of conserve (about 26-30 ounces)
  • 4 cups fresh peaches, diced and peeled
  • 1 1/2 cups fresh raspberries, rinsed and dried
  • 1/2 cup pure maple syrup
  • Juice of 1/2 a small lemon

In a medium pot, bring all ingredients to a boil. Reduce heat and let the fruit simmer for about 25-30 minutes or until the juices have thickened and evaporated some (mix the fruit once in a while). Turn off the flame and keep covered until ready to serve over the waffles.
Store covered in the refrigerator. Keeps for several weeks. Extra conserves can be frozen as well. But ours never last that long because this mixture is so delicious over toast or eaten straight out of the jar. YUM!

To serve: Plate 2 waffles for each person with some peach melba conserves and sprinkle with 1-2 tsp. sliced almonds.

Friday, July 15, 2011

Summer in My Mouth: Strawberry Pineapple Quick Bread


Quick Breads: More matter with less art.--Anonymous

Fun fact: Quick breads originated in the 1850's.

Summer in a bread.....sweet, moist, simply wonderful! This recipe is amazing--I found it on allrecipes.com, read all the lengthy reviews, and deemed it capable of handling healthy changes. The reviews proved that to be true. Here is the original recipe--it uses frozen strawberries and canned pineapple (that is not acceptable to me when it's cheaper to buy the fresh during this season). This quick bread is intensely flavorful!

My version is below--I wanted less sugar, less cinnamon taste (so the fruit flavors would be more discernible), some whole grain flour, and half the fat. The only thing I would do differently next time is to use even less sugar! It was a little too sweet to me--but still very good. This recipe makes TWO loaves--so keep in mind that if you don't freeze one, you will probably have to share with your coworkers, friends, and/or neighbors--and then you will probably have to share the recipe too (or so say the reviewers). (Each loaf has about 10 slices-give or take--more like take!)

I found it super easy and was surprised by how fast it came together. I might be making this again at the holidays--can't imagine it would compete with any fruitcake I've had. 


STRAWBERRY PINEAPPLE QUICK BREAD
Adapted from www.allrecipes.com
Makes 2 loaves

  • 1 2/3 cups sugar (definitely decreasing this further next time by another 1/3 cup)
  • 4 eggs, beaten
  • 1/2 cup applesauce (heaping)
  • 1/2 cup vegetable oil
  • 1 tsp. pure vanilla extract
  • 1.5 cups all-purpose flour
  • 1.5 cups white whole wheat flour (good, but will use whole wheat pastry flour next time)
  • 1 tsp. baking soda
  • 1 tsp. salt
  • 1 tsp. cinnamon
  • 1 cup chopped pineapple--packed and drained
  • 1 cup sliced strawberries--packed
  • 1 cup chopped walnuts (optional--but I liked the crunch)
Preheat oven to 350 degrees (F). Lightly grease two 5x9 inch loaf pans.

In a medium-large bowl, mix the eggs, applesauce, oil, vanilla extract, and sugar. Then mix in the strawberries and pineapple.

In a separate (smaller) bowl, sift together the flour(s), baking soda, salt, and cinnamon. (In all honestly, I'm not a big 'sifter' and therefore skipped this step. I don't think we suffered too much because of it. Or at all.) 

Mix the flour mixture into the bowl with the fruit until evenly moist. Fold in walnuts. Divide the batter between the prepared loaf pans.

Bake 1 hour in the preheated oven, until a toothpick inserted in the center of a loaf comes out clean. Cool on wire racks.


A dreamy treat with coffee or tea...

Monday, June 27, 2011

BEST EVER Coffee Cake: Blueberry, Lemon, Almond Crumb Heaven


This coffee cake is the BEST coffee cake I have ever made! I first made it years ago when my in-laws came to visit and it was the first time my mother in law asked for one of MY recipes! I always ask for hers! Anyway, it's not 'my' recipe--it's from a Cooking Light magazine from June 2005. And I made it again this weekend while my friend from college and her family came to visit. And Lila asked for the recipe too. We were talking about how there are people out there that don't give credit or share recipes and since neither of us are those types of people, the recipe is below for your enjoyment!

The texture of this moist coffee cake is crumbly and delicate. And the flavors of the blueberries, lemon, and almond are absolutely perfect together. It's the perfect side to a cup of coffee (or as dessert with a scoop of vanilla bean ice-cream). And one of my favorite recipes ever! A great weekend brunch item or a delightful treat to have if you're lucky enough to have afternoon tea!


BLUEBERRY LEMON (ALMOND) COFFEE CAKE
Adapted from Cooking Light

For cake:
  • 1 1/2 cups all-purpose flour

  • 2 tsp. baking powder

  • 1/4 tsp. baking soda

  • 1/2 tsp. salt

  • 1/2 cup sugar

  • 1/3 cup almond paste

  • 2 Tbsp. chilled butter, cut into small pieces

  • 1 large egg

  • 1 Tbsp. lemon juice

  • 3/4 cup fat-free milk

  • 1 1/2 cups blueberries

  • 2 tsp. grated lemon rind (I never measure-just use rind of a whole lemon)


  • Topping:
  • 1/4 cup sugar

  • 3 tablespoons sliced almonds, chopped

  • 1 1/2 tablespoons butter, melted (light butter is fine)

  • 1/2 teaspoon ground cinnamon


  • Preheat oven to 350°.

    To prepare cake, lightly spoon flour into dry measuring cups, and level with a knife. Combine flour, baking powder, baking soda, and salt in a small bowl, stirring with a whisk.

    Place 1/2 cup sugar, almond paste, and 2 tablespoons butter in a large bowl; beat with a mixer at medium speed until well blended. Add egg and lemon juice, beating well. Add flour mixture and fat-free milk alternately to sugar mixture, beginning and ending with flour mixture. Fold in blueberries and rind. Spoon batter into a 9-inch square baking pan coated with cooking spray (I use an 8X8 inch pan and it always works out perfectly).

    To prepare topping, combine 1/4 cup sugar and remaining ingredients in a small bowl, tossing with a fork until moist. Sprinkle topping evenly over batter.

    Bake at 350° for 35 minutes or until a wooden pick inserted in center comes out clean. Cool in pan on a wire rack.
    Note: Almond paste is found in the baking section of the grocery store. (Don't substitute marzipan, which is sweeter and has a smoother texture.) If it is hard, soften it by microwaving at HIGH 10 to 15 seconds.

    Makes approximately 12 pieces.


    Saturday, June 25, 2011

    Strawberry Yogurt Whole Grain Muffins


    Well, you knew it was coming, didn't you? Muffins + Strawberries + Yogurt + Whole Grain Flour= Awesome breakfast or snack. My friend, Nancy, first posted about this recipe a while back (here's the post). I've worked with it a bit & must say it's my second favorite muffin recipe. Here's my first. And the perfect recipe to have on hand when your strawberries are about to go bad--but not quite there, yet not worthy to be put out to be eaten either. The muffins are even better with freshly picked strawberries!

    I first made these last year and then again a couple months ago when we went strawberry picking. But I'm getting ready to make them again and figured I'd share the recipe for anyone else that finds themselves with a bumper crop of strawberries--they are still cheap at the grocery store in June! Here are a few pictures from our picking in April:


    I've included two of my trials below as notes after the recipe--you may want to read through them before trying out the recipe to see what might sound good in your own efforts. I don't know that I prefer one over the other. The original is wonderful, but I would encourage you to play around with the recipe if you wish too--it's a forgiving one. Thanks again for the inspiration, Nancy! These are really melt-in-your-mouth good!


    STRAWBERRY YOGURT MUFFINS 
    Adapted from Stonyfield Farm

      
    "these muffins are a great brunch item. for extra sweetness, dust with cinnamon sugar while still hot."
    • 1 cup all-purpose flour
    • 1 cup whole wheat flour
    • 1/2 cup sugar (I've only made them with raw sugar so far b/c I adore raw sugar)
    • 1 1/2 tsp. baking soda
    • 2 eggs
    • 1 cup lowfat plain yogurt
    • 1/4 cup butter, room temperature (used light butter before with success)
    • 1 tsp. pure vanilla extract
    • 1 cup chopped strawberries, fresh or frozen (I've only used fresh)


    Preheat oven to 375°F. Grease a 12 muffin tin or line it with paper baking cups. In a large bowl, sift together flour, sugar and baking soda. (I skipped the sifting and it was fine) In another bowl, stir together eggs, yogurt, melted butter and vanilla until blended. Toss the strawberries with the flour mixture.

    Pour the egg mixture into the flour mixture and stir until the flour is just moistened. The batter will be lumpy. Spoon the batter into the muffin cups. (Sprinkle with cinnamon sugar, if desired) Bake for 20 – 25 minutes, or until the tops are golden brown.

    Yields 12 muffins.

      
    TRIAL I

    1) I used regular strawberry yogurt and must say this made a big difference in the 'pop' of the strawberry flavor 2) Used 3 egg whites in place of 2 regular eggs 3) Substituted whole wheat pastry flour instead of whole wheat flour (I tend to prefer it for baking) 4) Added about 1/4 cup of wheat germ + ~2 Tbsp. of ground flax seeds 5) Used brown sugar instead of regular sugar 6) When my dough seemed too dry, I added a splash of skim milk. Came out spectacular and HEALTHY!

     
    TRIAL II
    1) Used Smart Balance buttery spread (stick form) instead of butter 2) Used 1/3 (raw) sugar in muffin batter and then mixed 1/4 cup of (raw) sugar with a couple teaspoons of ground cinnamon cinnamon and sprinkled this cinnamon-sugar mixture on top of the muffins before baking 3) Had to add ~1/2 cup of buttermilk b/c dough was dry 4) Used fat-free strawberry Greek yogurt. Still a smashing success!!!!

    Sunday, June 5, 2011

    Easy Breakfast or Dinner: Quesdillas Huevos Rancheros


    I cut this quick little recipe out of a magazine almost 7 years ago and it has become one of our favorite breakfasts. And if you're rolling your eyes at another Mexican breakfast, you are once again going to miss out on a good meal. We are obsessed with Mexican=type things in this house... Bookmark this recipe to use next year when you are left scratching your head and wondering what to do with leftover hard boiled eggs after Easter has passed.

    This dish makes me think of what healthier fast food could be (well, if you omit the pimento cheese especially)....but still cheesy, quick, easy (well not as easy as going through the drive through....but easy when you consider how few ingredients it has and simple preparation), and amenable to all ages. A fun meal for a real family. 

    If you have hard boiled eggs already waiting in your fridge, you can make this lightening fast. I would even serve these quesadillas huevos rancheros for dinner with a Mexican salad of lettuce, corn, beans, tomatoes, olives, cilantro, avocado and jicama (optional). Vegetarians, rejoice!

    QUESADILLAS HUEVOS RANCHEROS

    Adapted from Real Simple magazine

    Serves 4
    • 4 (6-inch) corn tortillas (we've done it with flour tortillas too)
    • 1/2 cup grated Monterey Jack cheese (or a Mexican cheese blend) + a couple Tbsp. pimento cheese (truly optional, but oh so good!)
    • 3 hard-boiled eggs
    • 1/4-1/3 cup salsa
    • Guacamole OR diced avocados & light sour cream (optional)
    Make the hard-boiled eggs.

    Lay the com tortillas on a cookie sheet. Place in a 325ยบ F oven for 10 minutes.

    Remove from oven and top 2 of the tortillas with the Monterey Jack cheese and the sliced hard-cooked eggs. This is what they will look like:


    Top with the other tortillas.

    Bake until the cheese melts, about 5 minutes. Cut into wedges and decorate with spoonfuls of salsa.

    Serve with hashed browns and fruit salad for a more complete meal :)

    Sunday, May 15, 2011

    Easy, Healthy, Fast Multi-Grain Waffles With Mixed Berries


    A few years ago, my mom had cancer--Burkitt's Lymphoma to be exact. Pretty rare and pretty awful. Through the grace of God, today she is in remission. Anyway, since then, mom started subscribing to the AICR Health e-recipes and forwarding recipes to me like the one below. To see a list of AICR's publications and sign up, here's a link.

    We have been loving them for several years now--they're not that much harder to make than using store bought mix ones. Enjoy them with the amazing berries that are about to be in season.

    This was the first time I ever prepared the batter the night before and made them the next morning. Worked amazingly well--so I would recommend doing that if you have overnight guests and want to simplify your breakfast routine. If I'm really ambitious, I premix the dry ingredients and store them in a ziplock bag until I need to them. I often double the recipe and wrap each waffle in plastic wrap and freeze. Some mornings, we just pop them in the toaster right from the freezer to re-crisp.


    MULTI-GRAIN WAFFLES WITH MIXED BERRIES

    Serves 4
    • 1/2 cup all-purpose flour
    • 1/2 cup whole-wheat flour
    • 1 1/4 cups fat-free buttermilk
    • 1/4 cup rolled oats
    • 2 Tbsp. toasted wheat germ
    • 1 Tbsp. sugar (raw sugar is preferred)
    • 1 Tbsp. canola oil
    • 1 tsp. baking soda
    • 1 large egg, lightly beaten
    • Pinch of salt
    • Cooking spray
    • 2 cups assorted fresh or frozen thawed berries, such as strawberries, raspberries, blueberries and blackberries
    • Maple syrup or low-fat vanilla yogurt, if desired
    **Feel free to add 1 tsp. vanilla extract or ground cinnamon or even  2 Tbsp. chopped nuts to the batter (I sometimes do)

    In a medium bowl, whisk together the first 10 ingredients. Let the mixture stand several minutes to thicken. (Add additional buttermilk to thin the batter if needed.) Coat a waffle iron with non-stick cooking spray and preheat.

    When the waffle iron is ready, ladle the batter into the center of bottom grid until it spreads to within one inch of the edges. Close the cover and cook until golden, about 5 minutes.

    Place the waffles on a plate; cover loosely with foil to keep warm. Repeat with more batter. Place the waffles on serving plates. Spoon the berries over the top, drizzle with pure maple syrup (if desired) and serve immediately. Can be served with low-fat vanilla yogurt too!
    Options: Serve these waffles as a dessert with low-fat frozen yogurt. Or double the recipe and freeze individually. Reheat in a toaster oven and serve with yogurt, nuts, or fresh fruit. Try other fruits such as bananas, mandarin oranges, and mangoes.
    Makes 4 servings or 4 waffles.

    My little girl was incredibly happy to have waffles for breakfast.